ROS
Introduction to ROS on the Robot
ROS (Robot Operating System) provides a powerful framework for controlling BonicBot A2. This setup guide will help you install and configure ROS 2 Humble for development with your robot.
Setting Up the ROS Development
Choose the setup method that works best for you:
1. Automated Setup
Uses installation scripts to simplify the ROS 2 setup process. Separate instructions for Windows and Linux users.
2. Manual Setup
Install each component individually with complete control over the installation process.
Automated Installation
Windows Users (WSL2 + Docker)
Run as Administrator in PowerShell:
cd path\to\bonicbot-a2-ros
.\install_docker_wsl.ps1
This script will:
- Enable WSL and Virtual Machine Platform
- Set WSL 2 as default
- Install Ubuntu 22.04 from Microsoft Store
- Install Docker Desktop
After reboot: Open “Ubuntu 22.04” from Start Menu, then proceed to Linux setup below.
Linux Users - Automated ROS 2 Installation
Note: This script is designed for Ubuntu 22.04 (Jammy Jellyfish). If you’re using native Ubuntu, ensure you have version 22.04 LTS installed.
From within Ubuntu (or native Linux):
cd ~/bonicbot-a2-ros
chmod +x ubuntu_ros2_install.sh
./ubuntu_ros2_install.sh
This script will:
- Install ROS 2 Humble Desktop
- Install all required packages (Navigation2, SLAM Toolbox, Gazebo, ros2_control, etc.)
- Create workspace at ~/dev_ws/src
- Clone this repository
- Configure your environment
After installation:
source ~/.bashrc
cd ~/dev_ws
colcon build
source install/setup.bash
Manual Setup
If you prefer manual installation or need to troubleshoot, follow these steps:
Install ROS 2 Humble and Required Packages
sudo apt update
sudo apt install -y \
    ros-humble-desktop \
    ros-humble-xacro \
    ros-humble-gazebo-ros-pkgs \
    ros-humble-gazebo-ros2-control \
    ros-humble-navigation2 \
    ros-humble-nav2-bringup \
    ros-humble-joy \
    ros-humble-slam-toolbox \
    ros-humble-twist-mux \
    ros-humble-ros2-control ros-humble-ros2-controllers \
    ros-humble-rviz2 \
    ros-humble-rosbridge-suite \
    python3-colcon-common-extensions \
    ros-dev-tools
Create Workspace and Clone Repository
mkdir -p ~/dev_ws/src
cd ~/dev_ws/src
git clone https://github.com/Autobonics/bonicbot-a2-ros.git my_bot
Build and Source Workspace
cd ~/dev_ws
colcon build
source install/setup.bash
ROS Development Options
You can develop your method using any of the options listed below.
1. SSH into Raspberry Pi
Connect directly to the robot’s Raspberry Pi and develop on the actual hardware.
Best for: Real-time testing on physical robot, direct hardware access, production deployment
2. Robot Workspace (Dev Workspace)
Work in the development workspace on your computer while connected to the robot.
Best for: Comfortable development environment, testing with real robot connection, iterative development
3. Simulation Only
Develop and test entirely in simulation without needing the physical robot.
Best for: Algorithm development, initial testing, learning ROS concepts, working without hardware access
Simulation Mode (ROS Mode)
Hope you have completed the installation process.
Step 1: Open Ubuntu Terminal and Enter
cd dev_ws
colcon build --symlink-install
source ~/dev_ws/install/setup.bash
Step 2: Launch the Robot
ros2 launch my_bot robot_system.launch.py use_sim_time:=trueOnce we launch the robot system we need to create a simulation world. For this, we use TurtleBot3, so first we need to install the TurtleBot3 Gazebo packages:
sudo apt update
sudo apt install ros-humble-turtlebot3-gazebo
After launching your robot system and installing TurtleBot3 packages, you can create the simulation world in Gazebo:
- Go to Insert in the left panel
- Search for TurtleBot3 House
- Select it and click in the Gazebo world to place it
Note: When ROS is installed inside Ubuntu running on Docker or WSL in Windows, the ROS services cannot be accessed directly from other devices, so port forwarding (port conversion) to the Windows host IP is mandatory.
In ROS Mode, locate and click on Simulation Mode. Use the command ifconfig on the system to find the robot’s IP address. Enter the obtained IP address in the Simulation Mode input field. Once the IP address is entered, the simulation will connect to the robot for testing and visualization.
Tap on Connect to Simulation. Once connected, you can simulate the robot directly on the system.
Start Developing in ROS2 Simulation
Step 1: Saving Custom World in Gazebo
- Add models and obstacles from the top menu
- Remove my bot before saving the world
- Save using path:
dev_ws/src/my_bot/worlds/obstacles.world
To launch saved world:
ros2 launch my_bot robot_system.launch.py \
use_sim_time:=true \
world:=/dev_ws/src/my_bot/worlds/obstacles.world
Step 2: Setup RViz2 Visualization
1. Open XTerm (Ubuntu 22.04)
2. In terminal
cd dev_ws
rviz2
If the RViz grid is not visible when opening RViz2, run the following commands to fix the issue:
echo "export LIBGL_ALWAYS_SOFTWARE=1" >> ~/.bashrc
source ~/.bashrc
3. In RViz2
- Change Fixed Frame: map → odom
- Add TF and RobotModel. In RobotModel, click the dropdown menu and set the Description Topic to
/robot_description - Add LaserScan and set the Topic to
/scan - Adjust the laser thickness (Size in meters), for example from 0.01 to 0.04
Step 3: Keyboard Control (Teleoperation)
Open a NEW Terminal and run:
cd ~/dev_ws
source install/setup.bash
ros2 run teleop_twist_keyboard teleop_twist_keyboard
What to do:
- Press
ito move forward - Press
jto turn left - Press
lto turn right - Press
kto stop - Press
,to move backward
Watch the robot move in both Gazebo AND RViz!
Controlling from BonicBot Application
Step 1: Connect to Robot
Tap on Connect to Robot.
Tap the Connect to Robot button.
ROS Interface
The ROS interface has two main pages: Movement Control and Servo Control.
Movement Page
When you first enter the ROS interface, you’ll be on the Movement page.
Movement Controls
You can control the robot’s movement using the interface controls.
Speed Values
Monitor and adjust speed parameters:
- Linear Speed - Forward/backward movement speed
- Angular Speed - Rotational speed
Camera View
Tap on Start Camera. This will reveal the camera toggle option in the screen.
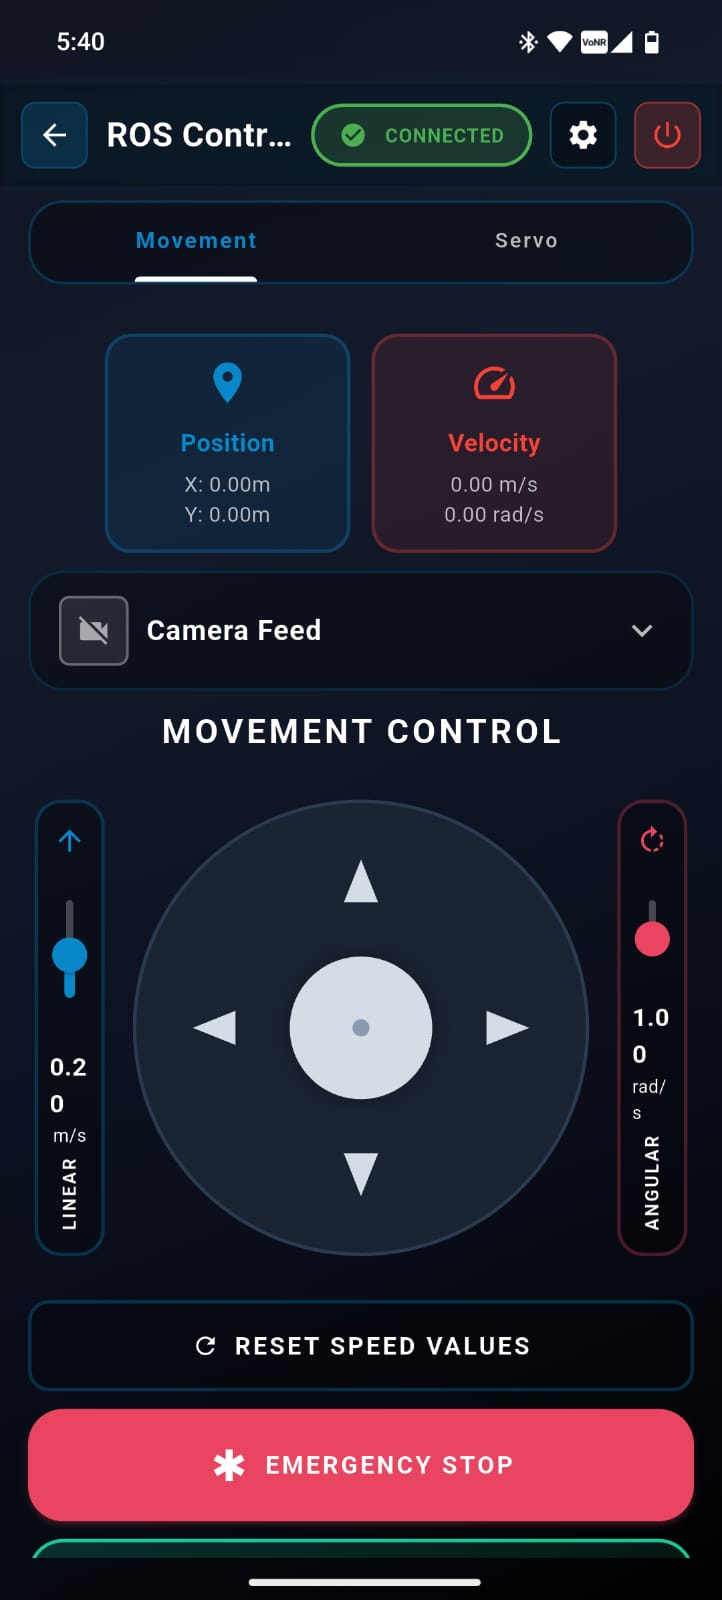
Tap to expand the toggle. As soon as the view expands, the application will connect to the robot’s camera, and the real-time video feed will appear on your screen.

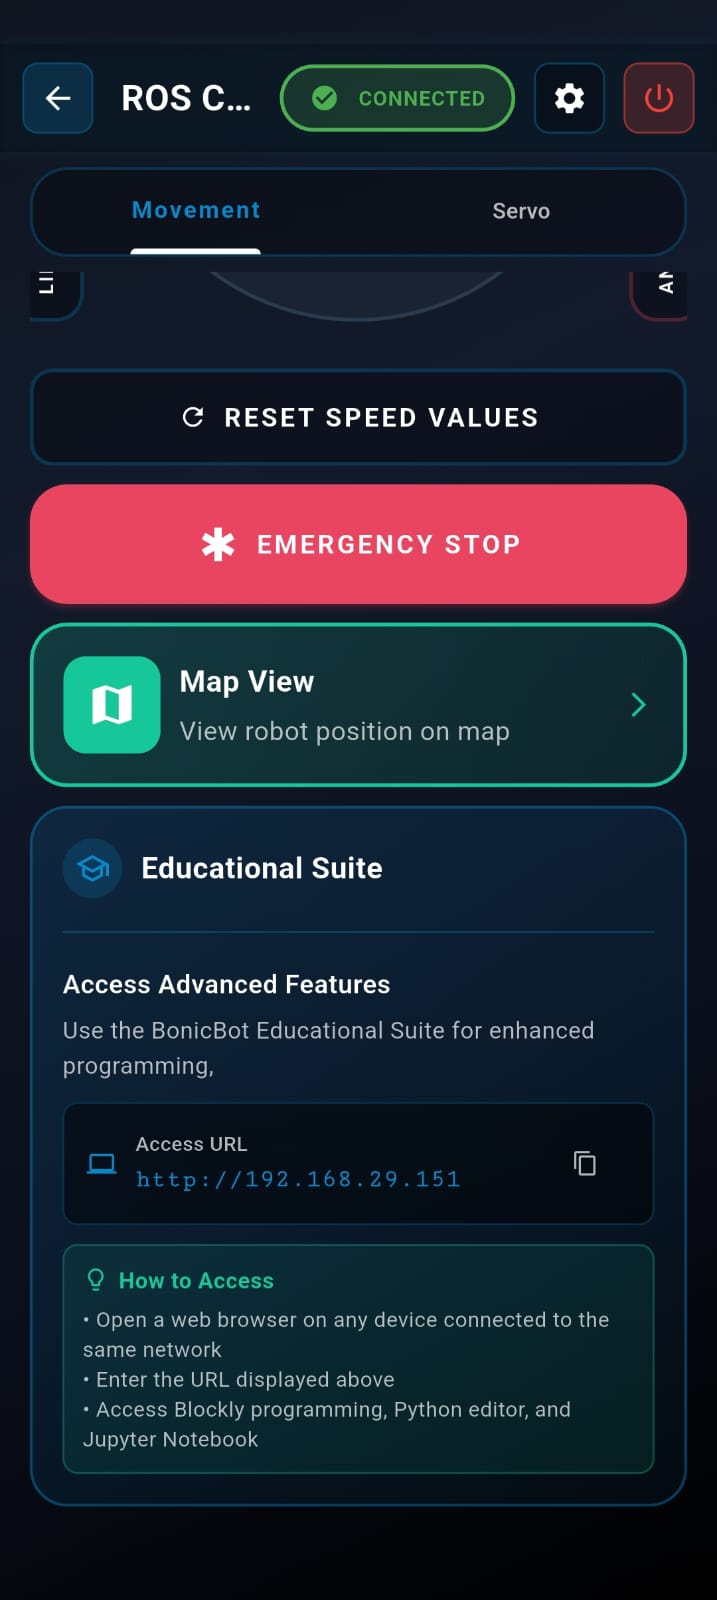
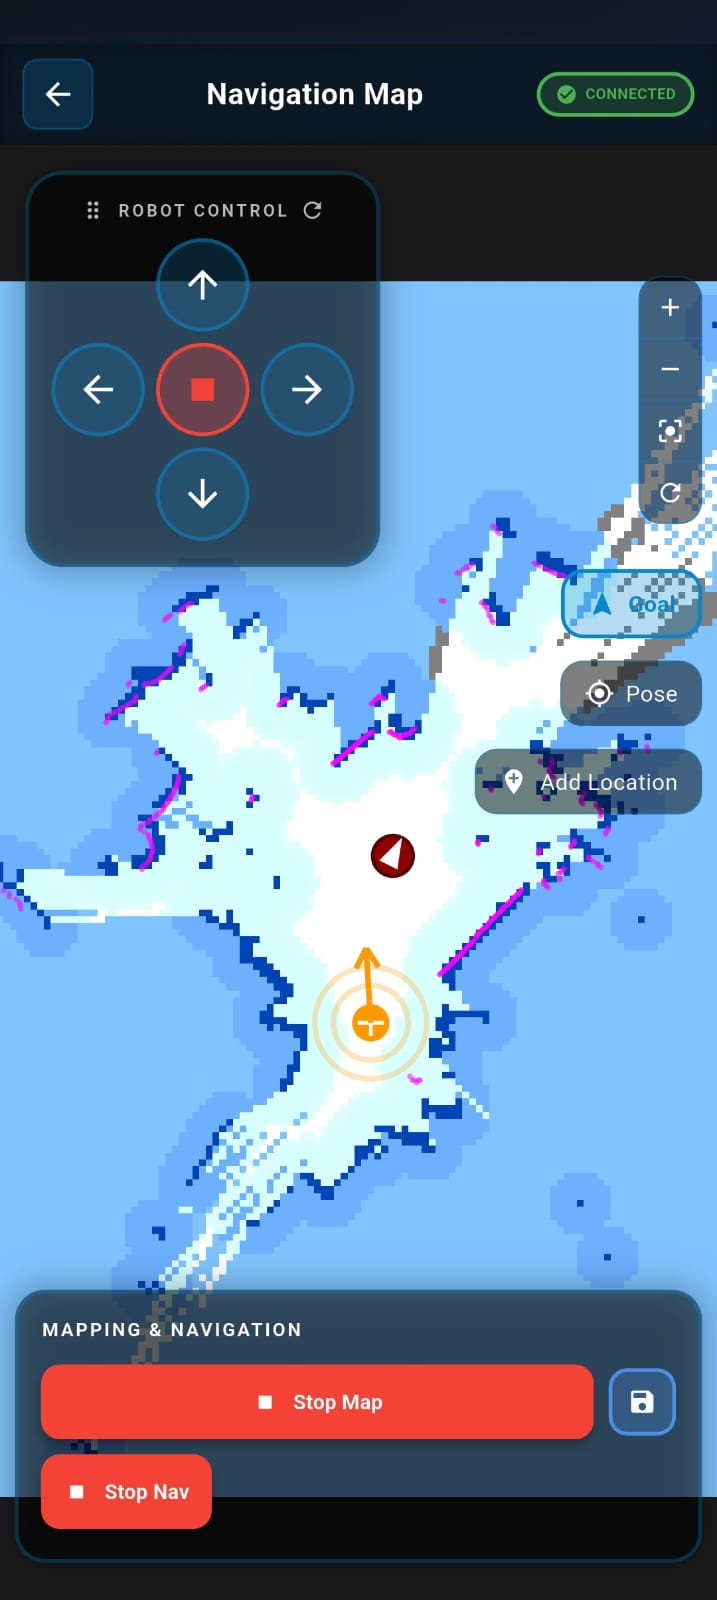
Map View
Below the speed controls, you’ll find the Map View section.
Creating and Using Maps
Step 1: Tap on the Map View
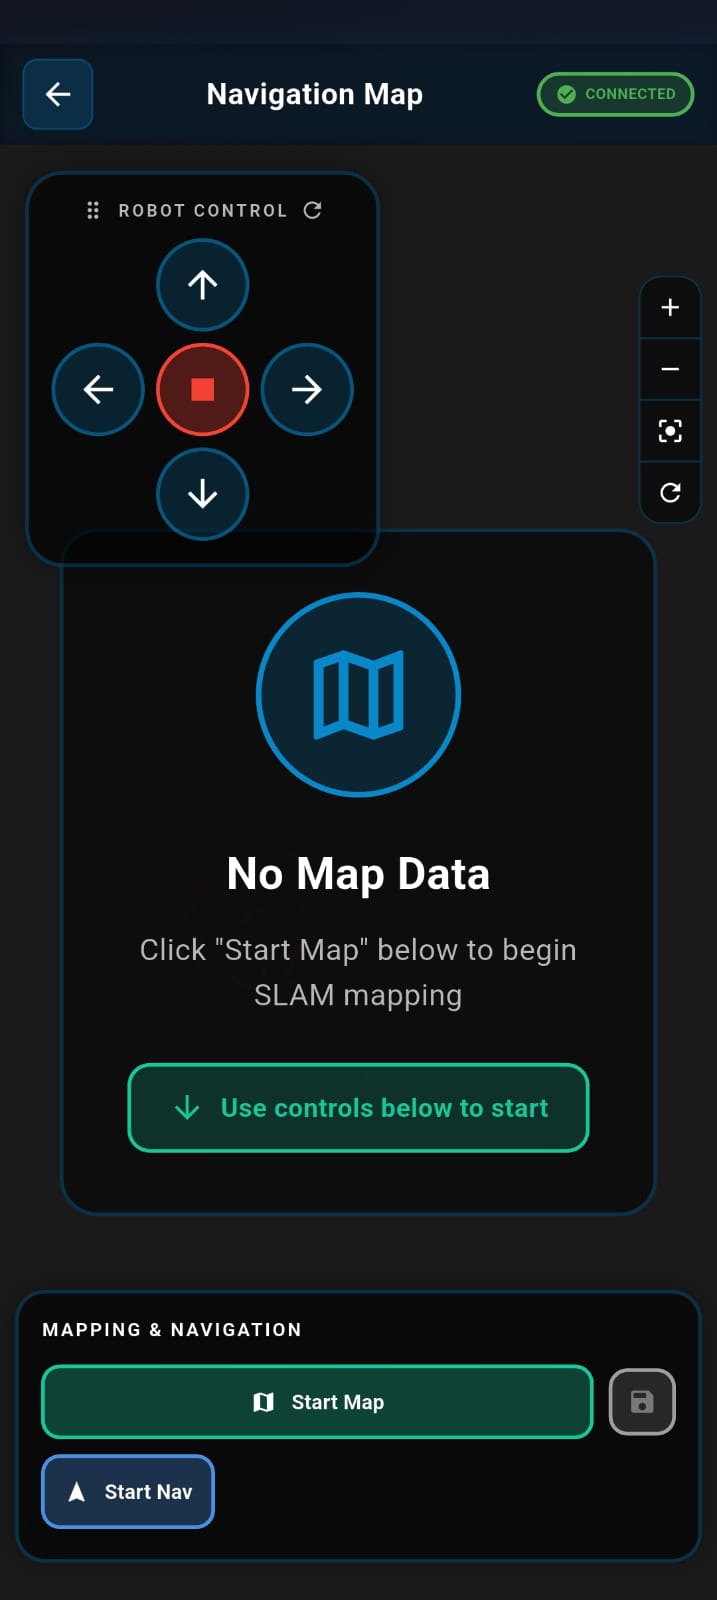
Step 2: Start Mapping
Tap Start Map to begin creating a map of your environment. You can now run the robot using the joystick or the BonicBot Controller App.
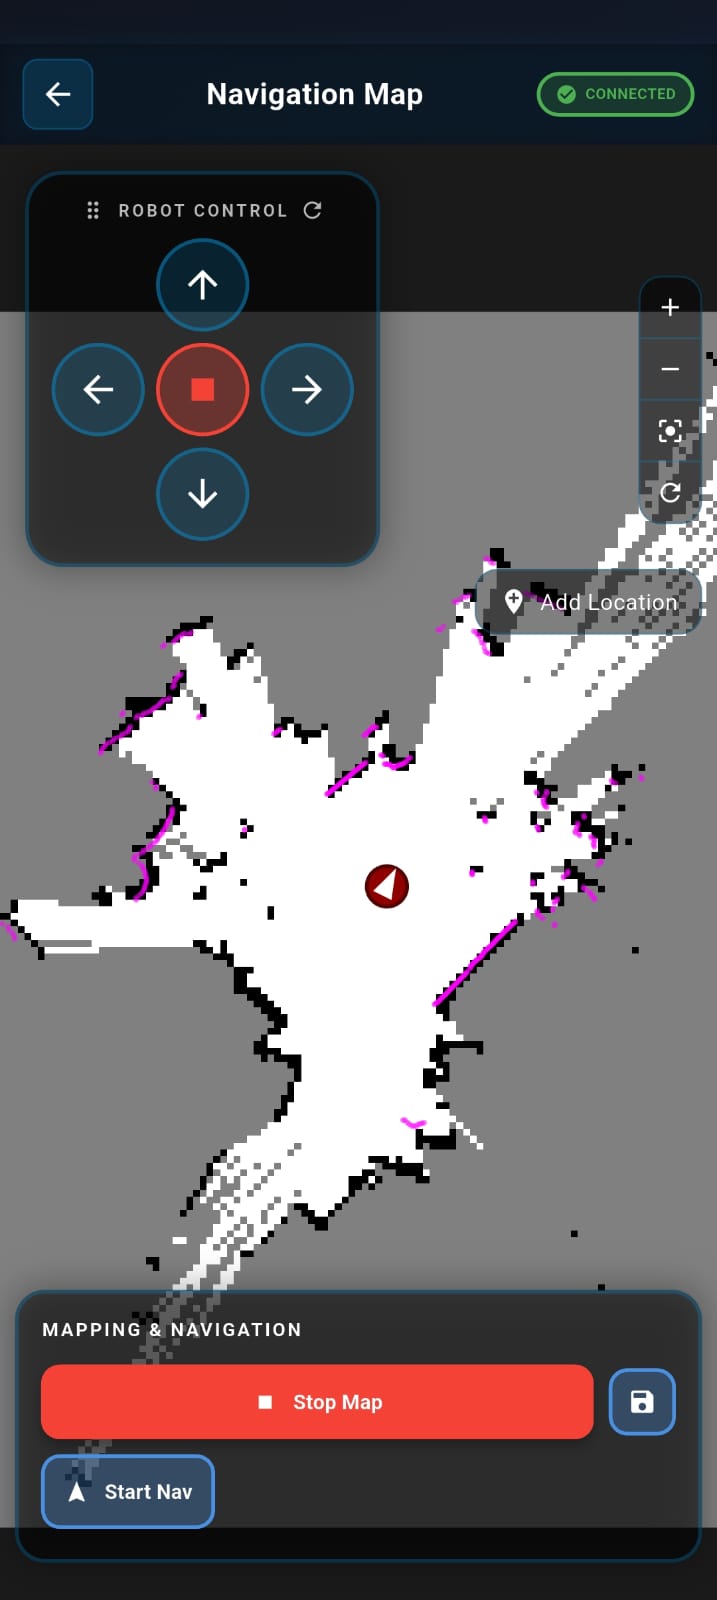
Step 3: Scan the Area
Drive the robot around the entire area you wish to map. Continue driving until the map on your screen looks complete and all boundaries/obstacles are clearly visible.
Step 4: Save the Map
Once the scan is complete, tap the Save Map button. This securely stores the current map data.
Step 5: Stop Mapping
After saving, tap Stop Map to finalize the mapping process.
Warning: We strongly recommend following this exact sequence (Save -> Stop) whenever you use the Auto-Navigation feature. This ensures the map data is “locked in” and stable, preventing errors that can occur if the robot tries to navigate while still updating the map.
Step 6: Switch to Navigation
Simply tap Start Nav to begin navigating within the map you just created.
Autonomous Navigation
Prerequisite: Ensure you have completed the mapping process before starting navigation.
Step 1: Initialize Navigation
- Activate Navigation: Tap the Start Nav button to switch the robot to navigation mode
- Wait for Cost Map: Please allow a moment for the system to process data. You will see the mapped area turn blue
Note: This blue region is the Cost Map—it defines the safe zones where the robot is allowed to move.
Scenario A: Navigation on a Live Map
Use this mode if you skipped “Stop Map” to continue updating the environment.
Scenario B: Navigation on a Saved Map
Use this mode for stable navigation on a finalized map.
Step 2: Set a Target
The process is the same for both Live and Saved maps:
- Select Destination: Tap on the map or drag the target marker to your desired location within the blue zone
- Initiate Movement: Release the marker to confirm the position. The robot will automatically calculate the route and begin moving
Step 3: Monitor Progress
- Track the Path: Look for a green line appearing on the map. This line represents the robot’s planned path (trajectory) to the destination
- Visual Confirmation: You can watch the robot icon move along this green line in real-time
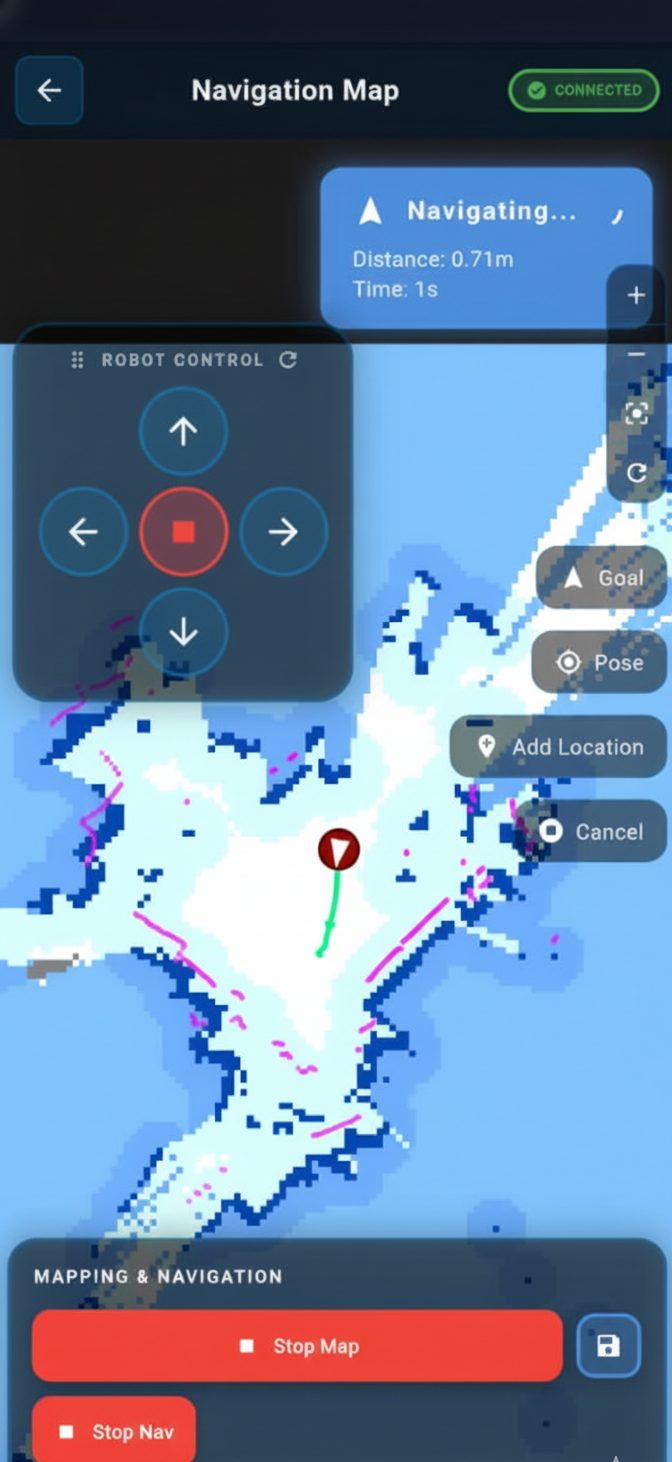
Step 4: Arrival & Completion
- Goal Reached: Once the robot arrives at the destination and stops, a “Goal Reached” message will appear on the screen to confirm the action is complete
- Stop Navigation: To end the autonomous session, simply tap the Stop Nav button
Adding Named Locations
You can save specific locations with custom names:
- Navigate to a desired location
- Enter a name for the room or location
- Click Add Location to save
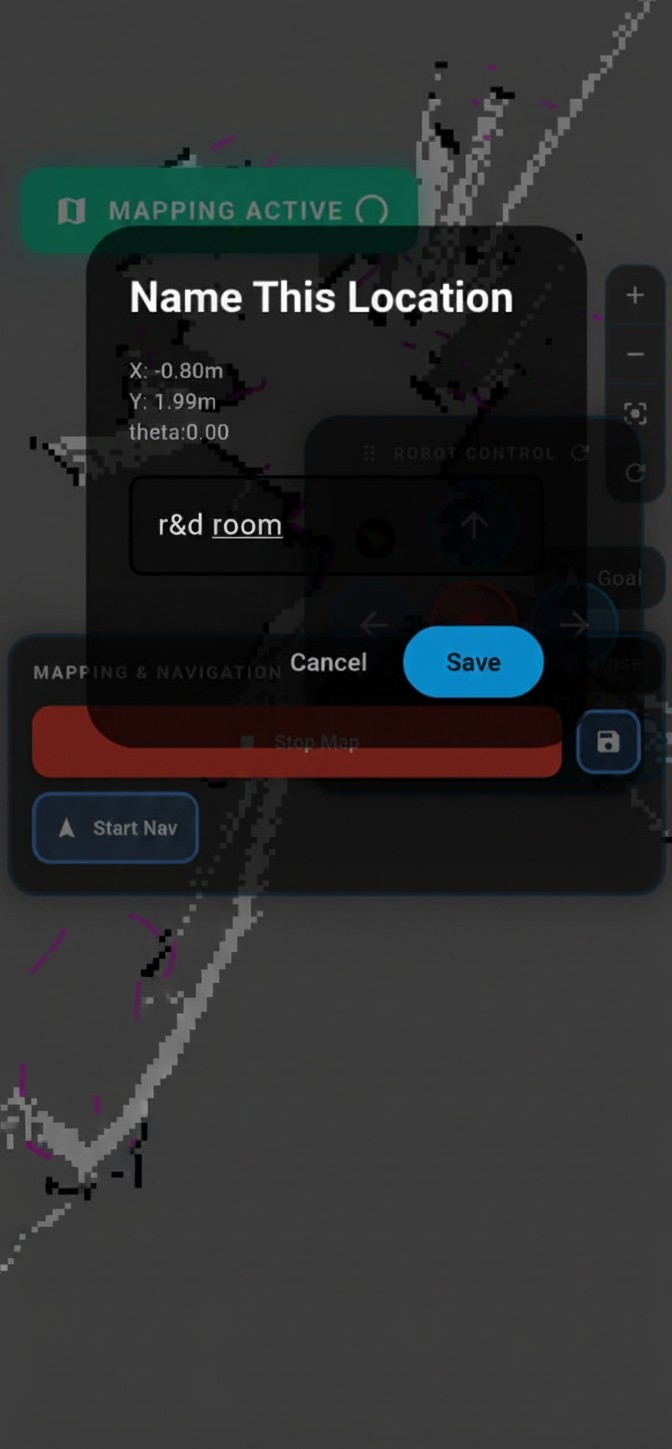
Once the location is saved, the robot will automatically move in that direction when we say the location name in AI Mode.
ROS In-Depth Learning: From Fundamentals to Advanced Robotics
This module provides a comprehensive journey into ROS (Robot Operating System), covering both core concepts and advanced robotics applications. Begin by mastering topics, publishers, and subscribers with commands like ros2 topic list and ros2 topic echo, and implement Python-based nodes for real-time communication between sensors and actuators.
Learn to control robot movement by publishing commands to /cmd_vel and custom motion topics, enabling precise forward, backward, turning, and stopping maneuvers. Explore teleoperation control using keyboards or joysticks via geometry_msgs/Twist, giving you hands-on experience with real-time robot manipulation.
Advance to autonomous navigation using the Nav2 stack, including goal-oriented movement, dynamic obstacle avoidance, and path planning. Integrate object detection and tracking using cameras with OpenCV or YOLO, and implement line following using image processing combined with PID control for smooth trajectory maintenance.
Develop auto docking systems to navigate to charging stations intelligently, and utilize SLAM mapping with LiDAR or depth cameras to build accurate, real-time environmental maps for autonomous operations.
Upcoming Updates: We will expand this curriculum with multi-sensor fusion, coordinated multi-robot control, AI-driven decision making, and dynamic environment handling. These topics will be available soon on the webpage, providing an end-to-end path to becoming a ROS expert.