BonicBot M1 – User Guide
1. Safety Instructions (Read Before Use)
Before operating BonicBot M1, follow these safety guidelines:
- Always place the robot on a flat and stable surface before turning it ON.
- Keep hands, clothing, and loose objects away from moving joints and motors.
- Do not press the emergency power switch during normal operation unless there is an emergency.
- Ensure sufficient clearance around the robot before initiating movement.
- Do not operate the robot near water, heat sources, or unstable surfaces.
- Operate BonicBot M1 only if you are trained and authorized.
2. Powering ON BonicBot M1 (Manual Mode)
Step 1: Power ON Using the Emergency Switch
- Turn the red emergency switch clockwise to power ON the robot.
- Press the red switch again to power OFF the robot.

Important
- Do not press the emergency switch while the robot is running unless it is an actual emergency.
Step 2: Robot Ready for Manual Control
- After powering ON, the robot is ready for joystick-based control.
3. Controlling BonicBot M1 Using Joystick Mode
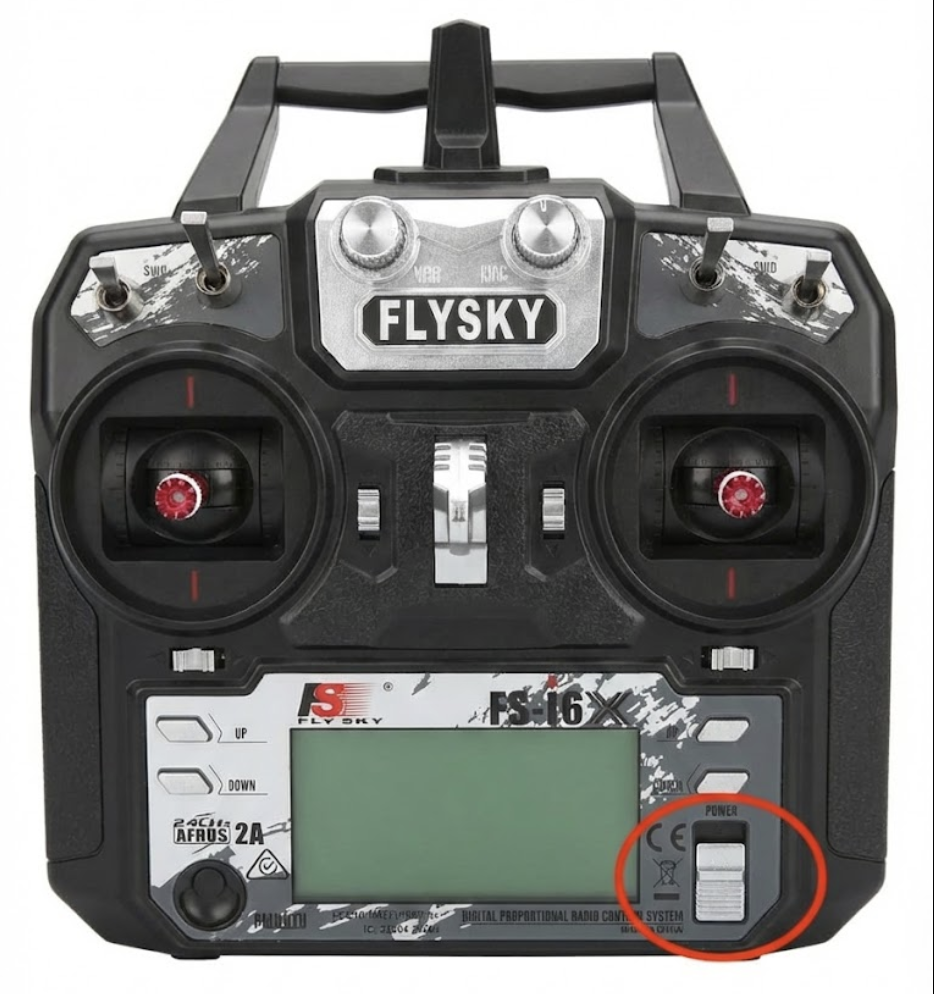
Step 1: Turn ON the Joystick Controller
- Power ON the joystick controller using the power switch.
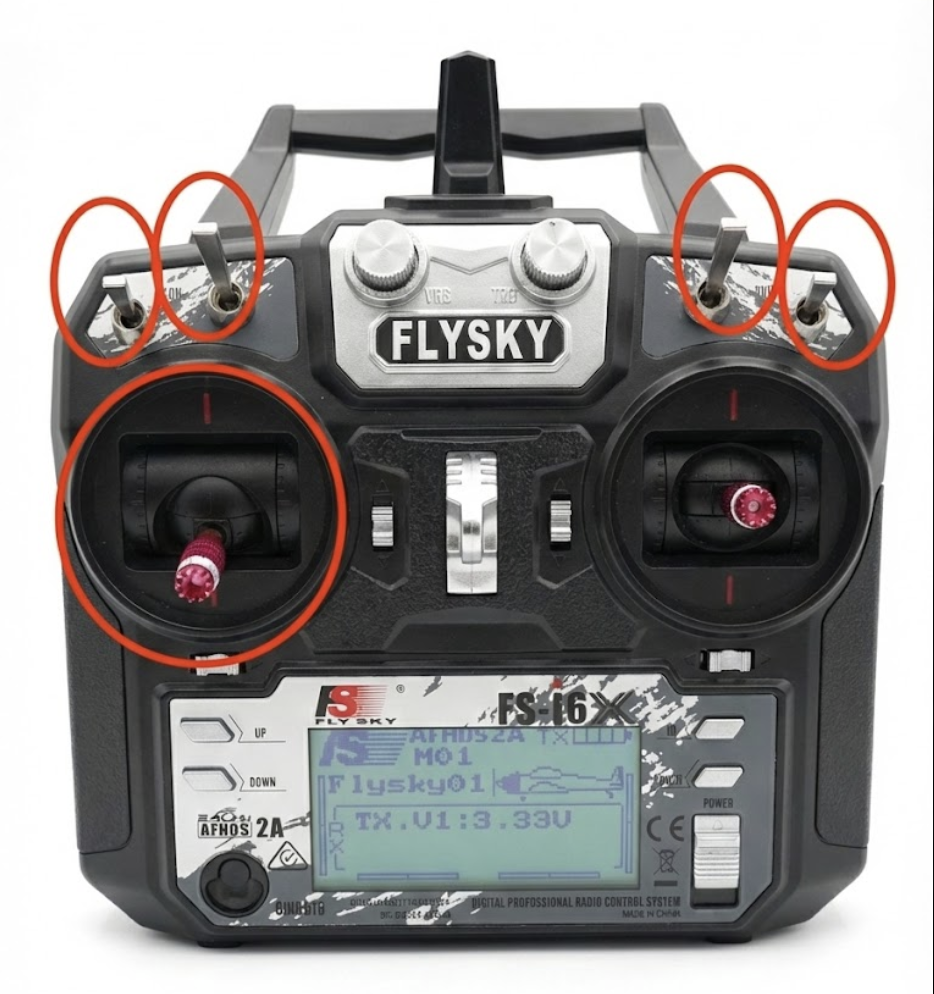
Step 2: Arm the Controller (Engage Control)
- Set all four top switches labeled SWA, SWB, SWC, and SWD to the UP position.
- Pull the left joystick fully downward to arm the controller.
Step 3: Enable Movement Control
- Toggle SWC to the MIDDLE position to enable movement control.

Step 4: Move the Robot
- Use the right joystick to control the robot’s movement direction.

4. Powering ON BonicBot M1 in ROS Mode
- Press the push button on the robot.
- The push button green light will turn ON.
- A boot screen will appear on the display.
- Wait until the system completes booting.
During boot, BonicBot M1 automatically:
- Connects to available Wi-Fi
- Starts ROS services
When the face display appears, the robot is ready in ROS Mode.
5. Controlling BonicBot M1 in ROS Mode (Gamepad Control)
Step 1: Turn ON the Gamepad
- Long press the center button on the gamepad.
- The red LED will turn ON, indicating connection.

Step 2: Move the Robot
- Hold the L button on the front-left side of the gamepad.
- Use the blue joystick to move the robot.

Important Operating Rule (ROS Mode)
While operating in ROS Mode:
- The big joystick controller must remain OFF.
- Turning ON the big joystick during ROS Mode may cause improper behavior or loss of control.
6. Safe Shutdown Procedure (Follow Exactly)
Step 1: Press the Push Button
- Ensure the push button green light is ON.
Step 2: Shutdown Popup
- A shutdown popup will appear on the display.
Step 3: Confirm Shutdown
- Select Shutdown on the screen.
Step 4: Wait for Complete Shutdown
- The system will shut down safely.
- The green light will turn OFF.
Step 5: Turn OFF Emergency Switch
- Only after the green light turns OFF, rotate the emergency switch to OFF.
✅ BonicBot M1 is now safely powered down.
7. Do’s and Don’ts
Do’s
- Place the robot on a flat and stable surface before operation.
- Ensure stable Wi-Fi connectivity when using ROS Mode.
- Use manual movement only during calibration or sequence training after disabling servo torque.
- Follow the safe shutdown procedure every time.
- Keep the robot clean and free from dust and debris.
Don’ts
- Do not force motors while the robot is powered ON (except during calibration or training with servos released).
- Do not disturb the robot’s hand movements while actions are active.
- Do not tamper with hardware or internal wiring.
- Do not operate on uneven or unstable surfaces.
- Do not turn ON the big joystick during ROS Mode.
- Do not press the emergency switch during normal operation unless it is an emergency.
Last updated on