Getting Started with ROS2
Before you start: Make sure BonicBot A2 is powered on and you have a working terminal — either SSH’d into the robot, or inside the Docker dev container on your laptop.
Not set up yet? See the ROS2 Development Setup.
Part 1 — Check the Connection
Before you drive anything, confirm your computer can actually see BonicBot A2 on the network. It takes ten seconds, and it saves you from chasing a “the robot won’t move” problem that’s really a networking problem.
Make sure your laptop and the robot are on the same Wi-Fi network. ROS2 discovers nodes automatically — no extra configuration needed, as long as your network allows it (more on that below if it doesn’t).
Open a terminal and run:
ros2 topic list
ros2 node list
You’re looking for the robot’s own topics and nodes — things like /scan, /odom, /robot_description, /tf. If you see them, the connection is good. Skip straight to Part 2 and start driving.
If ros2 topic list comes back empty, or only shows things you started yourself — nothing from the robot — it isn’t visible to your machine yet. This is most common on Windows. Open the section below to fix it.
🪟 Topics Not Showing Up? You’re Probably on Windows
If you’re working from a Docker container on Windows (Docker Desktop, or WSL2) and ros2 topic list comes back empty, or only shows nodes you started yourself — nothing from the robot — this isn’t something you misconfigured. It’s a networking limitation, and there’s a quick fix below.
Why this happens
ROS2 nodes find each other using multicast: instead of sending a message to one specific address, a node sends a single message to a special shared address that every device on the network is listening to at once — like a group announcement instead of a one-to-one phone call. That’s what lets the robot and your computer find each other automatically with zero configuration, on a normal network.
The problem is that the virtual network Docker Desktop creates on Windows (and the one WSL2 uses) sits behind a layer of network address translation (NAT), and that layer doesn’t pass multicast traffic through. The robot’s “I’m here” announcements never reach your container, and yours never reach the robot. Nothing is broken — multicast simply can’t cross that boundary.
The fix: bridge over a direct connection with Zenoh
Instead of depending on multicast discovery, we can carry ROS2 traffic over an ordinary point-to-point TCP connection, which has no trouble crossing Docker’s NAT. The tool for this is Zenoh — a lightweight pub/sub networking protocol — specifically the zenoh-bridge-ros2dds package: a standalone bridge (no full ROS2 install needed to run it) that picks up ROS2 topics and services on whichever machine it’s running on and relays them to a matching bridge on the other end. Once both are running, the robot’s topics just appear in your container as if discovery had worked normally — no code changes needed.
You’ll run one copy of the bridge on the robot and one in your container, then connect them directly using the robot’s IP address.
1. Install on the robot (over SSH)
echo "deb [trusted=yes] https://download.eclipse.org/zenoh/debian-repo/ /" \
  | sudo tee /etc/apt/sources.list.d/zenoh.list
sudo apt update
sudo apt install -y zenoh-bridge-ros2dds
2. Install in your Docker container
Run the same three commands inside your container — both sides need the package.
echo "deb [trusted=yes] https://download.eclipse.org/zenoh/debian-repo/ /" \
  | sudo tee /etc/apt/sources.list.d/zenoh.list
sudo apt update
sudo apt install -y zenoh-bridge-ros2dds
3. Start the bridge on the robot
zenoh-bridge-ros2ddsLeave this running — by default it listens for an incoming connection on TCP port 7447.
4. Connect to it from your container
Find the robot’s IP address (the same one you SSH into it with), then in your container:
zenoh-bridge-ros2dds --connect tcp/<ROBOT_IP>:7447For example, if the robot’s IP is 192.168.1.42:
zenoh-bridge-ros2dds --connect tcp/192.168.1.42:7447Keep both terminals open for as long as you want the connection — closing either one disconnects the bridge.
5. Verify it worked
With both bridges running, open a new terminal in your container and run:
ros2 topic listYou should now see the robot’s topics — /scan, /odom, /robot_description, and so on — alongside your own. To confirm data is actually flowing, not just visible:
ros2 topic echo /scanIf distance readings start streaming in, the bridge is working. Re-run ros2 topic list above to confirm the robot’s topics now appear, then head to Part 2 and drive with teleop as normal — the bridge is transparent to ROS2 itself.
Part 2 — Drive the Robot with Your Keyboard
Now that your computer can see the robot, let’s move it.
Launch Teleop
You’ll need teleop_twist_keyboard to drive the robot manually. If it isn’t installed yet:
sudo apt install ros-humble-teleop-twist-keyboardNo
sudoneeded inside the Docker container — you already have the necessary privileges there. Dropsudofrom the command above if it’s not available, or simply run it as-is; either way works inside the container.
Launch teleop:
ros2 run teleop_twist_keyboard teleop_twist_keyboardClick on the terminal to give it focus, then drive the robot around the space using your keyboard keys :
| Key | Action |
|---|---|
i | Forward |
, | Backward |
j | Turn left |
l | Turn right |
k | Stop |
q / z | Faster / Slower |
Your keyboard is publishing velocity commands to the /cmd_vel topic. The robot’s motor controller is subscribed to it and responding in real time. That’s the ROS2 pub/sub model in action — and it works the same way whether you’re driving a real robot or a simulation.
Part 3 — Explore What the Robot is Doing
With the robot running, open another terminal and look closer at what’s flowing across the network.
Stream live distance readings from the laser sensor:
ros2 topic echo /scanWatch the numbers change as you move objects near the robot. Each value is a real-time distance measurement from the robot’s surroundings. This is the same data that powers obstacle avoidance, SLAM, and autonomous navigation.
Try publishing a command directly without teleop:
ros2 topic pub /cmd_vel geometry_msgs/msg/Twist \
  "{linear: {x: 0.2}, angular: {z: 0.0}}"
The robot moves forward. You just sent a motion command from scratch — no driver code, no SDK. This is how ROS2 works at its core.
Part 4 — Visualise the Robot with RViz2
Show RViz2 setup steps
RViz2 gives you a live 3D view of the robot — its model, transforms, and sensor data — all updating as it moves.
RViz2 runs on your laptop. You need the Docker dev environment for this.
If you haven’t set it up: ROS2 Development Setup → Docker.
Launch RViz:
rvizIf the grid doesn’t appear, run this first:
echo "export LIBGL_ALWAYS_SOFTWARE=1" >> ~/.bashrc && source ~/.bashrcConfigure the display:
-
Change Fixed Frame from
map→odom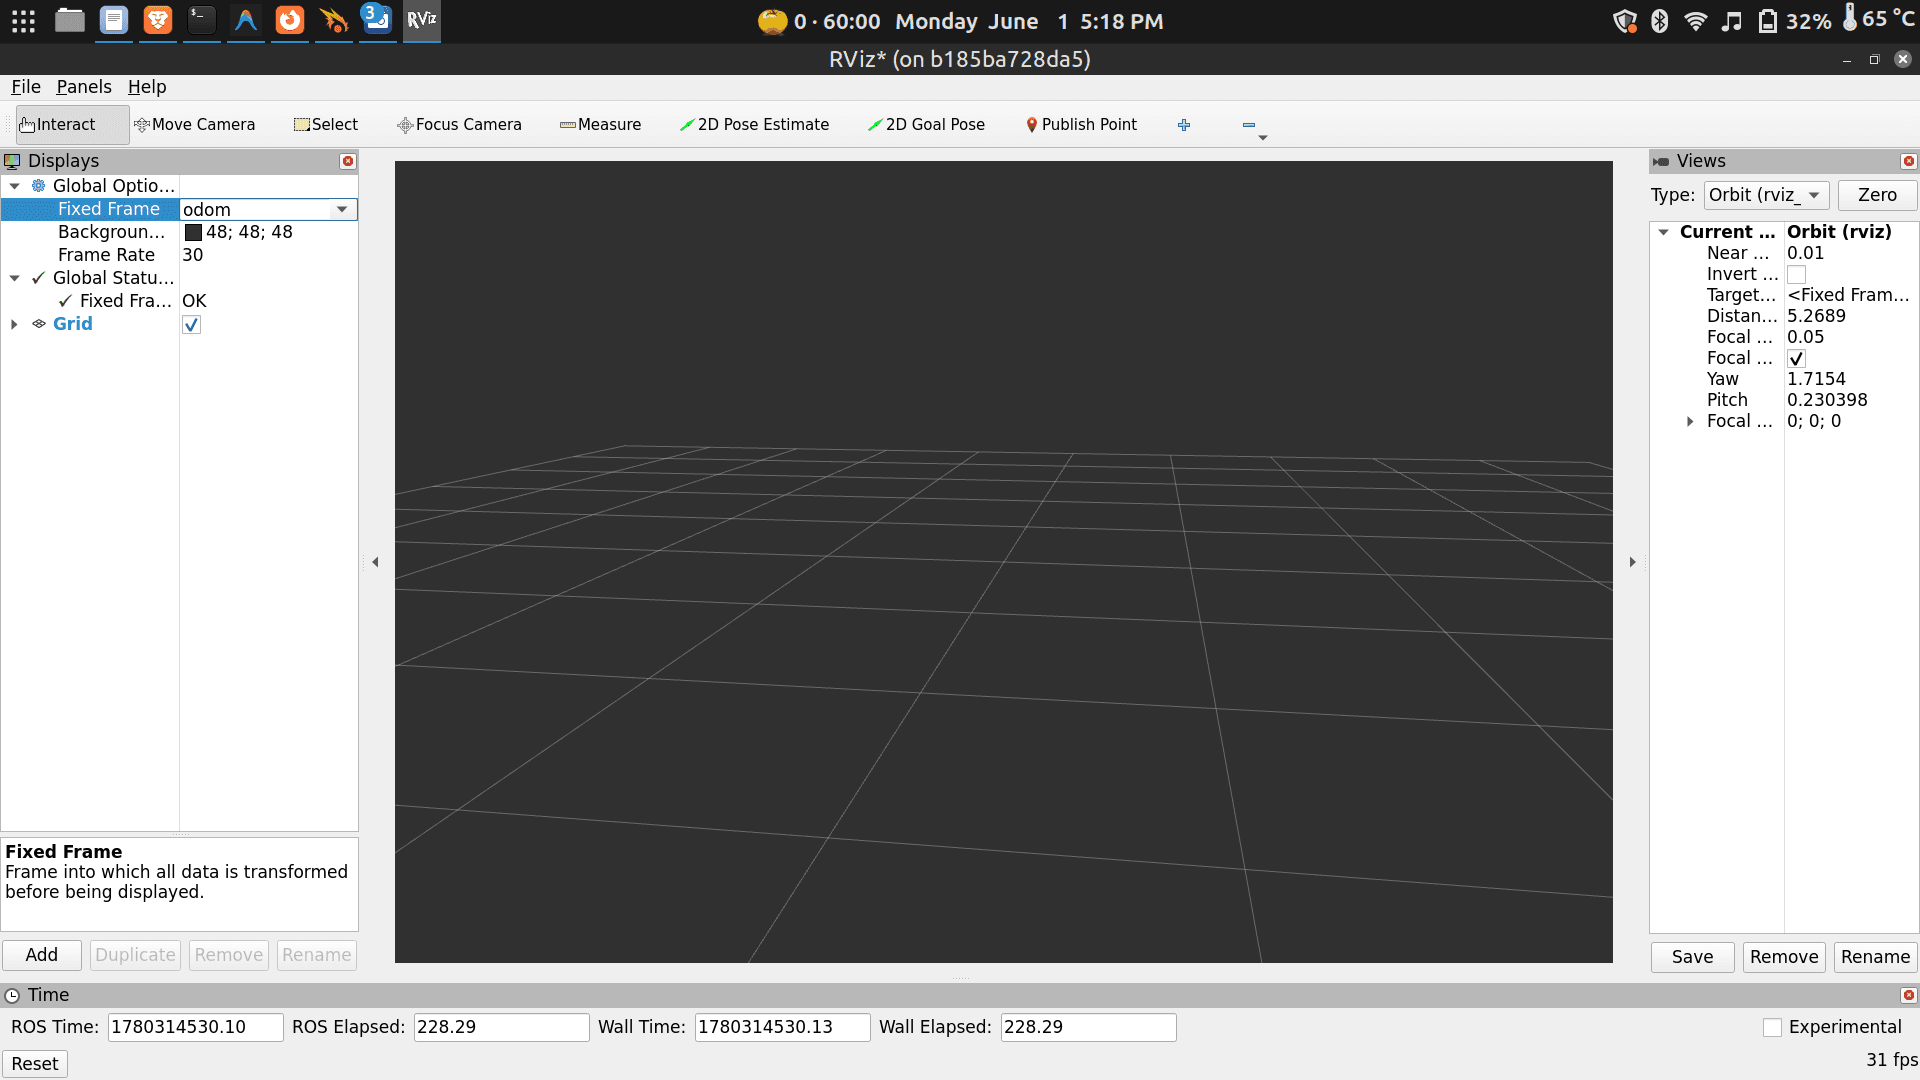
-
Click Add → select TF and RobotModel
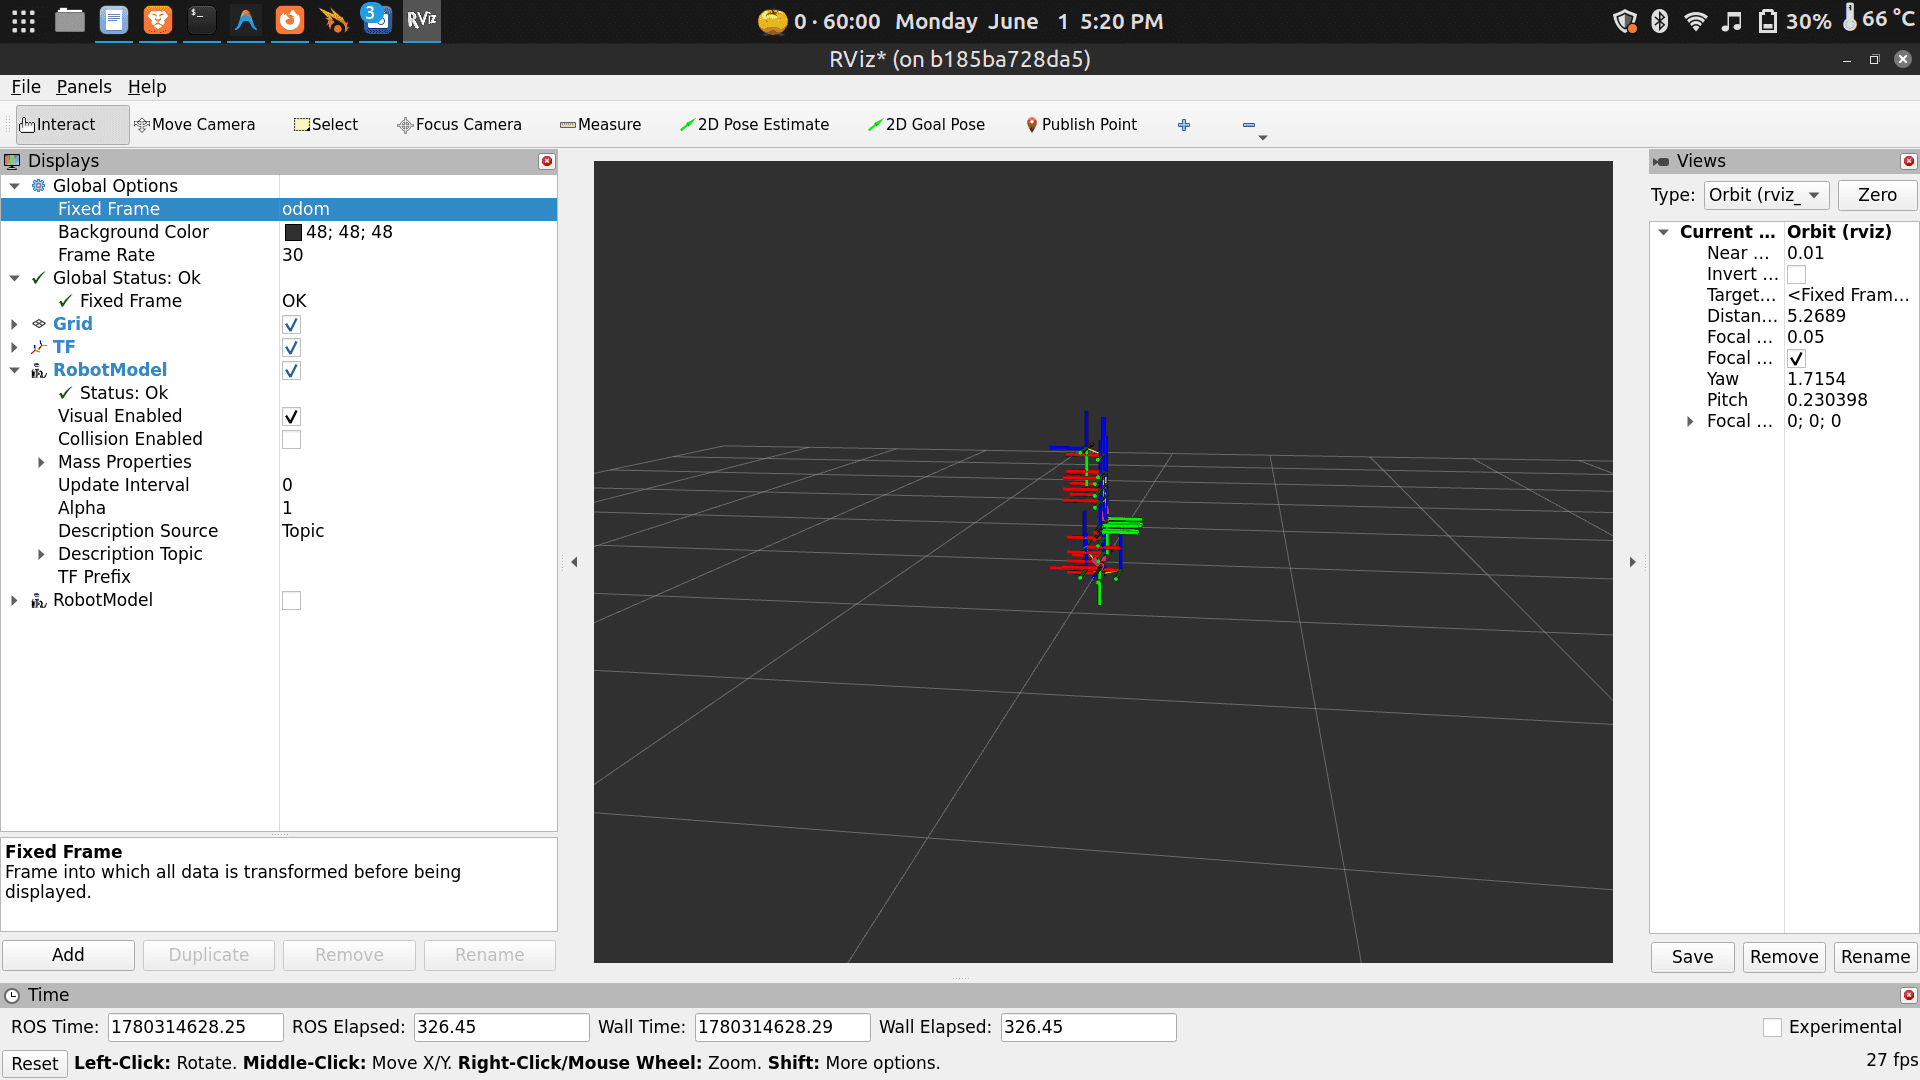
- Set Description Topic to
/robot_description
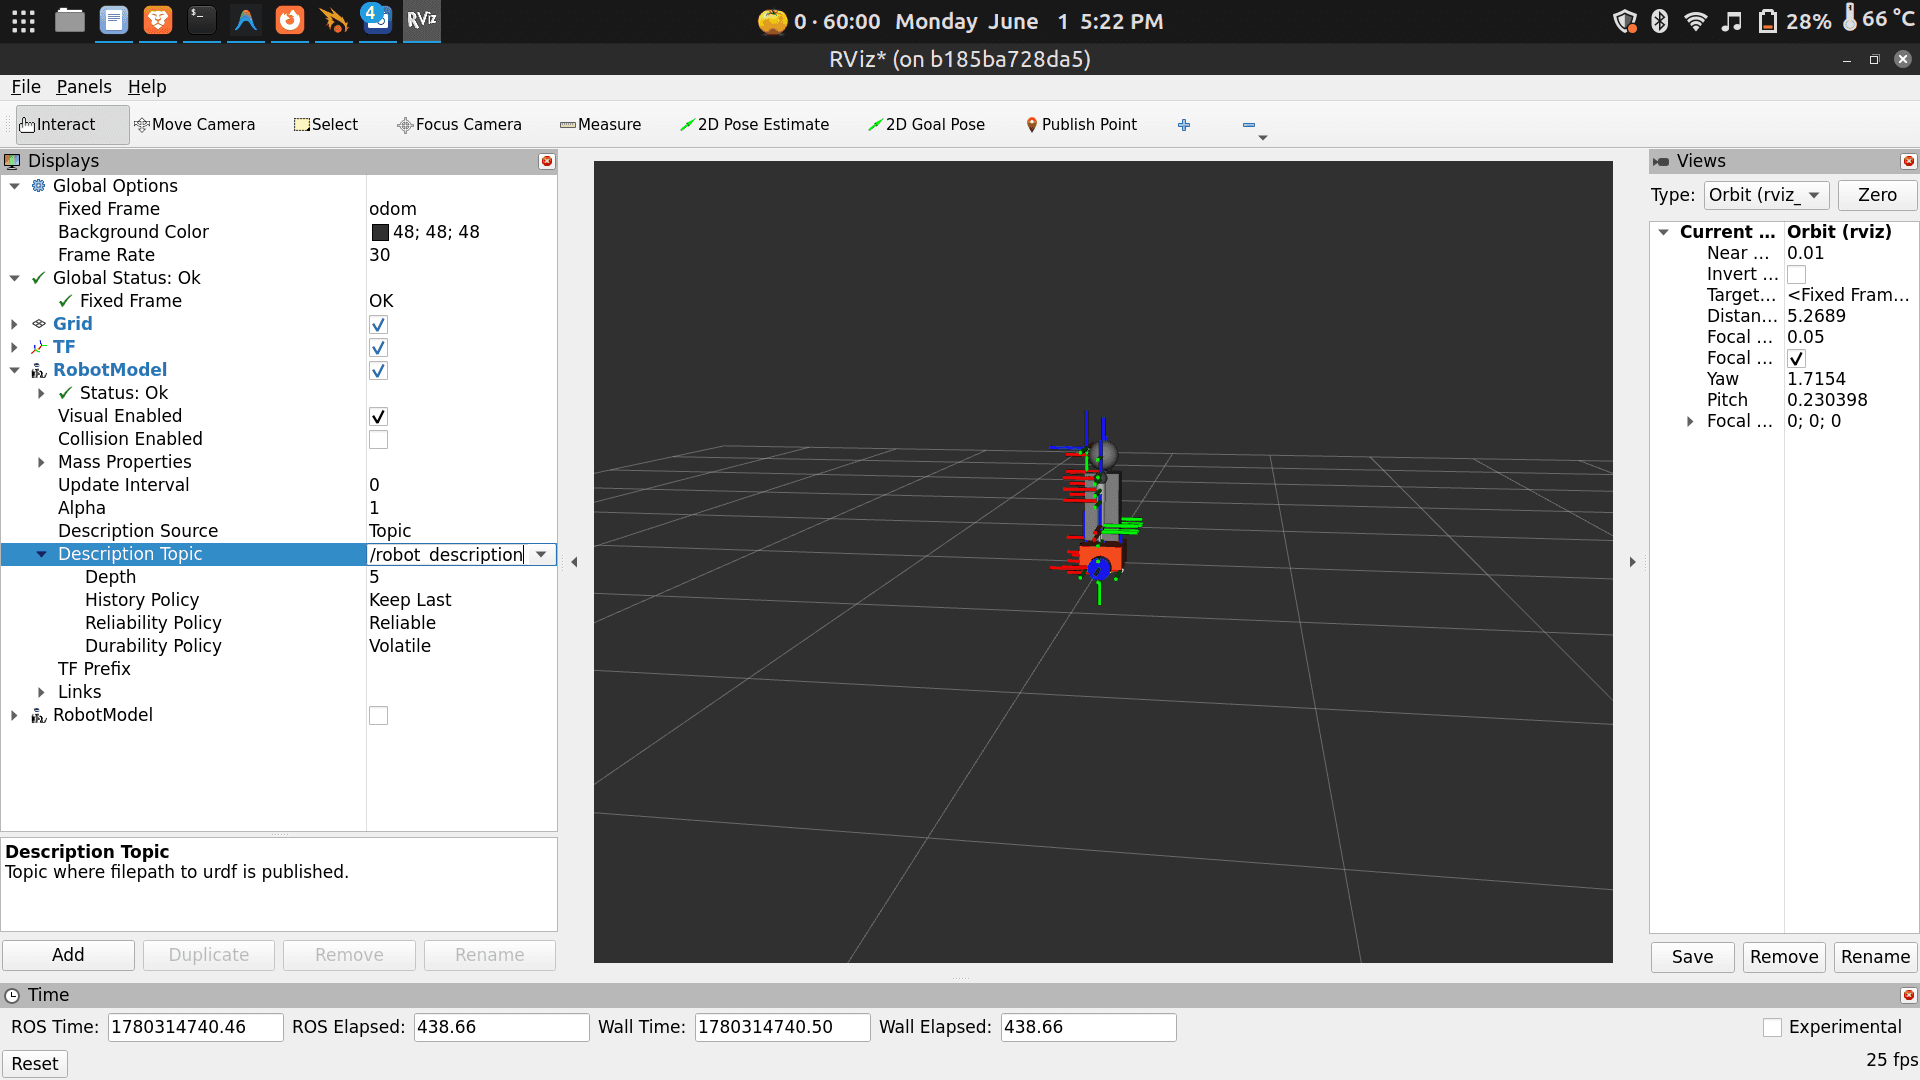
- Set Description Topic to
-
Click Add → select LaserScan
- Set Topic to
/scan - Set Size to
0.04for better visibility
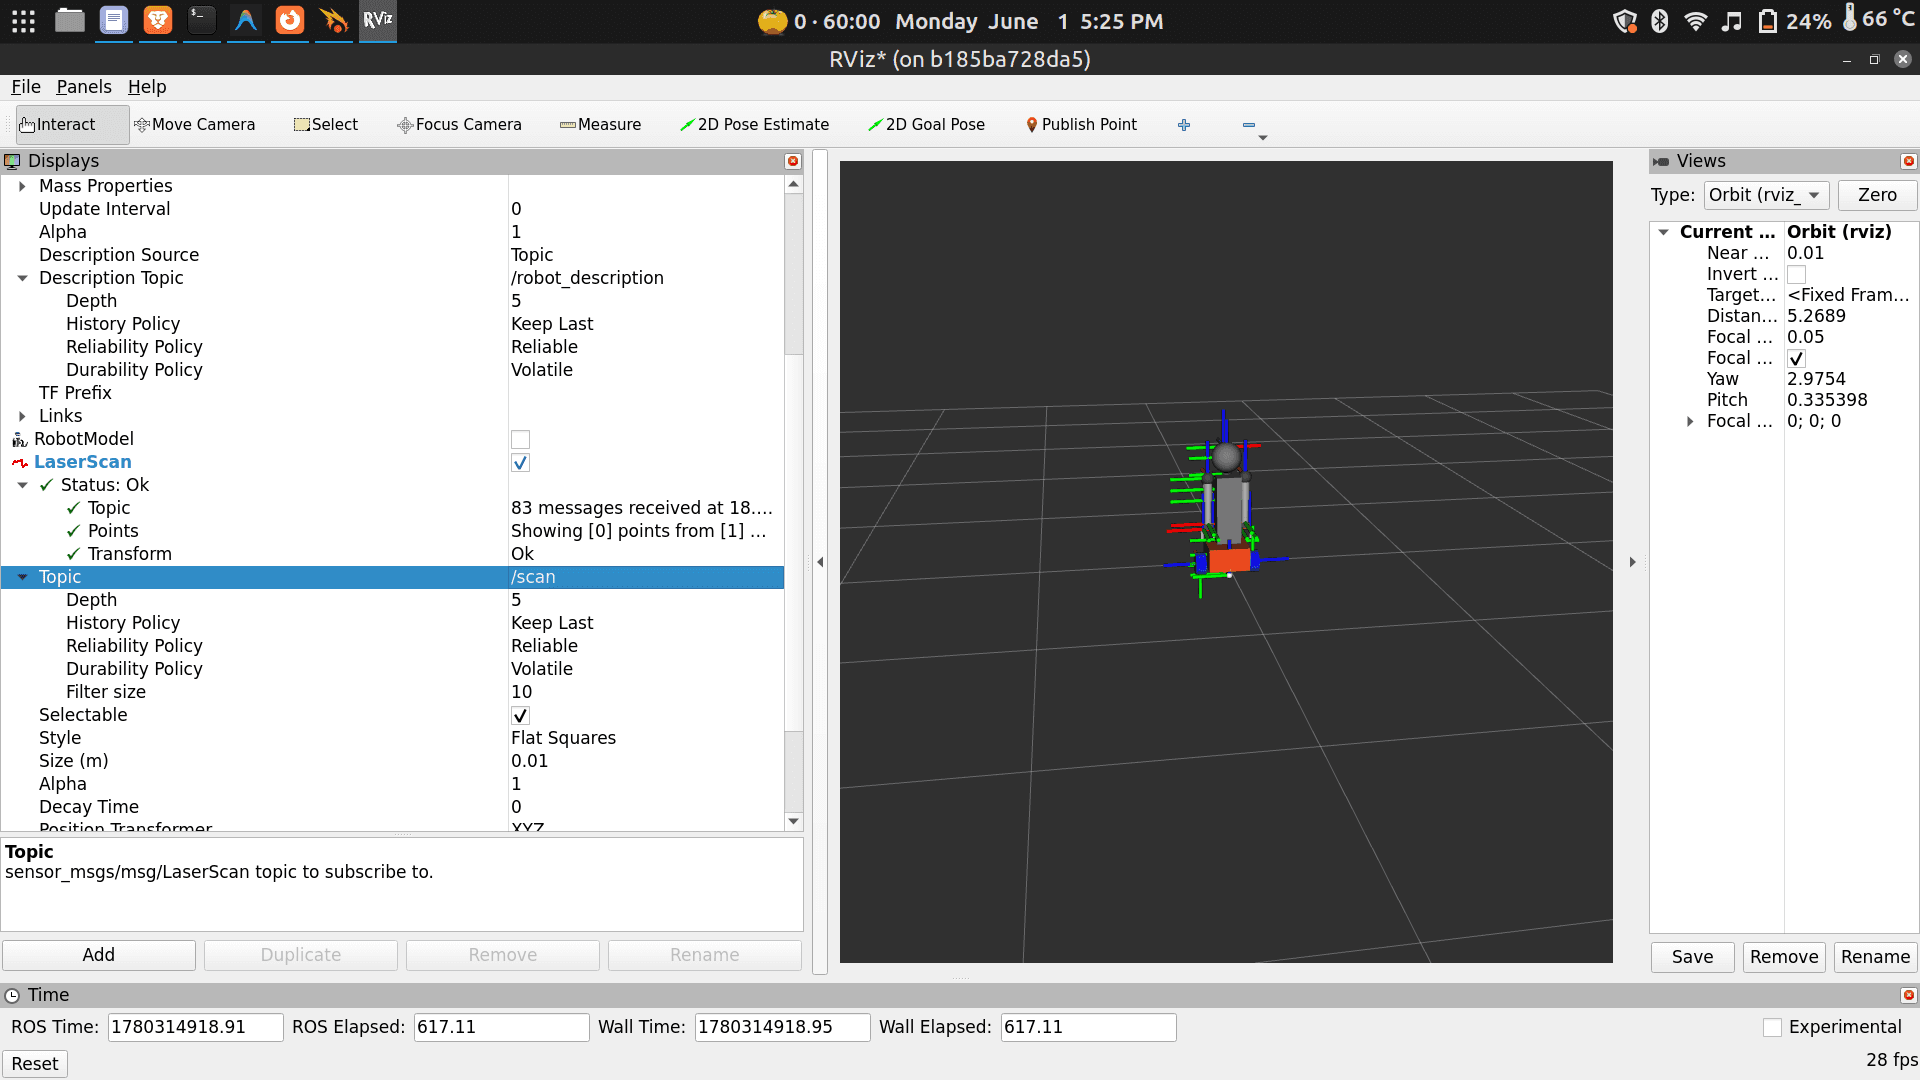
- Set Topic to
Now drive the robot with teleop in another terminal. Watch the laser scan sweep in real time as the robot turns and navigates.
Part 5 — Run the Robot in Simulation
Don’t have the robot with you? Want to test code before running it on hardware? Gazebo gives you a virtual BonicBot A2 that behaves identically — same topics, same commands, same everything.
You need the Docker dev environment for this part. See ROS2 Development Setup → Docker.
First time — clone and build the workspace
⚠️ Do this once only.
mkdir -p ~/dev_ws/src
cd ~/dev_ws/src
git clone https://github.com/Autobonics/bonicbot-a2-ros.git
cd ~/dev_ws
colcon build --symlink-install
source install/setup.bash
Launch Gazebo
ros2 launch my_bot robot_system.launch.py use_sim_time:=true world:=obsworld.sdfTeleop in simulation
Open a second terminal and run teleop exactly as in Launch Teleop:
ros2 run teleop_twist_keyboard teleop_twist_keyboardSame command. Same topics. The only difference is what’s listening on the other end.
Ready to Build Your Own Environments?
Running the default world simulation is just the start. When you’re ready to build real rooms, warehouses, or custom test spaces for the robot to navigate — and to populate them with objects and people — head to the dedicated Simulation pages:
Go Deeper — Explore the Source
You’ve been running BonicBot A2’s ROS2 stack without looking inside it. Now open it up.
The ROS2 Package
git clone https://github.com/Autobonics/bonicbot-a2-ros.gitOpen it in your code editor and explore:
- How the robot description (URDF) defines the physical model
- How launch files wire nodes together
- How sensor drivers publish to topics
- How you can add your own nodes to the same system
This is a real, working ROS2 package — not a toy example. Reading it is one of the best ways to learn how production robotics software is structured.
The Python Library
git clone https://github.com/Autobonics/bonicbot-bridge.gitbonicbot-bridge is a Python library that lets you control and communicate with BonicBot A2 without writing raw ROS2 code. Install it with:
pip install bonicbot-bridgeThen open your editor and start experimenting:
from bonicbot_bridge import BonicBot

robot = BonicBot()
robot.move_forward(speed=0.3)
It’s a faster on-ramp for building applications — data logging, behaviour scripting, integrating sensors with your own logic — without needing to understand every ROS2 concept first.
🐍 Want to go further with
bonicbot-bridge? See the full Python SDK reference for the complete API, examples, and advanced usage.
Both repositories are open. Read them, fork them, modify them, break things. That’s how this is meant to be used.
What’s Coming
You’ve driven the robot, explored its data, and looked under the hood. The tutorials below pick up from here:
| Tutorial | What you’ll do |
|---|---|
| SLAM and Mapping | Drive through a space and generate a map in real time |
| Autonomous Navigation | Set a destination and let the robot find its own path |
| Writing ROS2 Nodes | Build your own publisher, subscriber, and service in Python |
| Sensor Pipelines | Process lidar and odometry data for your own applications |
| Working with bonicbot-bridge | Control the robot with Python in a few lines of code |
Next Steps
Ready for autonomous movement? Learn how to generate maps and let the robot find its own path:
🗺️