Autonomous navigation and mapping
Learn how to connect your Pro robot to Wi-Fi, start its navigation software, create a room map, save destinations, and send the robot to them.
Who can do this: People with User or Admin access to a Pro robot
Hardware requirement: Autonomous navigation and room mapping are available exclusively on BonicBot Pro variants (BonicBot A2 Pro, S1 Pro, and M1 Pro). Lite models do not contain the autonomous navigation processor and use manual directional driving.
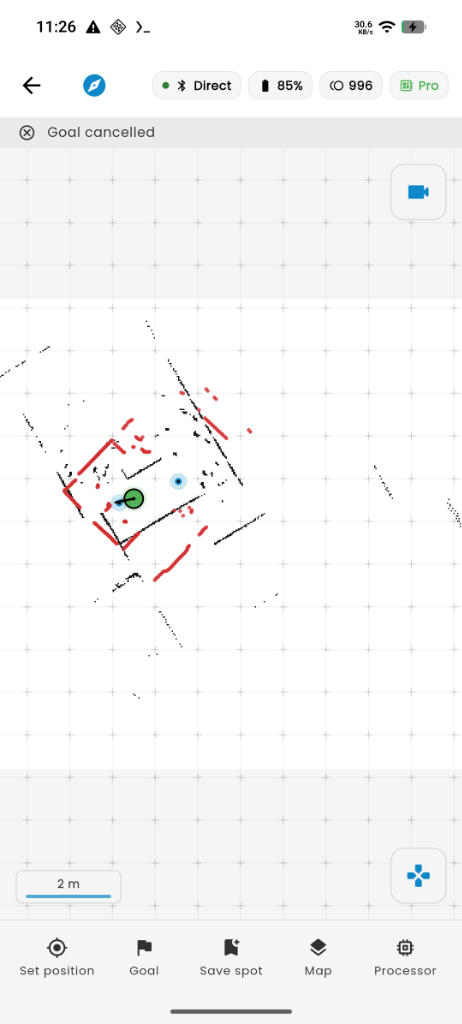
Controller App shown.
Understanding the navigation processor
Every BonicBot Pro model contains an onboard navigation processor that powers its spatial sensors, LiDAR, obstacle detection, and autonomous path planning:
- The processor is a dedicated onboard computer with its own Wi-Fi connection, separate from the robot’s chest tablet or your controller device.
- For map streaming and navigation to work, the processor must be on the same local Wi-Fi network as your tablet or phone.
- The processor runs a Robot Software Stack (ROS) that must be started before creating maps or sending navigation goals.
Before you begin
- Power on the robot by pressing and holding the push button on the upper part of its back until the ring light turns on.
- Ensure the robot is placed on a level floor with clear space around it.
- Connect the device you will use to your building’s Wi-Fi network: your Android phone or tablet for Controller App, or the robot’s chest touchscreen for BonicOS.
Step 1: First-time Wi-Fi setup for the robot processor
If your robot is new or has been moved to a new building, you must connect its navigation processor to your local Wi-Fi network. Both interfaces transfer network credentials wirelessly to the processor over Bluetooth without needing any cables, but they use different setup flows:
Option A: On BonicBot Controller App (A2 Pro or remote S1/M1)
On the Controller App, you enter the network details manually:
- In the Controller App, ensure your robot is connected in Direct Mode (Bluetooth) on the top Connect Bar.
- Select the Pro tab in the bottom navigation bar.
- If the processor has not joined your network yet, a banner displays: Robot Processor Offline. Select Open Processor Connectivity (or select the Processor button in the navigation toolbar).
- In the Wi-Fi Network section of the processor sheet:
- Enter your local wireless network name into the SSID field (e.g.,
Office_WiFi). - Enter your wireless password into the Password field (select the eye icon to verify).
- Select Send to Robot.
- Enter your local wireless network name into the SSID field (e.g.,
- The app sends the credentials directly to the robot over Bluetooth. The button displays Sending…, followed by Sent network to the robot — waiting for it to join….
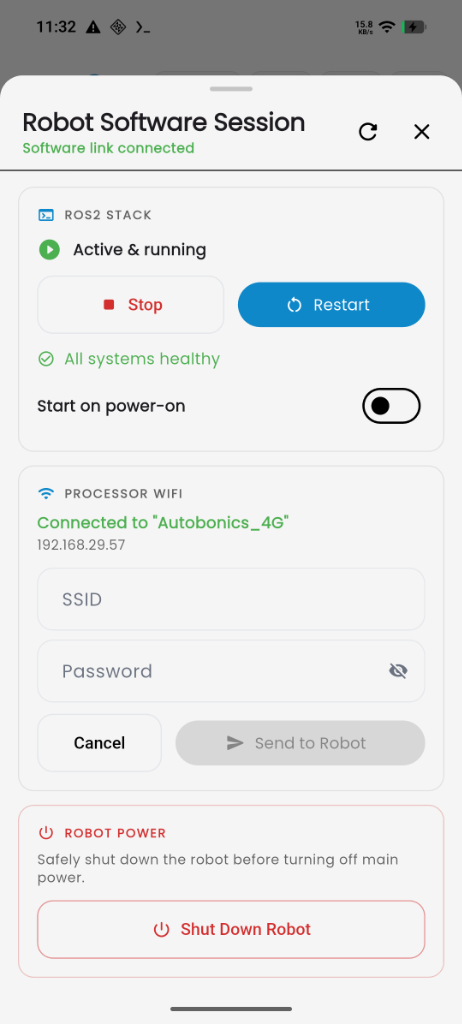
Controller App shown.
Option B: On BonicOS (S1 Pro, M1 Pro, or A2 Pro with add-on)
On BonicOS, connect the navigation processor to the same Wi-Fi network as the chest tablet:
- Ensure the chest tablet is already connected to your local Wi-Fi (via Settings > WiFi networks).
- Open the Robot Processor panel by selecting the Processor icon in the navigation toolbar (or via Settings > Robot processor).
- The Network Topology card displays This Tablet (showing its active Wi-Fi network name) and the Robot Processor status node.
- Under the Sync Network to Robot section, BonicOS automatically targets the tablet’s connected network:
- If prompted, enter the Wi-Fi password for the network.
- Select Connect Robot to “[SSID]”.
- A confirmation dialog appears: Connect robot to this network?. Select Connect.
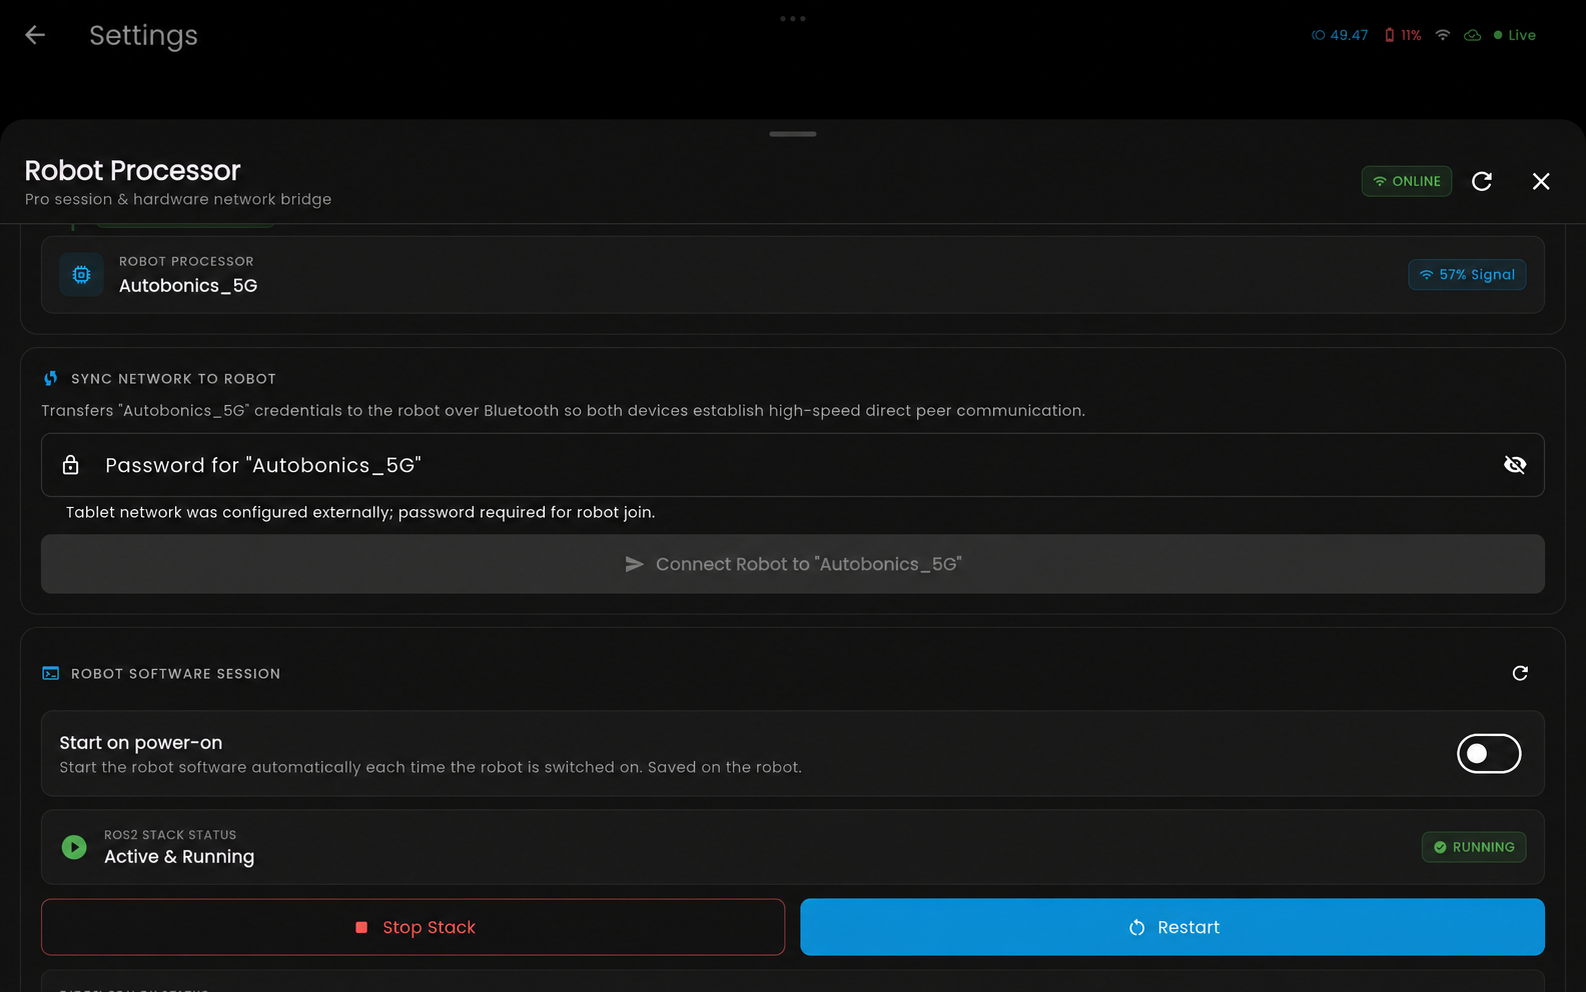
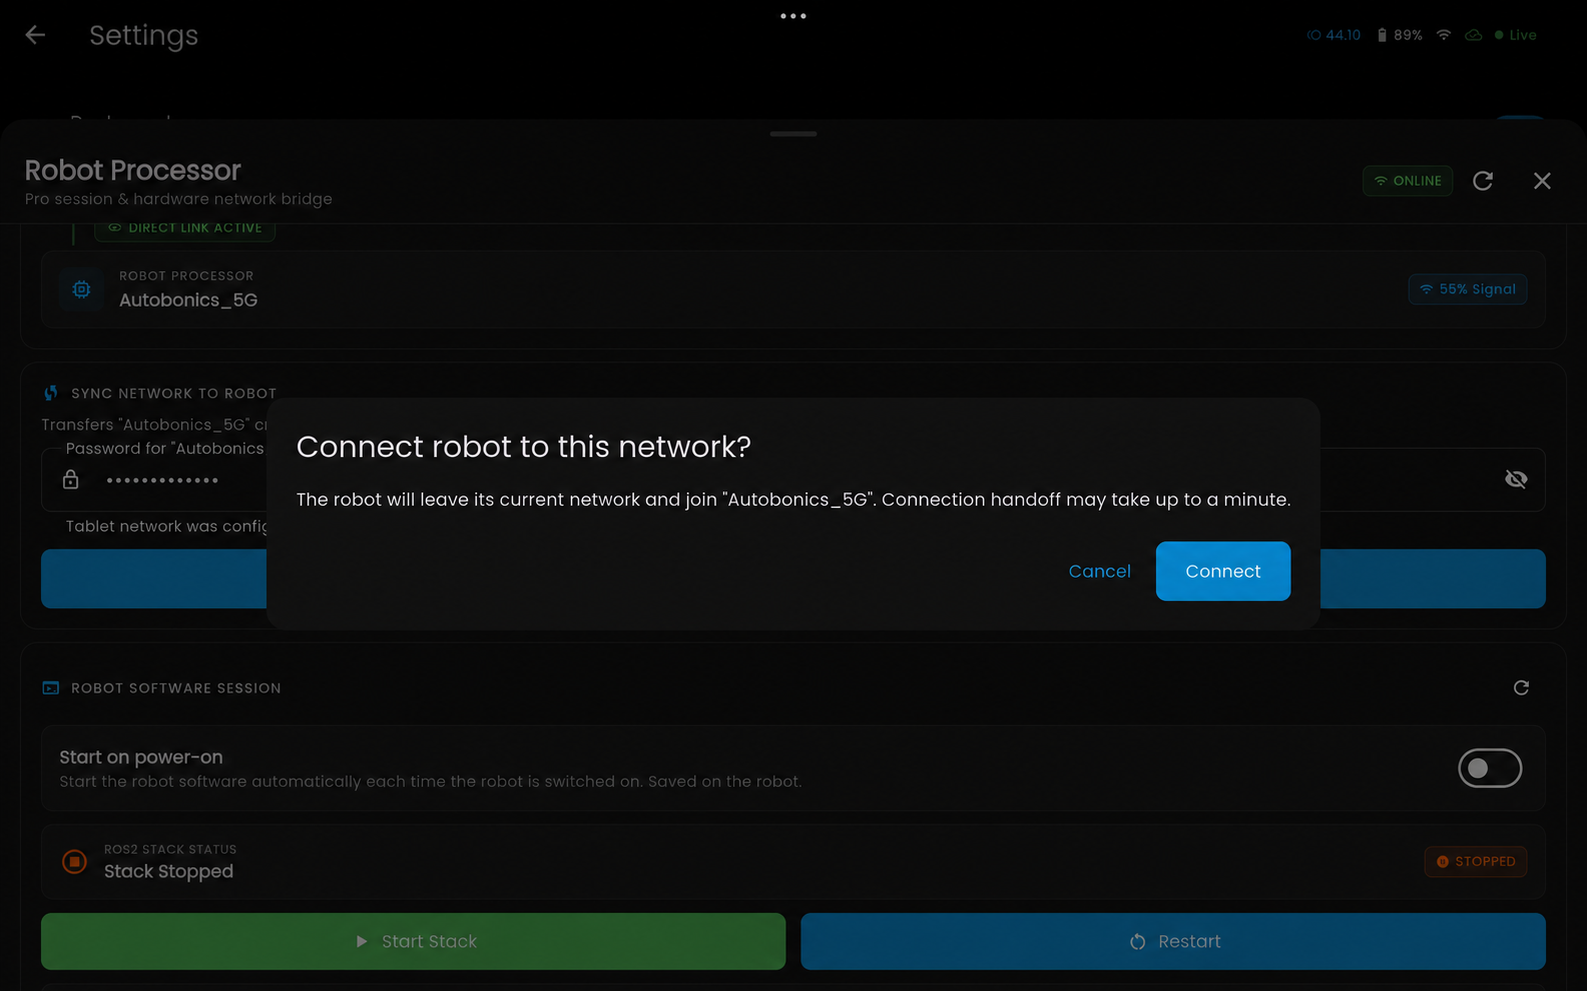
- The tablet transfers the network credentials over Bluetooth to the robot processor. The processor status updates to Joining “[SSID]”….
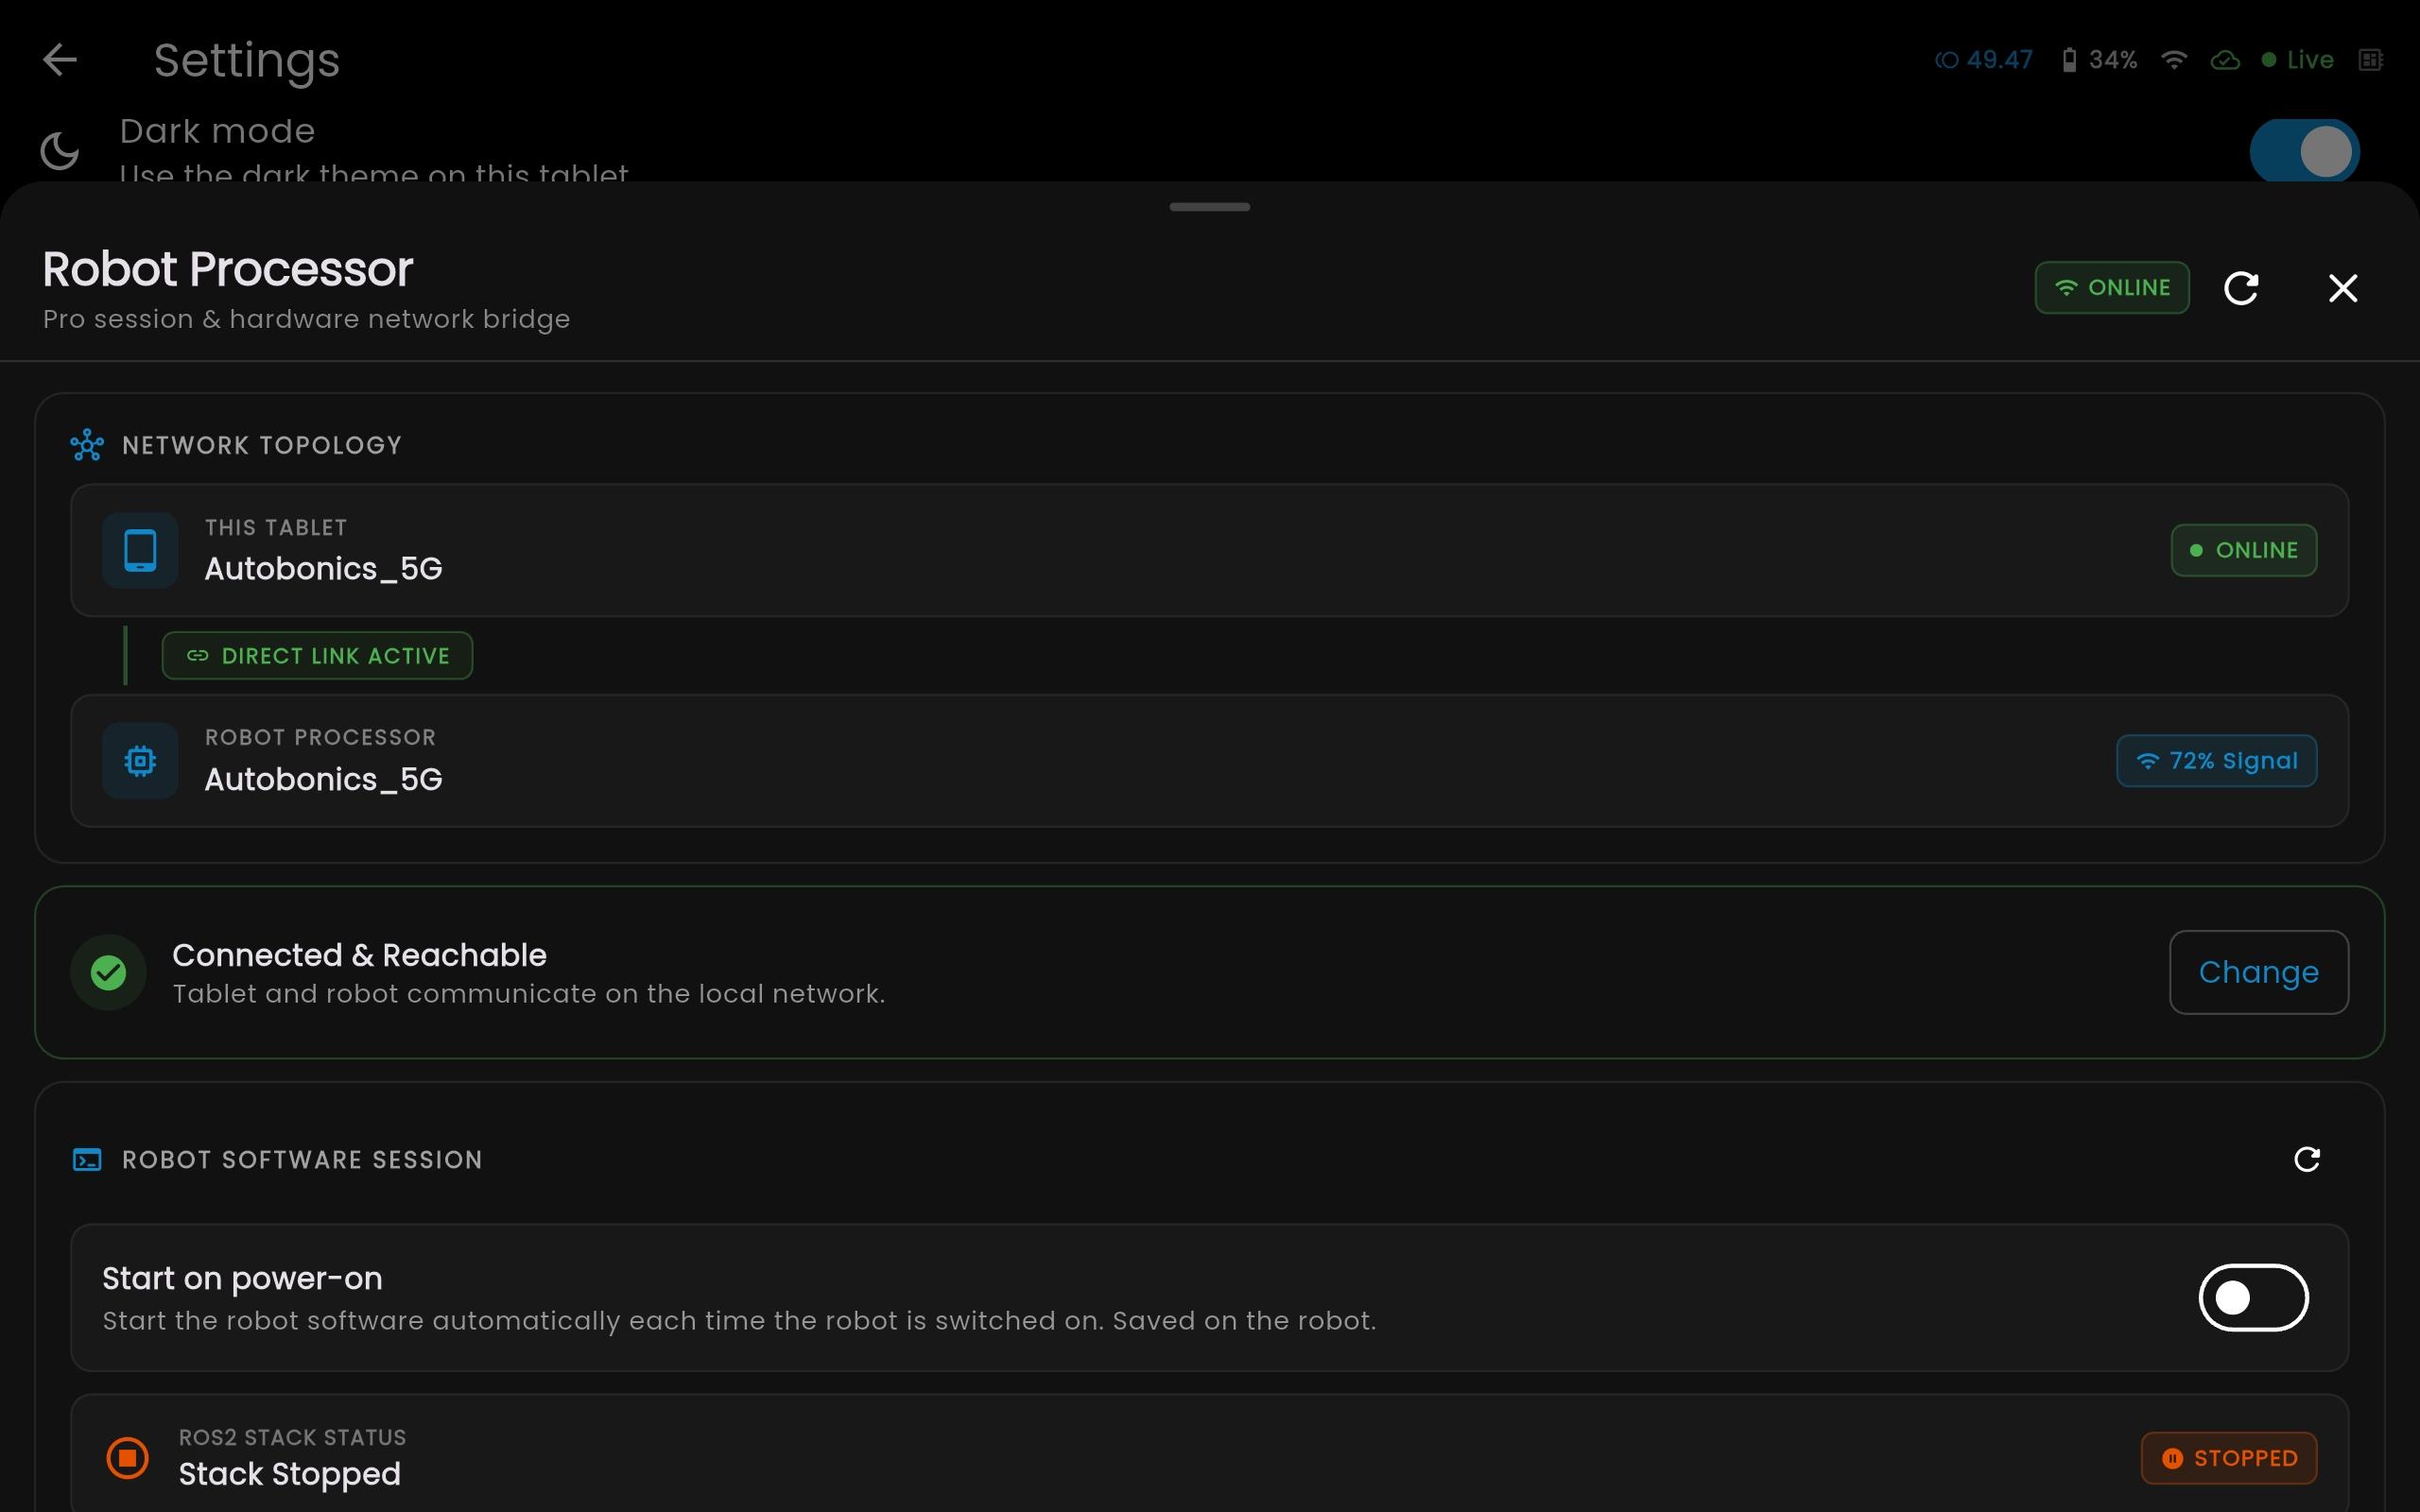
BonicOS shown after connection. Network Topology displays both devices on the same network, with Direct Link Active and Connected & Reachable.
You should see: on either interface, the processor status updates to a green ONLINE badge displaying its assigned local IP address once it joins the network. Both your interface and the robot processor are now communicating over the same local network.
Step 2: Launching the Robot Software Stack (ROS)
Once the processor is online, its autonomous software stack must be active:
- In the Processor Connectivity sheet (or on the main Pro navigation screen), check the Software Session status.
- If the software is stopped, the screen displays: The robot’s ROS software stack is currently stopped.
- Select Start Software Session (or Start Robot Software Stack).
- The status updates to Software starting… as sensors and navigation services initialize. Wait for the running status before continuing. BonicOS indicates that startup takes approximately 30–60 seconds.
- Once complete, the status turns green. BonicOS shows Active & Running and RUNNING.
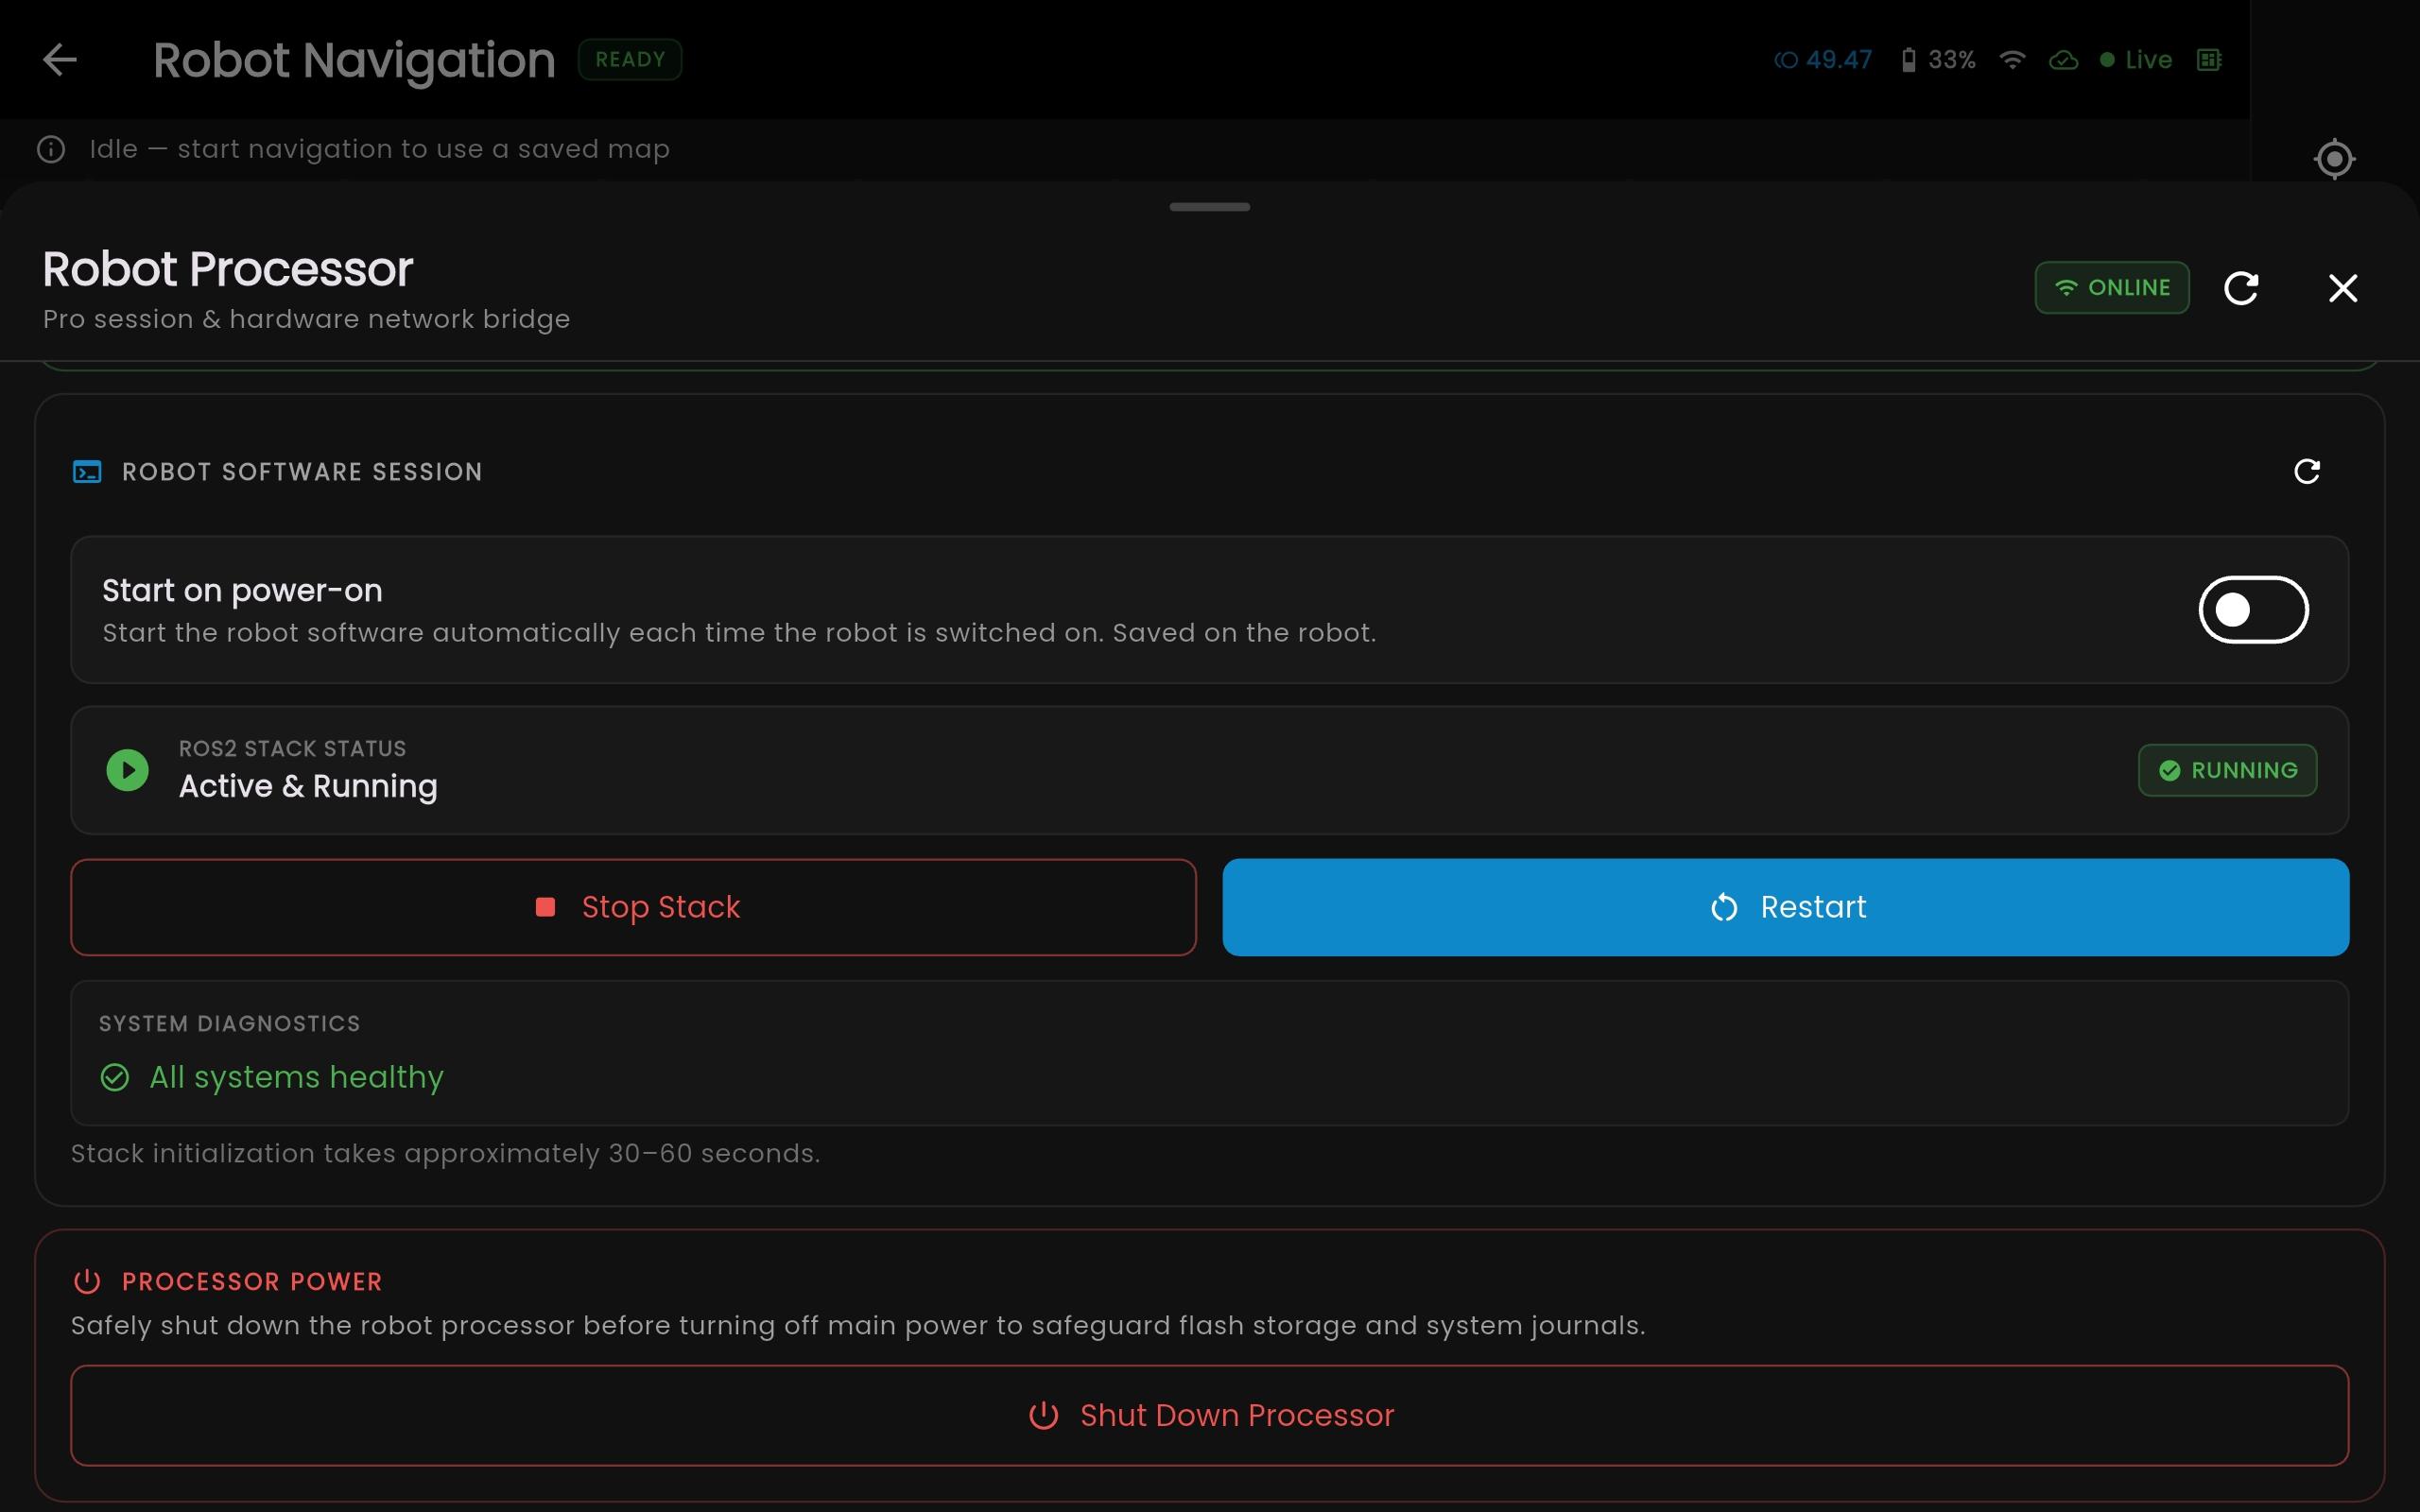
BonicOS shown with the software running. Start on power-on is the BonicOS label for automatic startup.
Tip (Autostart on boot): To save time in the future, toggle the Autostart on boot switch to ON. The robot will then automatically launch its navigation software stack whenever it is powered on.
Step 3: Creating a room map
Applies to: BonicOS and the Controller App. The following shared mapping and destination procedures use Controller App screenshots. BonicOS uses a wider tablet layout; follow the named controls.
Mapping scans walls, corridors, and furniture into a high-precision 2D floor plan:
- Place the robot at its designated home station (e.g., docking base or corner) with clear space around it.
- On the Pro navigation screen, select Start Mapping (or open the Map menu and select Make a New Map).
- Wait a few moments for the mapping canvas to appear on screen.
- Tap the floating Drive Joystick overlay on the map.
- Drive the robot slowly around the outer perimeter of the room:
- Keep speeds low (around
0.15 m/s) to allow sensors to capture clean wall boundaries. - Keep roughly 0.5 to 1 metre away from walls.
- Complete a continuous loop back to your starting position.
- Keep speeds low (around
- Verify on the map canvas that all room boundaries, doorways, and major pillars are clearly visible.
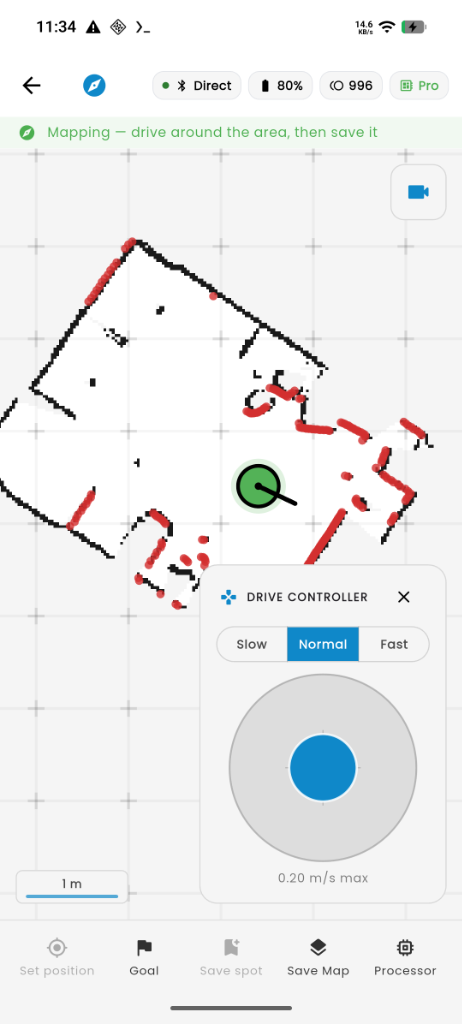
Controller App shown.
- Select Save Map to open the save sheet.
- Enter a Map Name (for example,
Main Campus Lobby), then select Save This Map.
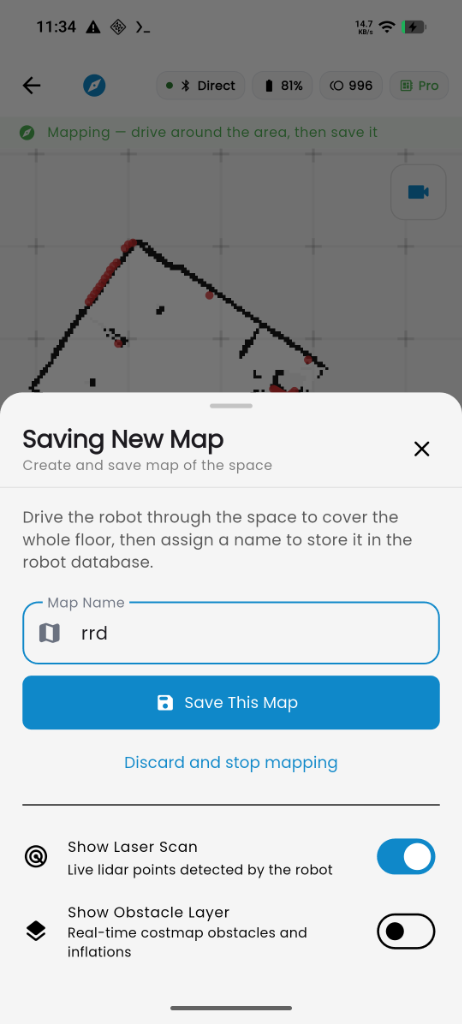
Controller App shown.
Warning: Saving with an existing map name overwrites that map. BonicOS and Controller do not show an overwrite confirmation. Use a distinct, non-empty name if you want to keep the existing map. Check the name displayed after saving; the robot may adjust it. Overwriting a map also removes its saved destination spots. Load the replacement map and save the destinations again before using them for navigation.
If saving fails while the robot remains powered on and connected, retry saving the current scan. You do not need to create the map again. If the robot loses power before the map is successfully saved, you must create the map again.
You should see: a confirmation displaying Start navigating on [Map Name]. Select it to immediately load your new map for autonomous travel.
Step 4: Setting the robot’s initial position (Localization)
Use a saved map after restarting
If your saved map is available in the robot’s map list, you can load it in BonicOS or Controller and set the robot’s initial position. Restarting does not require a new mapping scan just to use an available saved map. If the room layout changes significantly, create a new map before navigating again. Use a different map name to keep the previous map; reusing its name overwrites it.
- Reconnect to the robot processor and start its navigation software as described above. Controller also requires its Direct connection.
- Open Map > Maps & Layers, select the saved map for the current room or floor, and wait for it to load.
- Set and confirm the robot’s position and facing direction using the steps below before sending a destination.
You should see: the selected saved map load and, after position confirmation, the robot’s position align with its surroundings.
Before an autonomous destination can be assigned, the robot must locate itself on the loaded map:
- Select Start Navigation (or open the Map menu and pick your saved map under Maps & Layers).
- Select Position (or Set position) in the toolbar.
- On the map canvas, tap the spot where the robot is physically standing.
- Drag your finger in the direction the robot is physically facing to align the orientation arrow.
- Review the placed marker, then select Confirm.
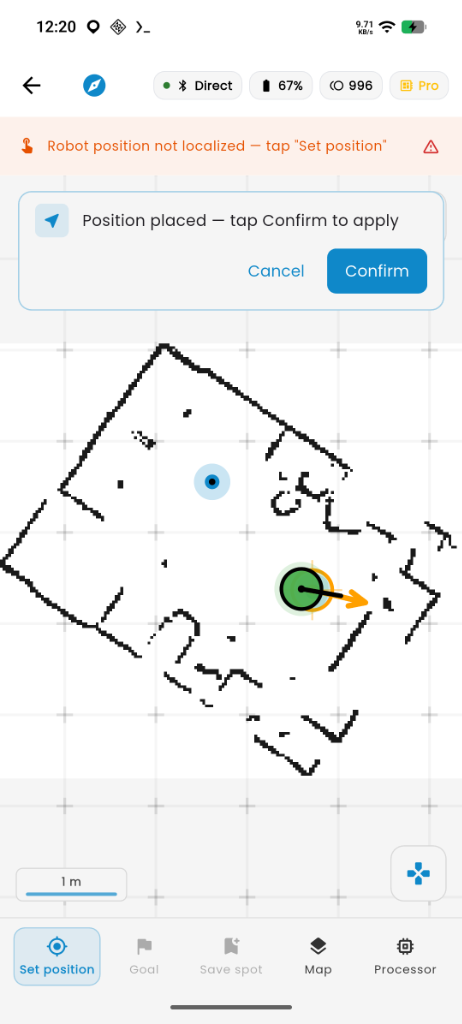
Controller App shown.
You should see: the robot’s localization marker align on the map and the navigation status update to ready.
Step 5: Saving destination spots on the map (Save Spot)
You can save points of interest directly from BonicOS or the BonicBot Controller App without using a computer:
- On the Pro navigation screen, select Save spot from the toolbar.
- Tap the specific spot on the map where you want to save a destination (for example, in front of the reception counter or lab door).
- Drag to set the direction the robot should face when arriving at that spot.
- Select Confirm to open Name this location.
- Enter a recognisable name in Location Name (for example,
Reception DeskorRoom 102). - Select Save to save the spot.
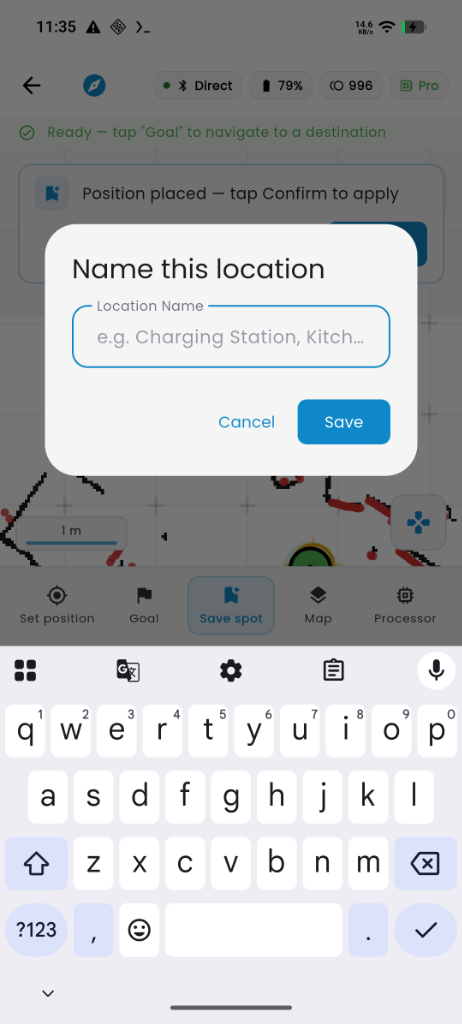
Controller App shown.
You should see: a permanent named marker pin appear on the map at that coordinate.
Managing saved spots: Tapping an existing saved spot marker opens an action banner where you can review its name, tap Navigate to travel there, or tap Delete to remove it.
Step 6: Navigating to a destination (Goal)
Once localized, the robot can plan an autonomous route to any accessible destination on the map.
Caution: Supervise the robot during navigation and keep its travel path clear. Do not rely on the map display to guarantee detection of people, glass barriers, drop-offs or fast-moving hazards.
In BonicOS and Controller, open Maps & Layers and enable Show Obstacle Layer to view the obstacle information reported by the robot. This changes the map display; it does not enable or disable obstacle avoidance.
Method A: Sending to a Saved Spot
- Tap any named marker pin on the map (e.g., Reception Desk).
- The action banner asks: Navigate to “Reception Desk”?.
- Select Confirm.
Method B: Picking an On-Demand Goal
- Select Goal in the toolbar.
- Tap any clear spot on the floor map where you want the robot to travel.
- Drag from the point to set the facing direction upon arrival.
- Review the destination marker, then select Confirm.
You should see: the navigation status update to display the active travel route, and the robot begin driving toward the destination point, orienting to the specified arrival heading.
Navigate through an agent conversation
You can request travel to a saved spot while talking with the robot through Agent mode in Controller or a BonicOS conversation.
Before you begin:
- Use a Pro robot with its navigation processor connected and navigation software running.
- Load the correct map and check that the robot’s position is ready.
- Save and name the destination using Save Spot.
- Ask the person configuring the active agent to enable Navigation and save its configuration. See Configure an existing agent.
- For Controller, maintain Direct Bluetooth and the same-network Pro connection. Use a Standard or Premium agent without an authentication requirement; Edge conversations work only in BonicOS.
- Open the robot’s agent conversation using Testing the conversation.
- Ask the robot to go to a saved spot by name, for example, Go to Reception Desk or Take me to Room 102.
- Follow any clarification or confirmation the agent requests.
- Keep the robot in view and monitor its travel and navigation status.
You should see: the agent start navigation to the requested saved destination when the command is accepted and navigation is ready. Check the navigation status and physical robot before assuming arrival.
To cancel travel, use the navigation Stop control described below. The conversation’s stop-speaking button interrupts the spoken reply; it does not stop base navigation.
Movement can start without another confirmation: In BonicOS and Controller, once the agent sends a valid destination and the navigation checks pass, the app submits it directly. There is no additional app confirmation step. Keep the path clear before asking the agent to navigate.
If a requested saved destination cannot be matched, the request is refused.
The docking example below shows an agent acknowledging a request to return to the charger and displaying Docking…. This example applies only to S1 Pro and M1 Pro with supported docking hardware and a saved dock; it is separate from travel to a named destination spot. See Docking in BonicOS.
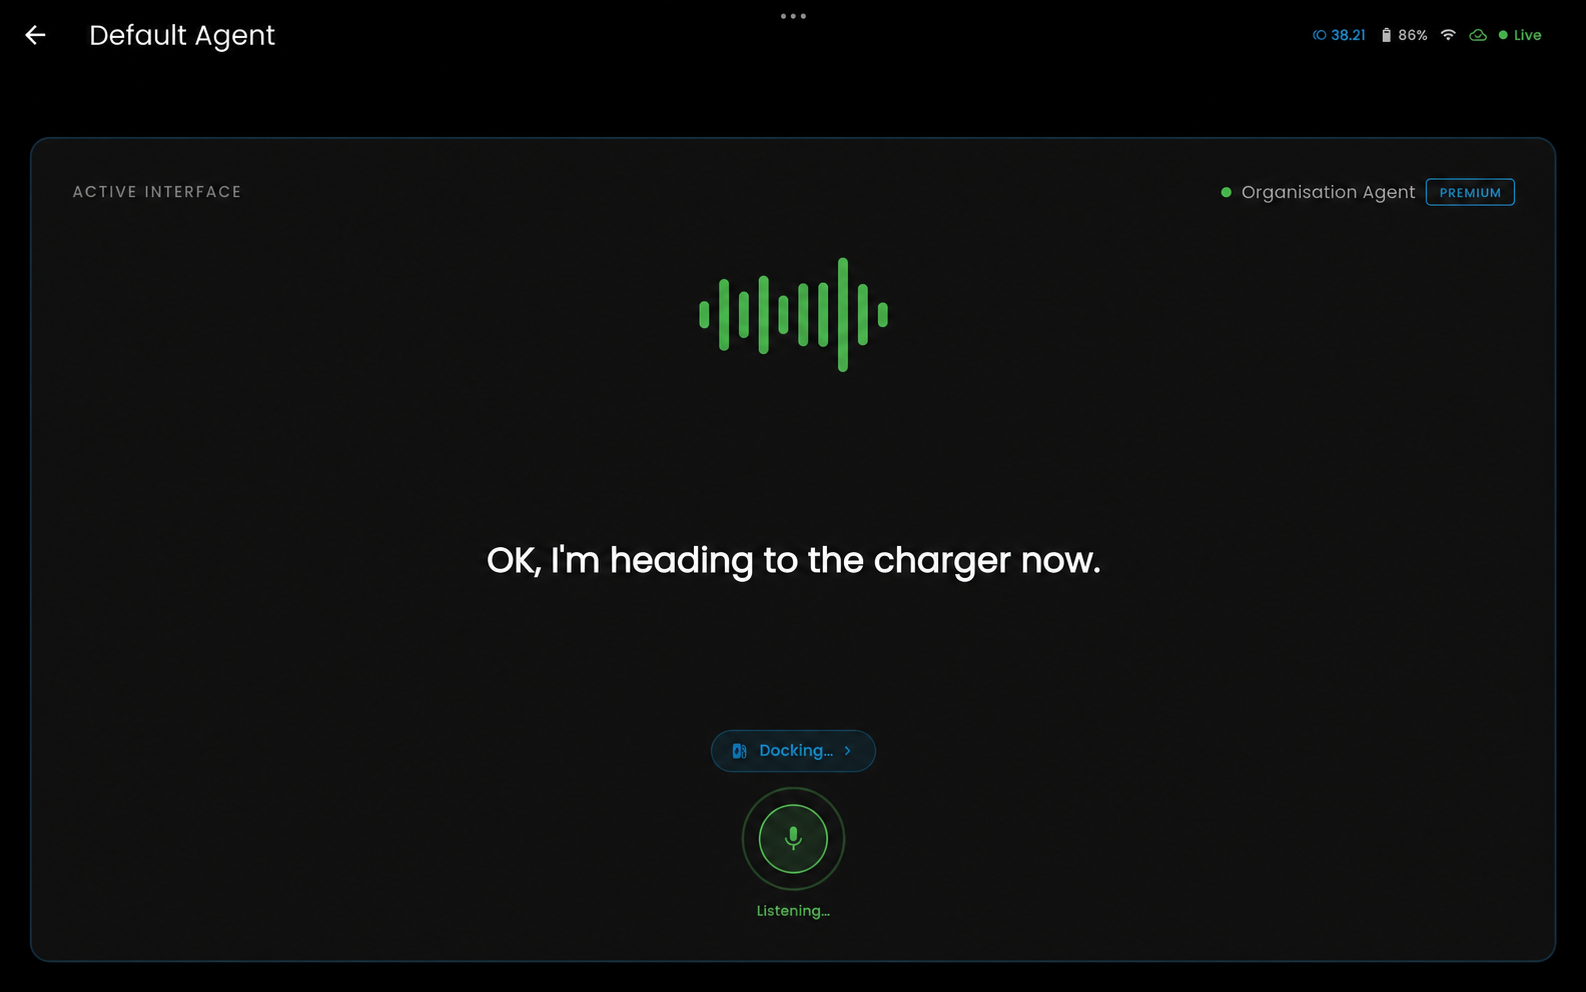
Cancelling or stopping navigation
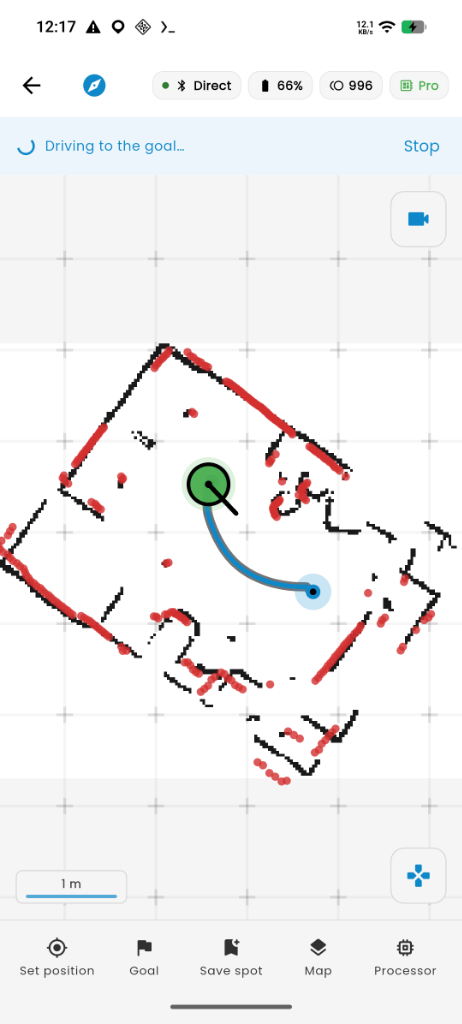
Controller App shown.
- In the active navigation status banner at the top of the screen (Driving to the goal…), select Stop.
- The robot brings its motion to a stop and cancels the active destination goal.
Docking in BonicOS
Availability: Docking is available only on BonicBot S1 Pro and BonicBot M1 Pro, with supported docking hardware and a compatible dock. It is not available on A2 models or Lite variants. BonicOS and the Controller App show docking controls when the connected robot reports docking support. If docking is expected but the controls are missing, contact BonicAI support.
The screenshots below show BonicOS. In the Controller App, open Pro and use the Dock menu when available; keep the required Direct Bluetooth and same-network processor connections active.
Before you begin: Use a robot with supported docking hardware, a prepared navigation map and a correctly saved dock. Keep the docking approach clear and supervise movement.
- On Robot Navigation, select Dock in the right toolbar to open the docking menu.
- When the robot is away from its dock and the action is available, select Dock to request docking. When docked, the menu offers Leave dock instead.
- Check the navigation status and physical robot before assuming docking has finished.
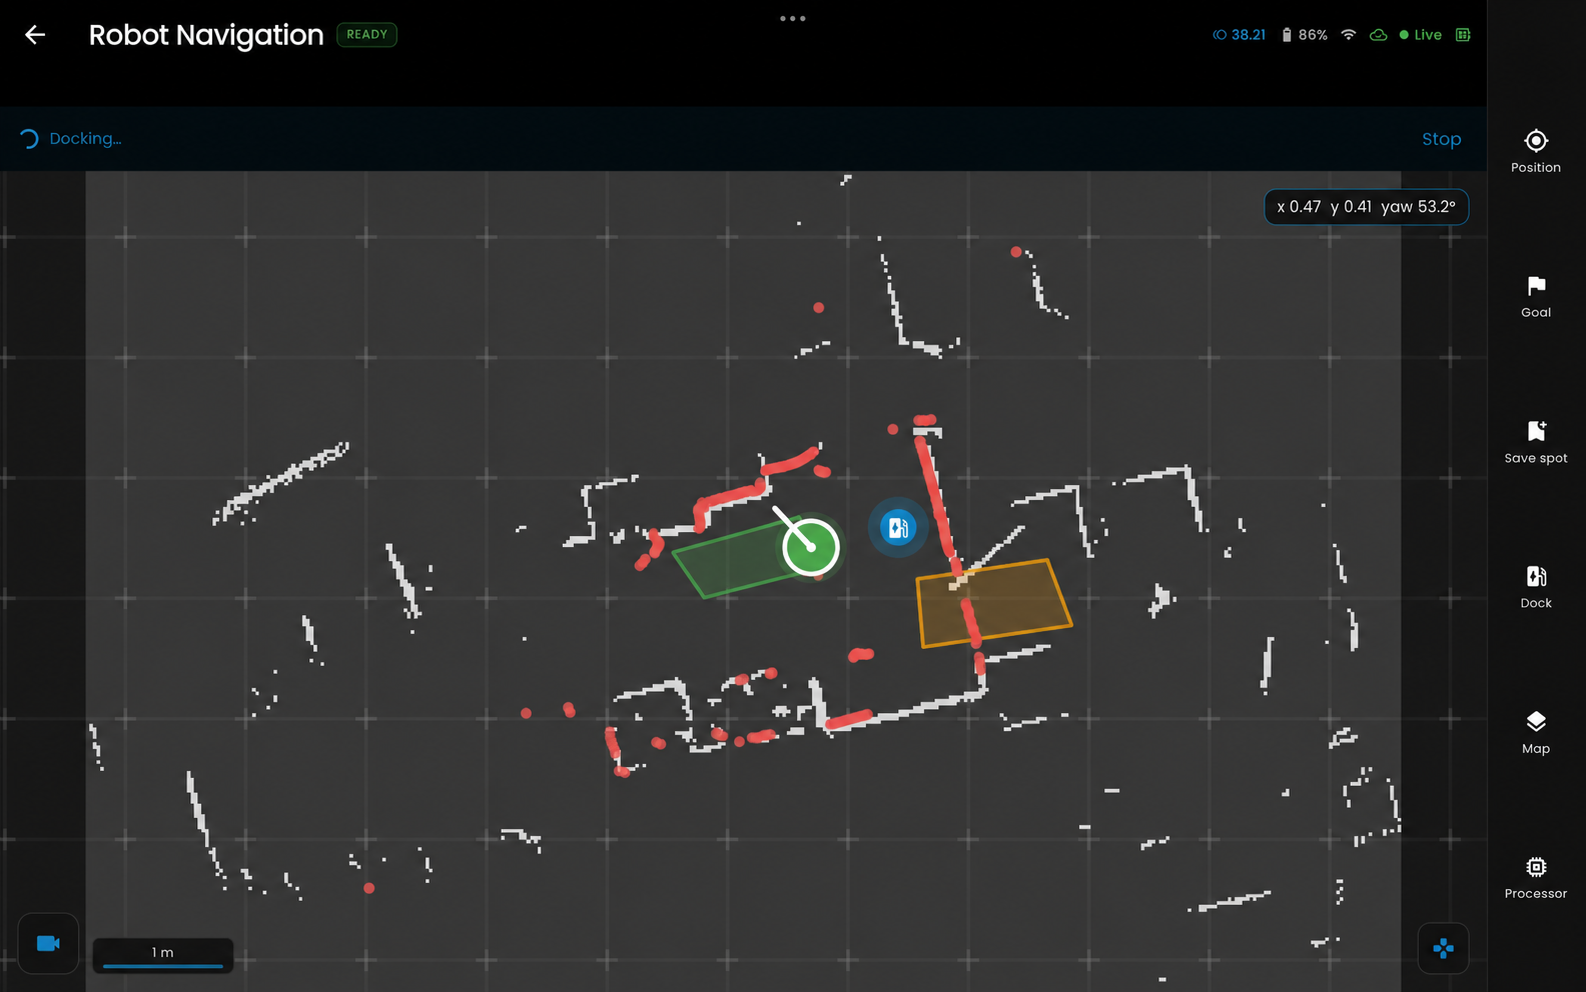
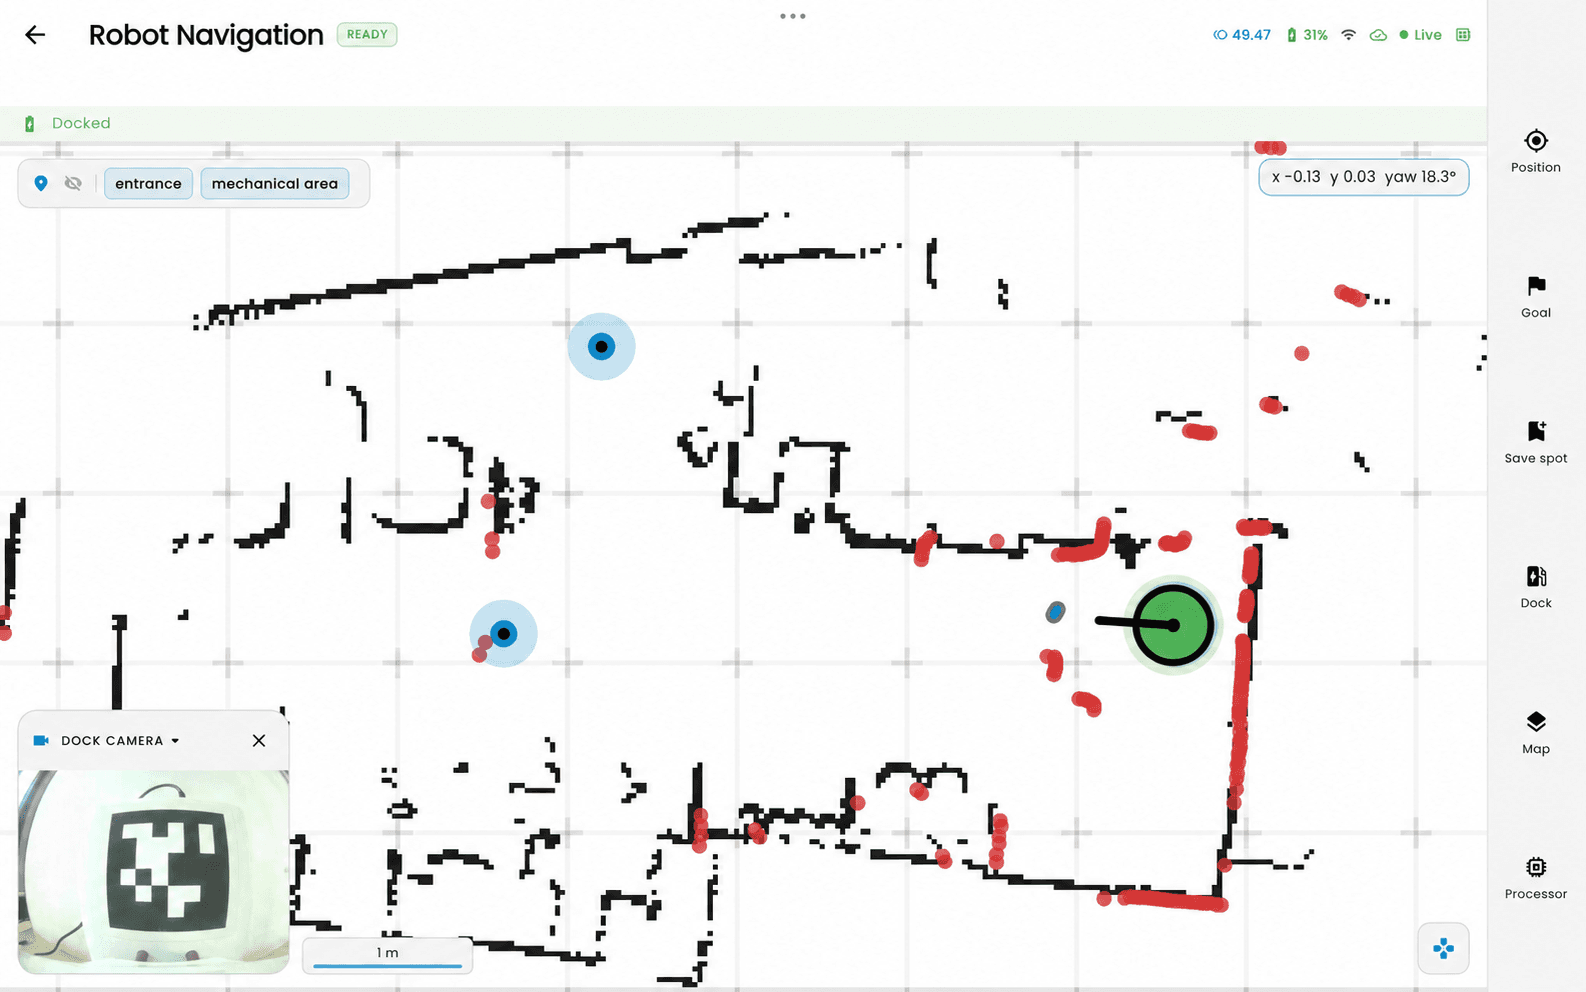
BonicOS showing the reported Docked state and dock camera.
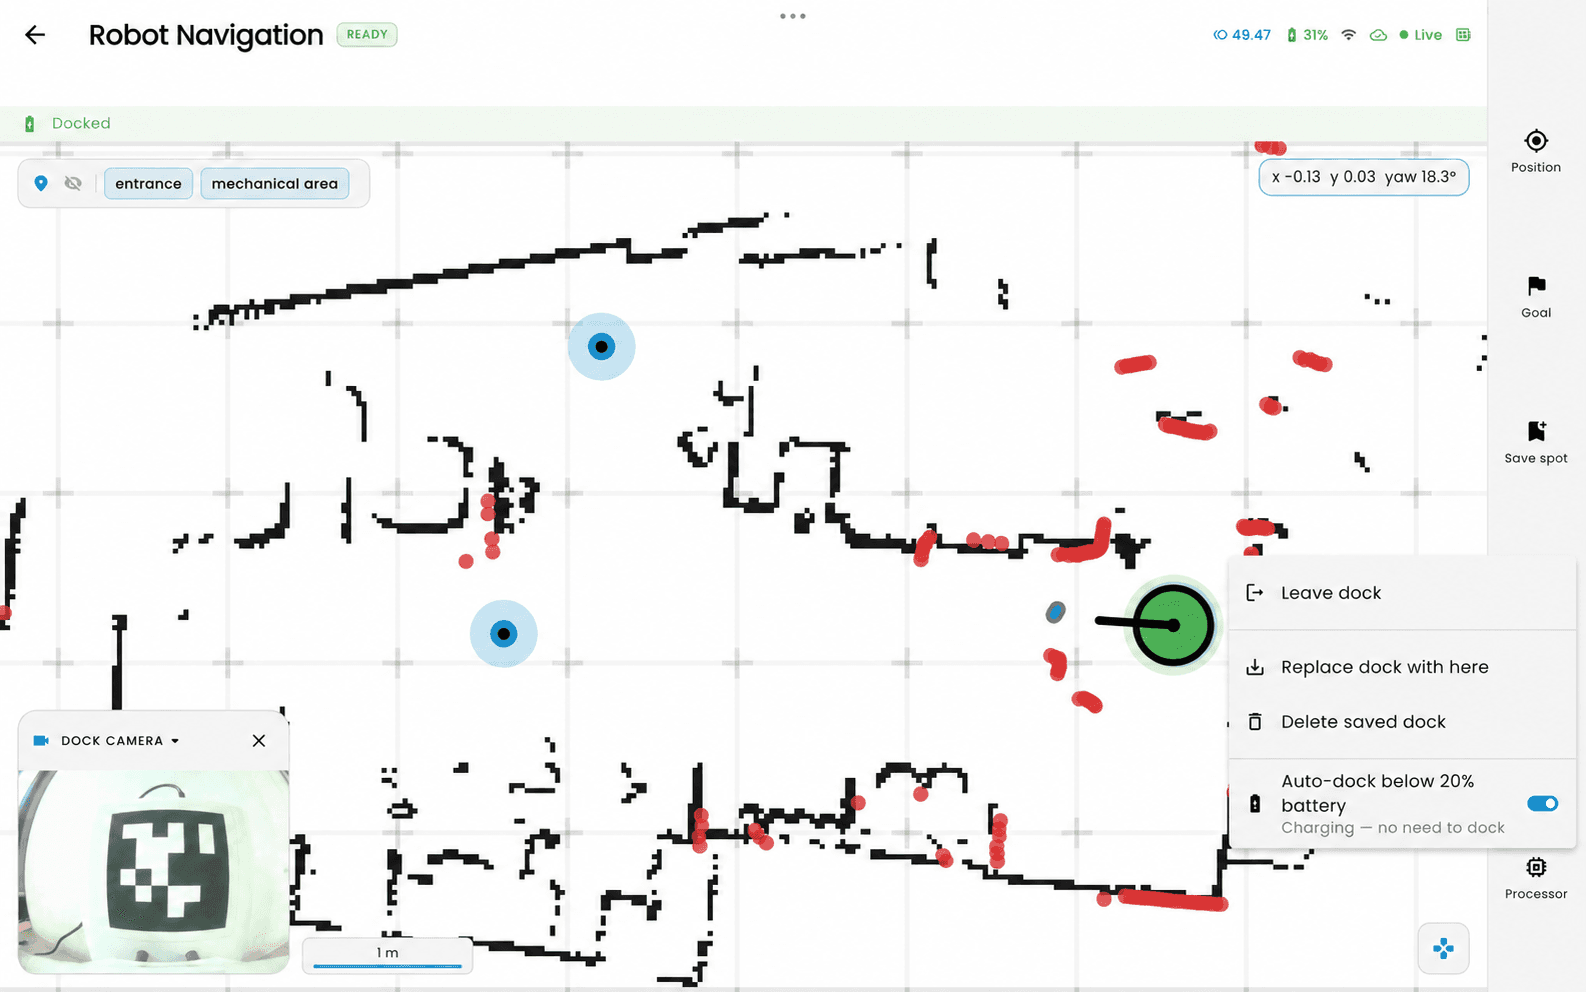
BonicOS docking menu while docked. Available actions depend on the robot’s reported state and capabilities.
The menu also offers Save dock here or Replace dock with here, and Delete saved dock. Replacing or deleting a dock changes the saved docking destination. If supported by the robot, an Auto-dock below [percentage] battery option appears; use the threshold shown on your screen.
Step 7: Managing locations and routes in BonicAI Dashboard
Use BonicAI on your computer to manage maps, saved destinations and ordered waypoint routes.
Who can do this: People with User or Admin access to a Pro robot can open Navigation.
Connect BonicAI using Direct Link
- Prepare the robot’s navigation processor and start its software using the earlier steps in this guide.
- Connect your computer and the robot’s navigation processor to the same local Wi-Fi network.
- Sign in to bonic.ai , select your robot under Your robots on the Dashboard, then select Navigation.
- In the connection panel, find Direct link is off and select Connect.
- Wait for a connected status and live map data before issuing navigation commands.
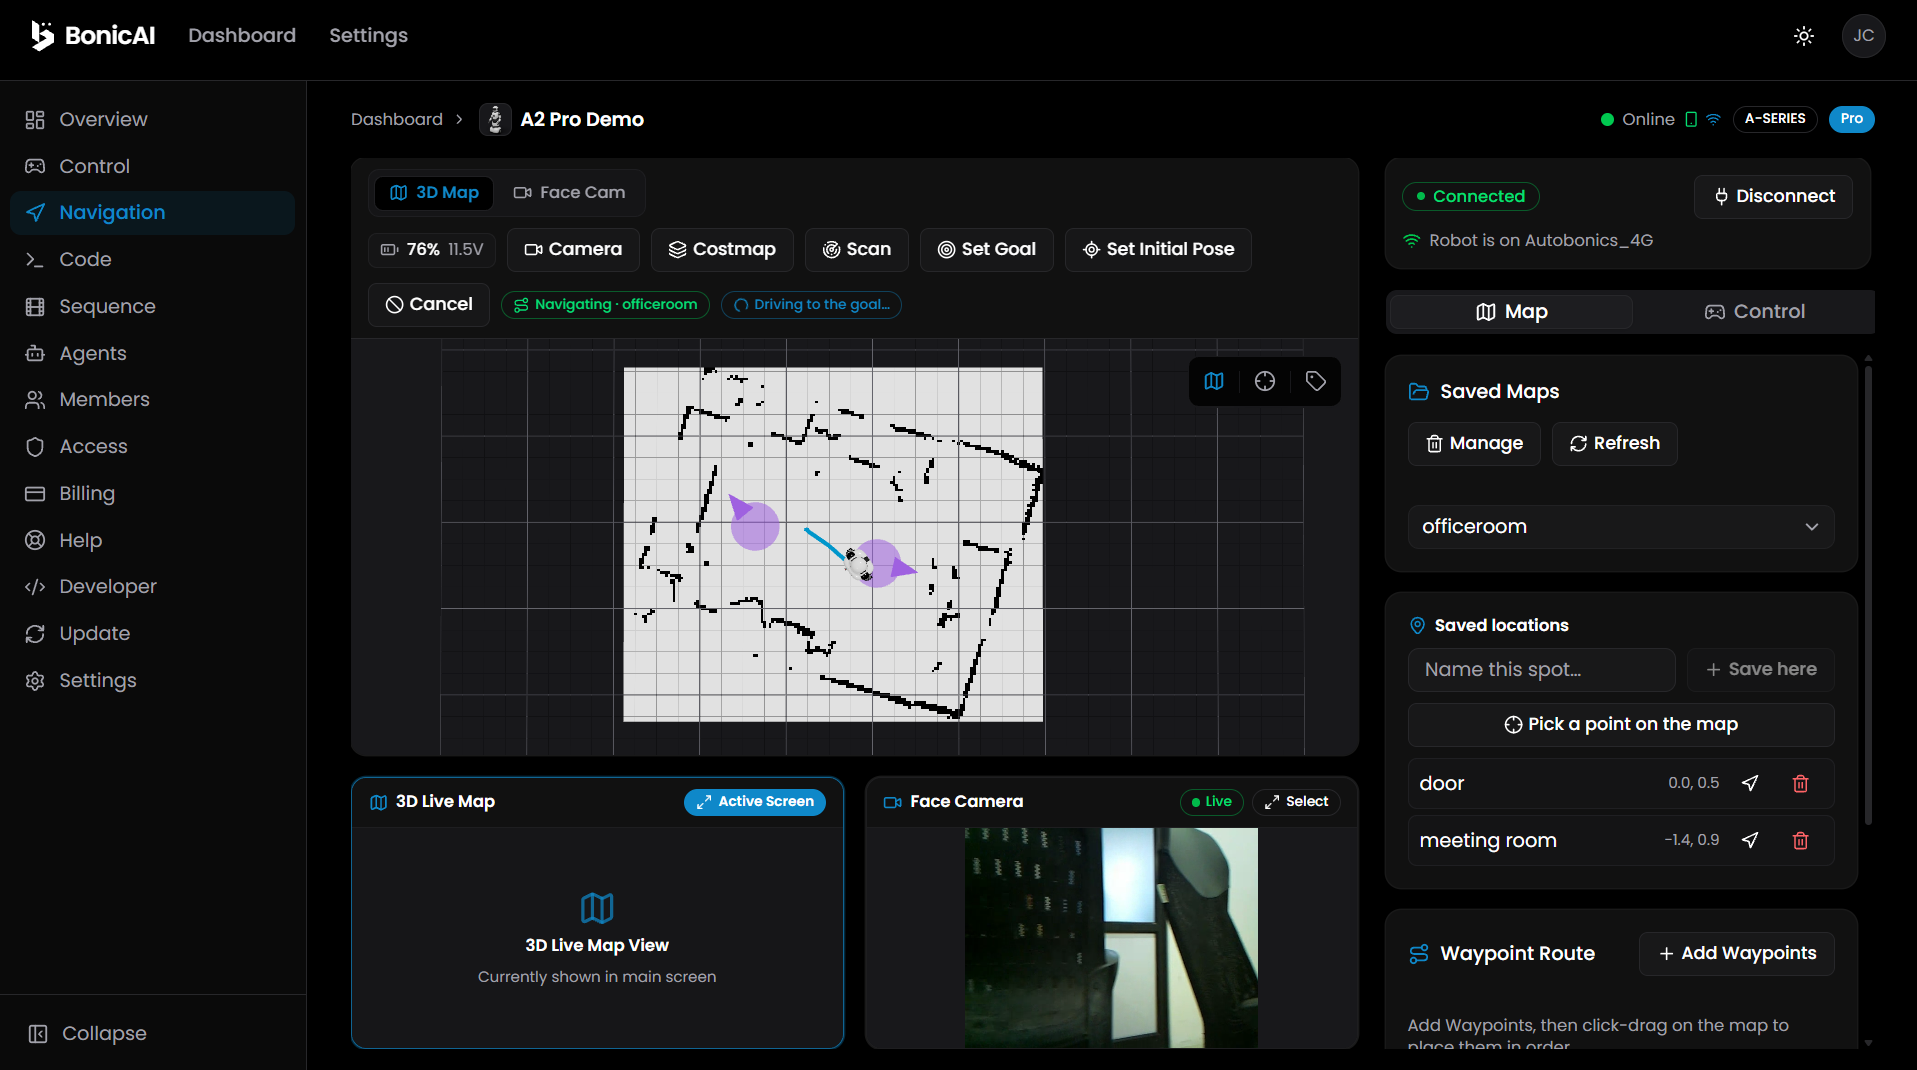
You should see: the live map become active and available camera streams begin updating.
Note: Navigation Direct Link uses the local network. It is separate from the Bluetooth Direct connection on the robot’s Control page. An old map view shown while disconnected is not a live position display.
Select and manage maps in BonicAI
- Select Map in the right sidebar.
- Under Saved Maps, open the dropdown and select the map matching the robot’s physical room or floor.
- Select Refresh if a map recently saved on the robot is missing from the list.
- To rename or delete a map, select Manage, choose the map and use the relevant action. Review the selected map carefully before confirming a deletion.
See the connected BonicAI screenshot above for Saved Maps, Manage and Refresh.
You should see: the selected map load, or the saved-map list reflect your completed management action.
Manage maps in BonicOS or Controller
- On the navigation screen, open Map to display Maps & Layers.
- Select the saved map you want to use and wait for it to load.
- To remove a map, select its Delete map bin icon.
- Read the confirmation. Select Keep to cancel or Delete to remove it.
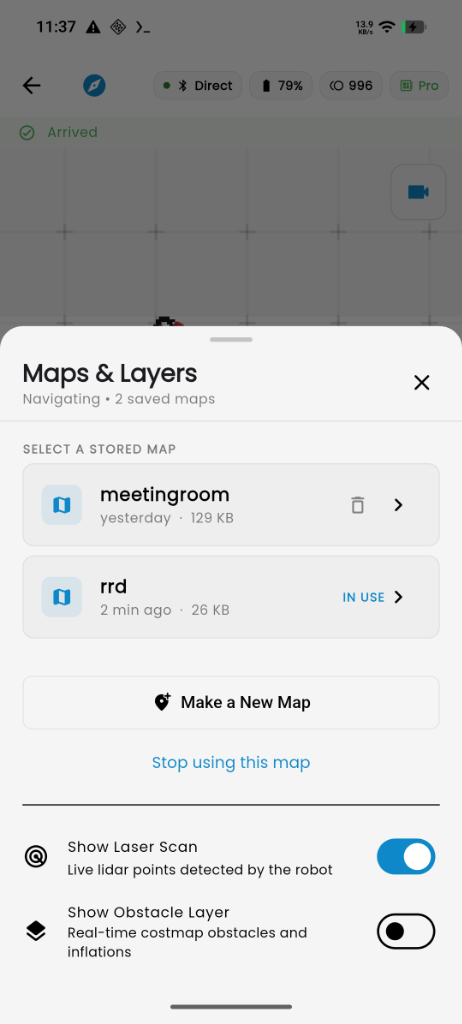
Controller App shown.
You should see: the chosen map load, or the deleted map disappear from the saved list. If an error appears, read it and check the list before assuming deletion succeeded.
Warning: In these app panels, deleting a map also removes every place and dock saved on it. The confirmation states that this cannot be undone.
Save destinations in BonicAI
- With the correct map loaded, open Saved locations in the Map panel.
- Select Pick a point on the map, then choose the destination on clear floor.
- Enter a recognisable name in Name this spot…, then select Save here when available.
You should see: the named destination in the saved-location list. Agents with Navigation enabled can use supported saved destinations; prepare the robot’s navigation before testing a voice request.
Create and run a waypoint route in BonicAI
A waypoint route visits points placed on the map in a chosen order. Keep the robot in view and check that the map, position and intended path match its surroundings.
- Establish Direct Link and load the correct map. Check that the robot’s position is ready before sending movement commands.
- In the Map panel, find Waypoint Route and select + Add Waypoints.
- Place the waypoints on the map in the order you want the robot to visit. Follow the map prompt to set their positions and directions.
- Review the numbered waypoint list. Use its up/down arrows to reorder points or the × control to remove a point. Clear clears the route list.
- Check that the route is clear, then select Run route to begin travel.
- Watch the robot and its navigation status as it follows the destinations.
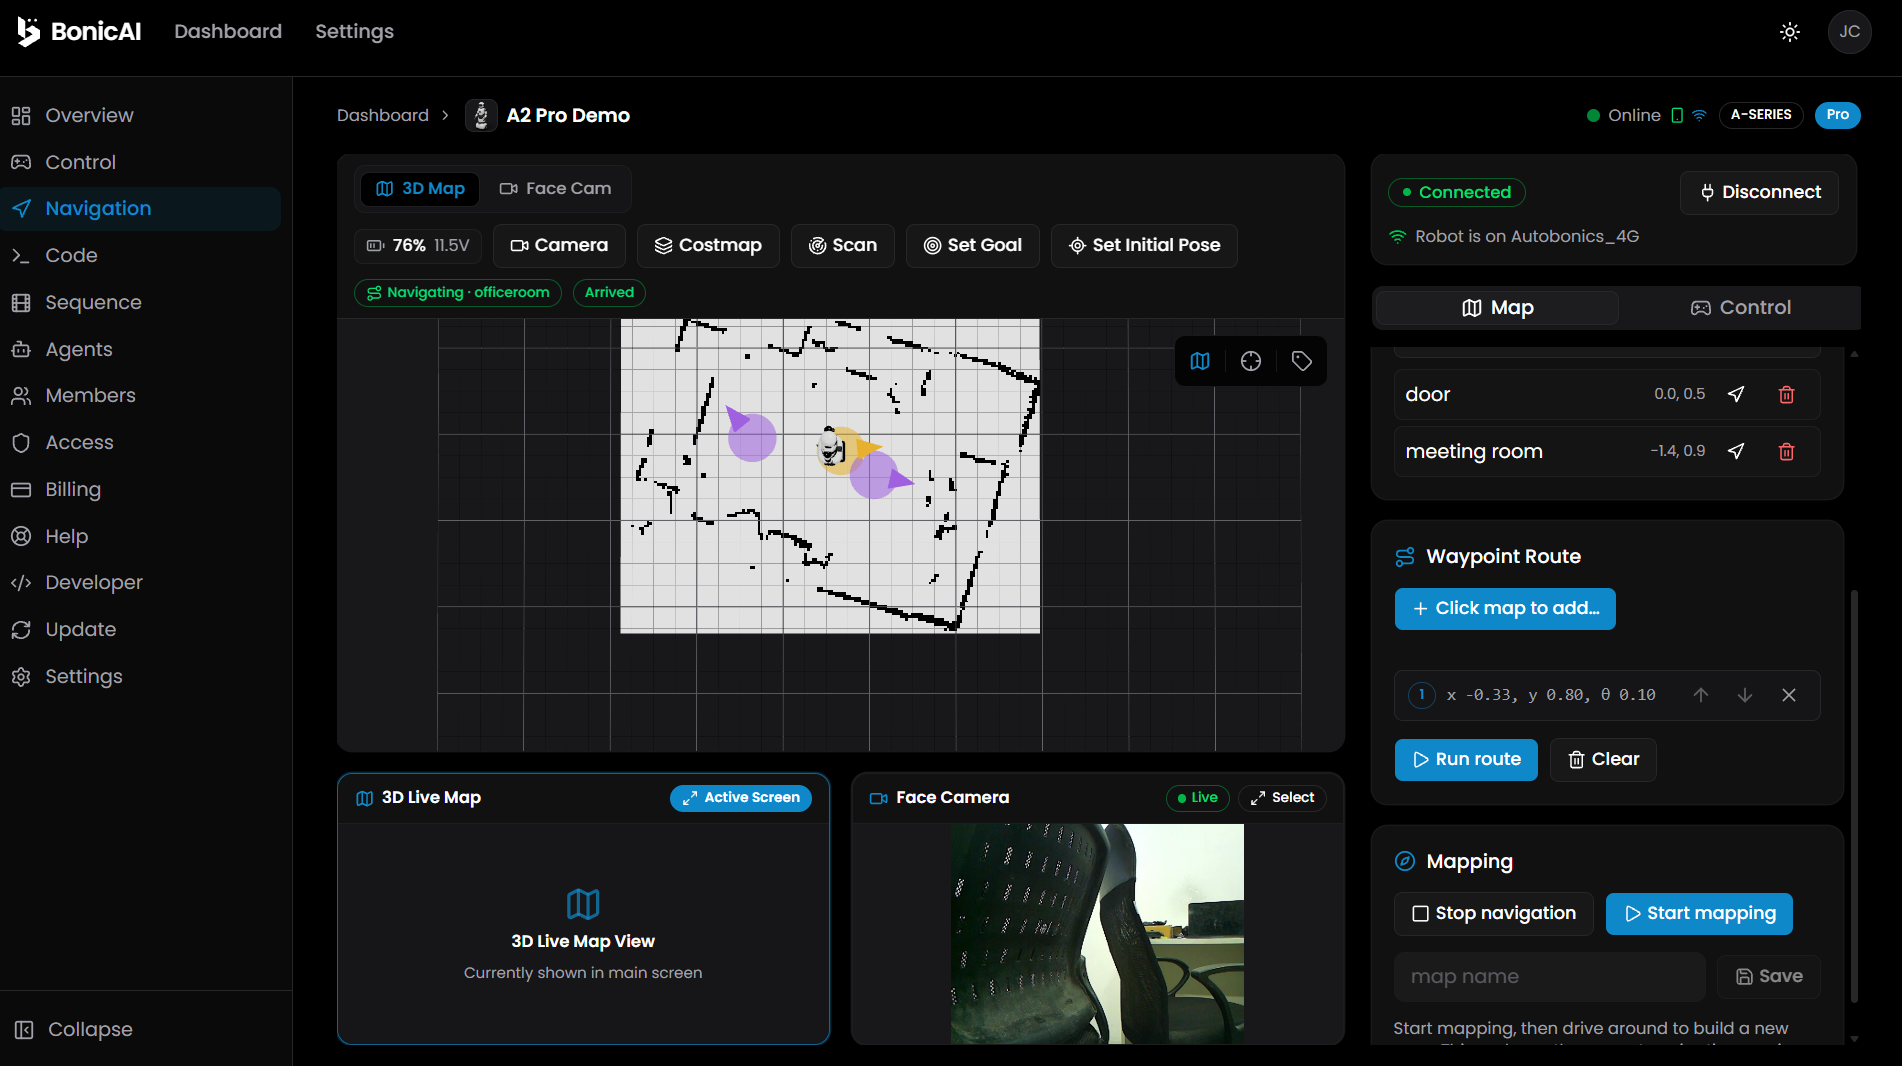
You should see: route progress as the robot visits the selected destinations. Check the displayed status before assuming it has completed the route.
View cameras and obstacle overlays
Select 3D Map, Face Cam, or Dock Cam to change the main view. Use Costmap to show the obstacle overlay. Available views depend on the robot’s connected sensors and streams.
You should see: the selected live view update while Direct Link is connected.
Shutting down the processor cleanly
Just like a computer, the navigation processor should always be shut down cleanly before switching off the robot’s main physical power:
- Open the Processor Connectivity sheet (via the Processor button in Pro Mode or under Settings > Robot processor on BonicOS).
- Scroll to the bottom and select Shutdown Processor (or SHUTDOWN).
- A confirmation dialog appears explaining that hardware navigation, sensor streams, and software runtimes will cleanly halt. Select Shut Down (or Shutdown).
- The on-screen status updates: Shutdown sent. Wait for the robot to power down before switching it off at the mains.
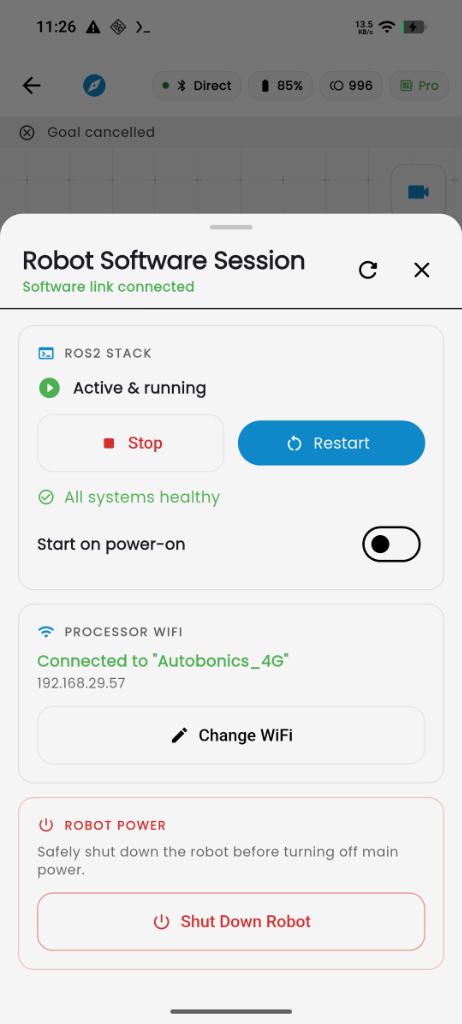
Controller App shown.
You should see: the shutdown-request message, followed by the robot turning off. Wait until you can directly observe that the robot has turned off. The message alone confirms only that the request was sent; no fixed waiting time is required by these instructions.
If the robot does not turn off, contact support@autobonics.com.
Setup checklist
Congratulations! You have completed the essential operational setup for your BonicBot robot:
- You know how to choose the right interface for your robot model (BonicOS vs Controller App).
- Your robot is connected and can be driven manually using the virtual joystick or on-chest diagnosis controls.
- Your customized AI agent (or built-in Default Agent) is active and conversing aloud.
- Your motion sequence library is configured for arm, head, and greeting animations.
- Your navigation processor is online, your ROS stack is active, your rooms are mapped, and your saved spots are calibrated for autonomous travel.
Next step
Need help resolving an issue? See Basic troubleshooting and common issues.