Connecting and controlling your robot
Learn how to establish a connection with your BonicBot robot and control its base, joints and display using the BonicBot Controller App, BonicOS, or the BonicAI Dashboard.
Who can do this: People with User or Admin access to the robot; organisation or department roles alone do not grant robot access
Choose your interface
Choose the route that matches how you are operating the robot. Follow that interface’s section; use the other sections only when you switch interfaces.
| Your task or location | Start here |
|---|---|
| Operate a standard A2, or control an S1/M1 from a distance | Controller App on your Android phone or tablet |
| Operate an S1/M1 while standing at its chest screen, or an A2 with a BonicOS add-on | BonicOS controls and settings |
| Control or configure the robot from your computer | BonicAI Dashboard controls, robot settings and updates |
| Try programming after basic setup | Optional Code introduction in BonicAI |
For sign-in and robot access, start with the Interface and robot guide. Conversations, sequences and navigation have their own task guides linked at the end of this page.
Before you begin
- The robot is placed on a level floor with clear space around it.
- Power on the robot by pressing and holding the push button on the upper part of its back until the ring light turns on.
Method A: Driving with the BonicBot Controller App
Use this method for all BonicBot A2 Series robots, or when remotely controlling an S1 or M1 Series robot from a distance.
Before you begin: Your Android device has Bluetooth and Wi-Fi enabled. Install the BonicBot Controller App from Google Play .
Note: The BonicBot Controller App is currently available exclusively for Android via the Google Play Store. iOS and desktop platforms are not supported.
Step 1: Open your robot
- Open the BonicBot Controller App on your Android device.
- Sign in with your BonicAI email and password, or select Continue with Google for your registered Google account.
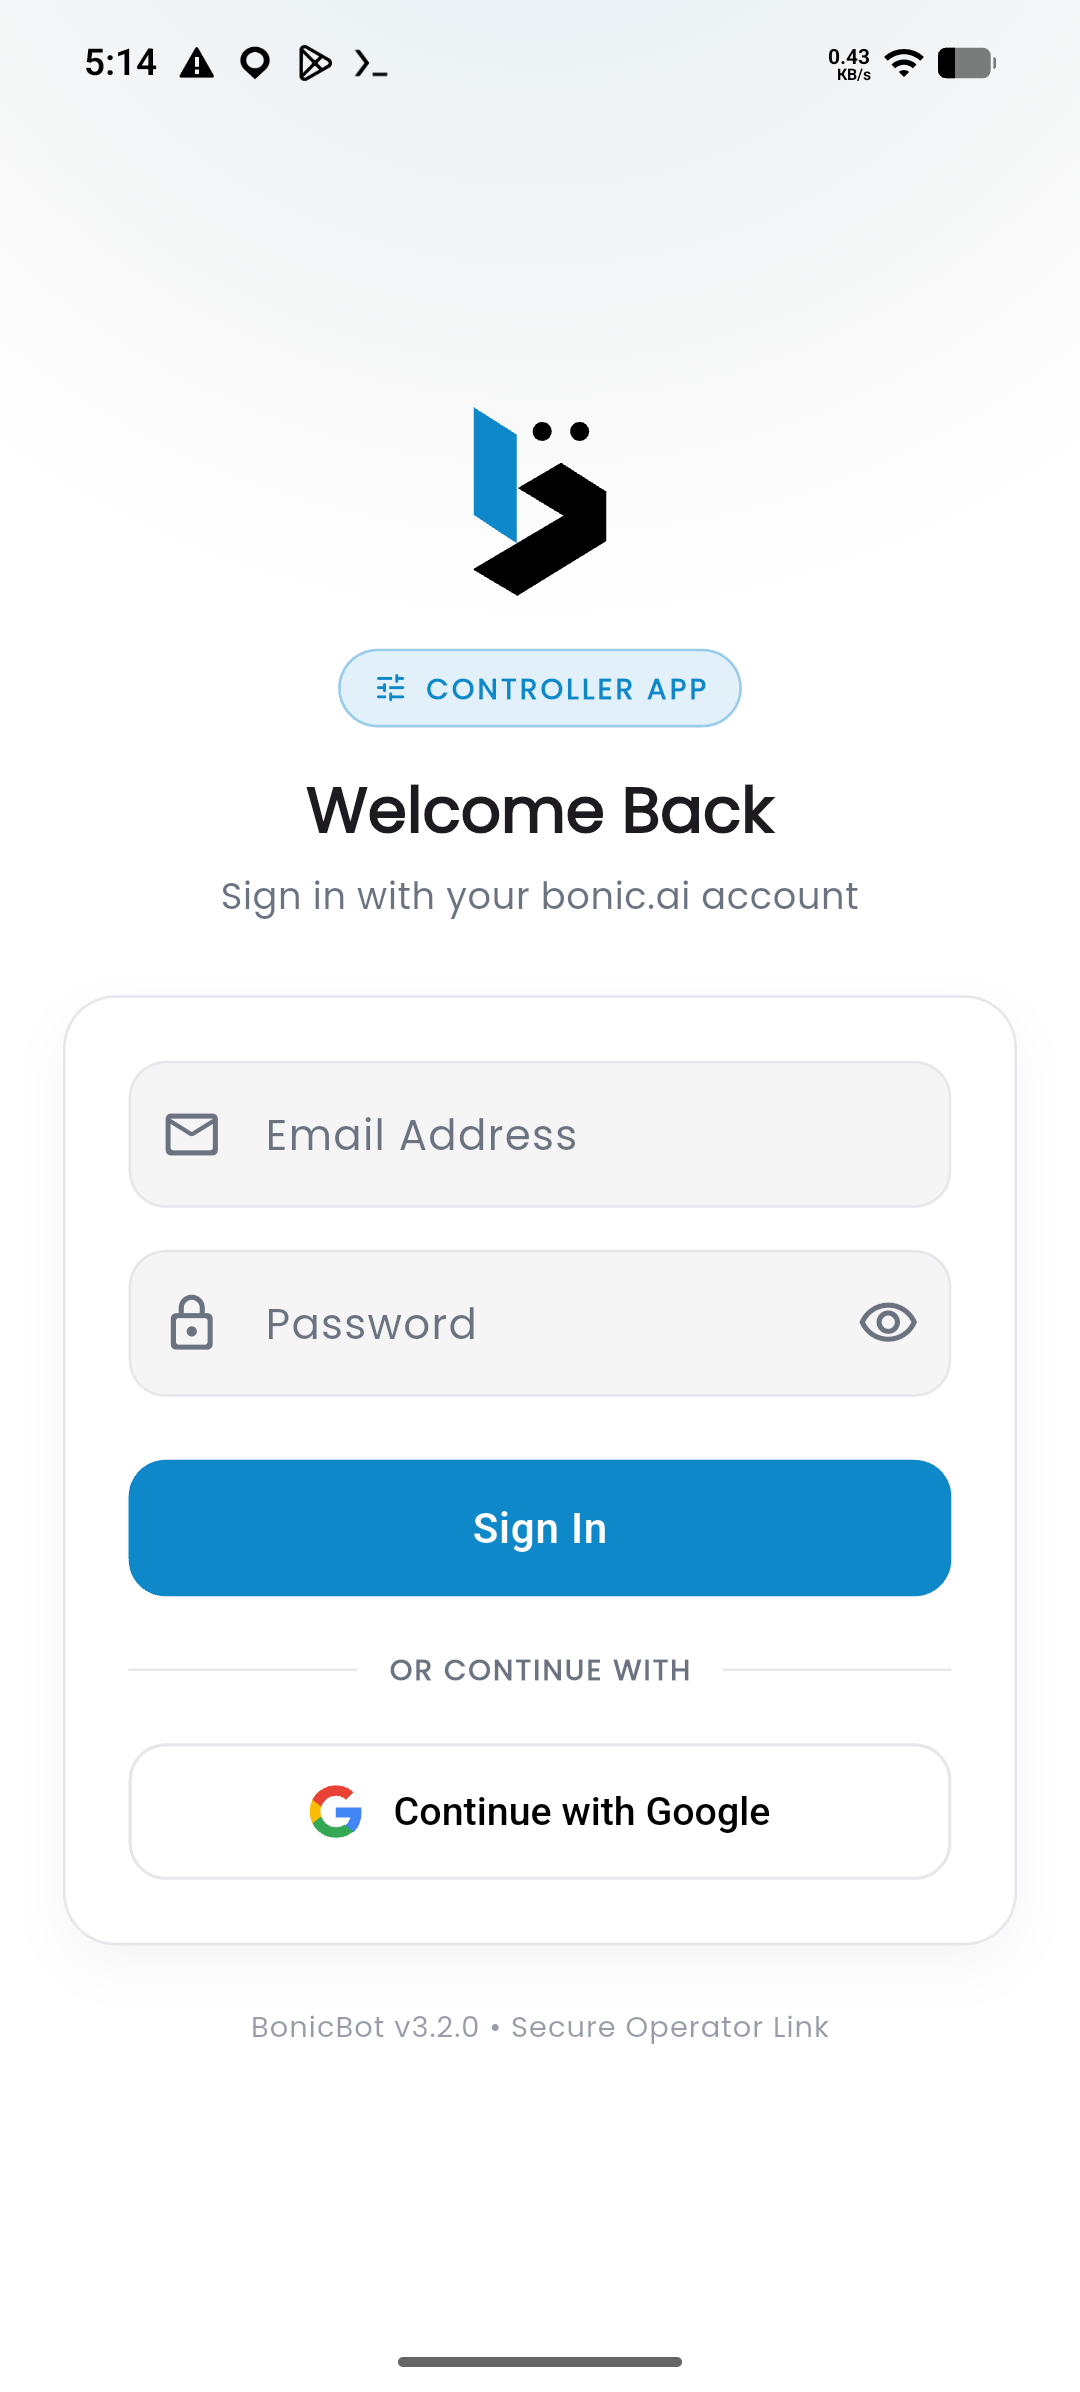
Controller App shown.
- On the Bonic Fleet robot list, find your robot. Use the series filters (such as A-Series or S-Series) or search by name.
- Select Open Operator Controls on the robot card to open its workspace.
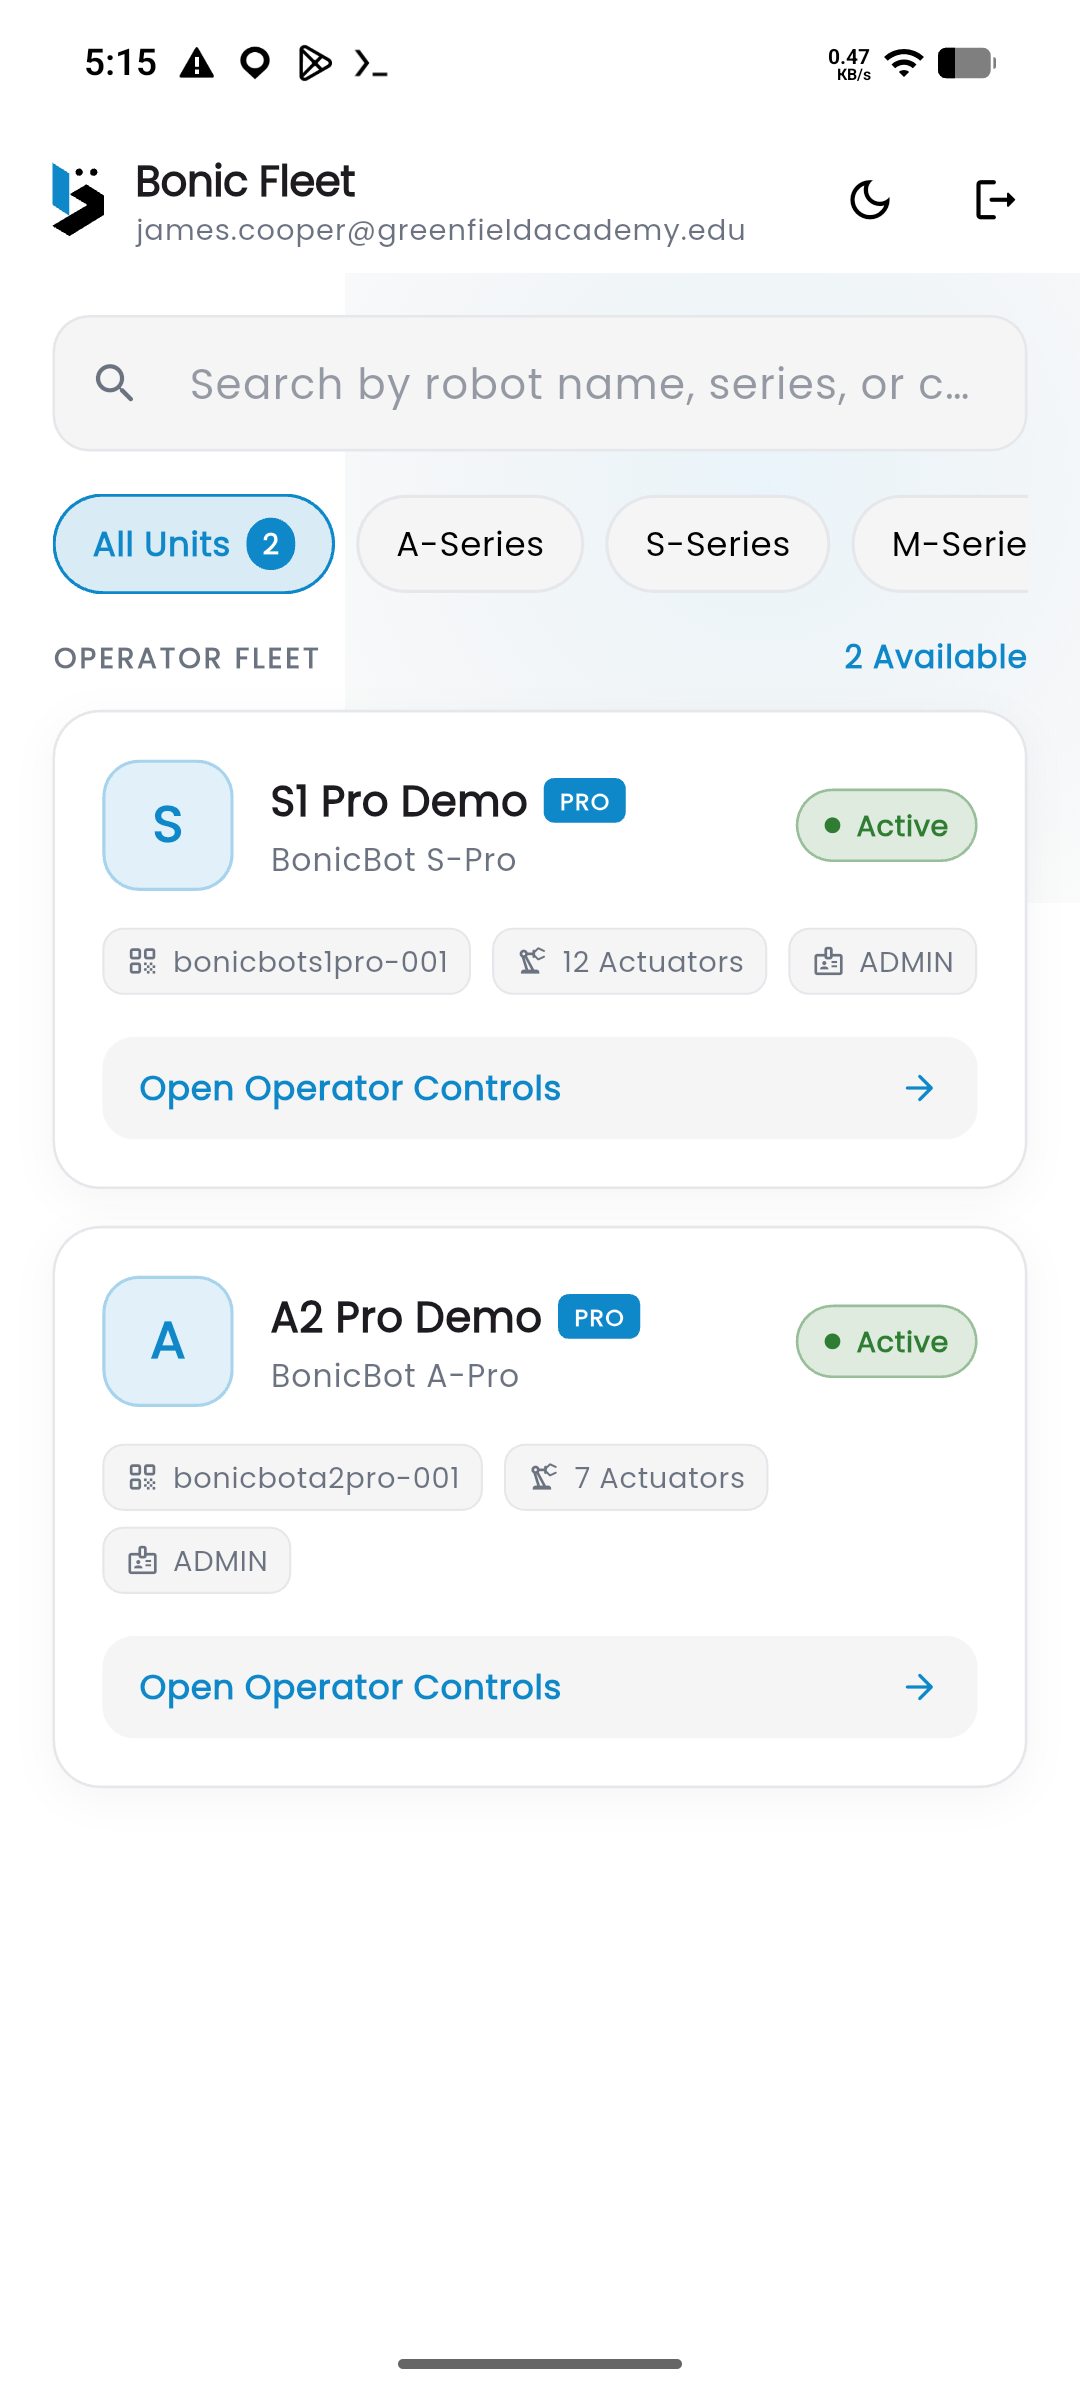
Controller App shown.
You should see: the Control dashboard load with an interactive 3D model of your robot and the Connect Bar at the top.
Step 2: Choose your connection mode (Cloud vs Direct Bluetooth)
At the top of the control screen, the Connect Bar manages how commands travel to the robot:
- Cloud Mode (Default): Communicates over the internet via Bonic Cloud. Use this for standard remote control when both the robot and your Android device are connected to Wi-Fi.
- Direct Mode (Bluetooth): Communicates directly with the robot over local Bluetooth. Use this for low-latency driving, Pro Navigation, or when Wi-Fi is unavailable:
- In the Connect Bar, select the Direct Mode toggle (or select Connect BT).
- The bar displays progress: Finding robot… → Connecting… → Finishing up….
- Once connected, the bar displays You (direct) with a green status indicator.
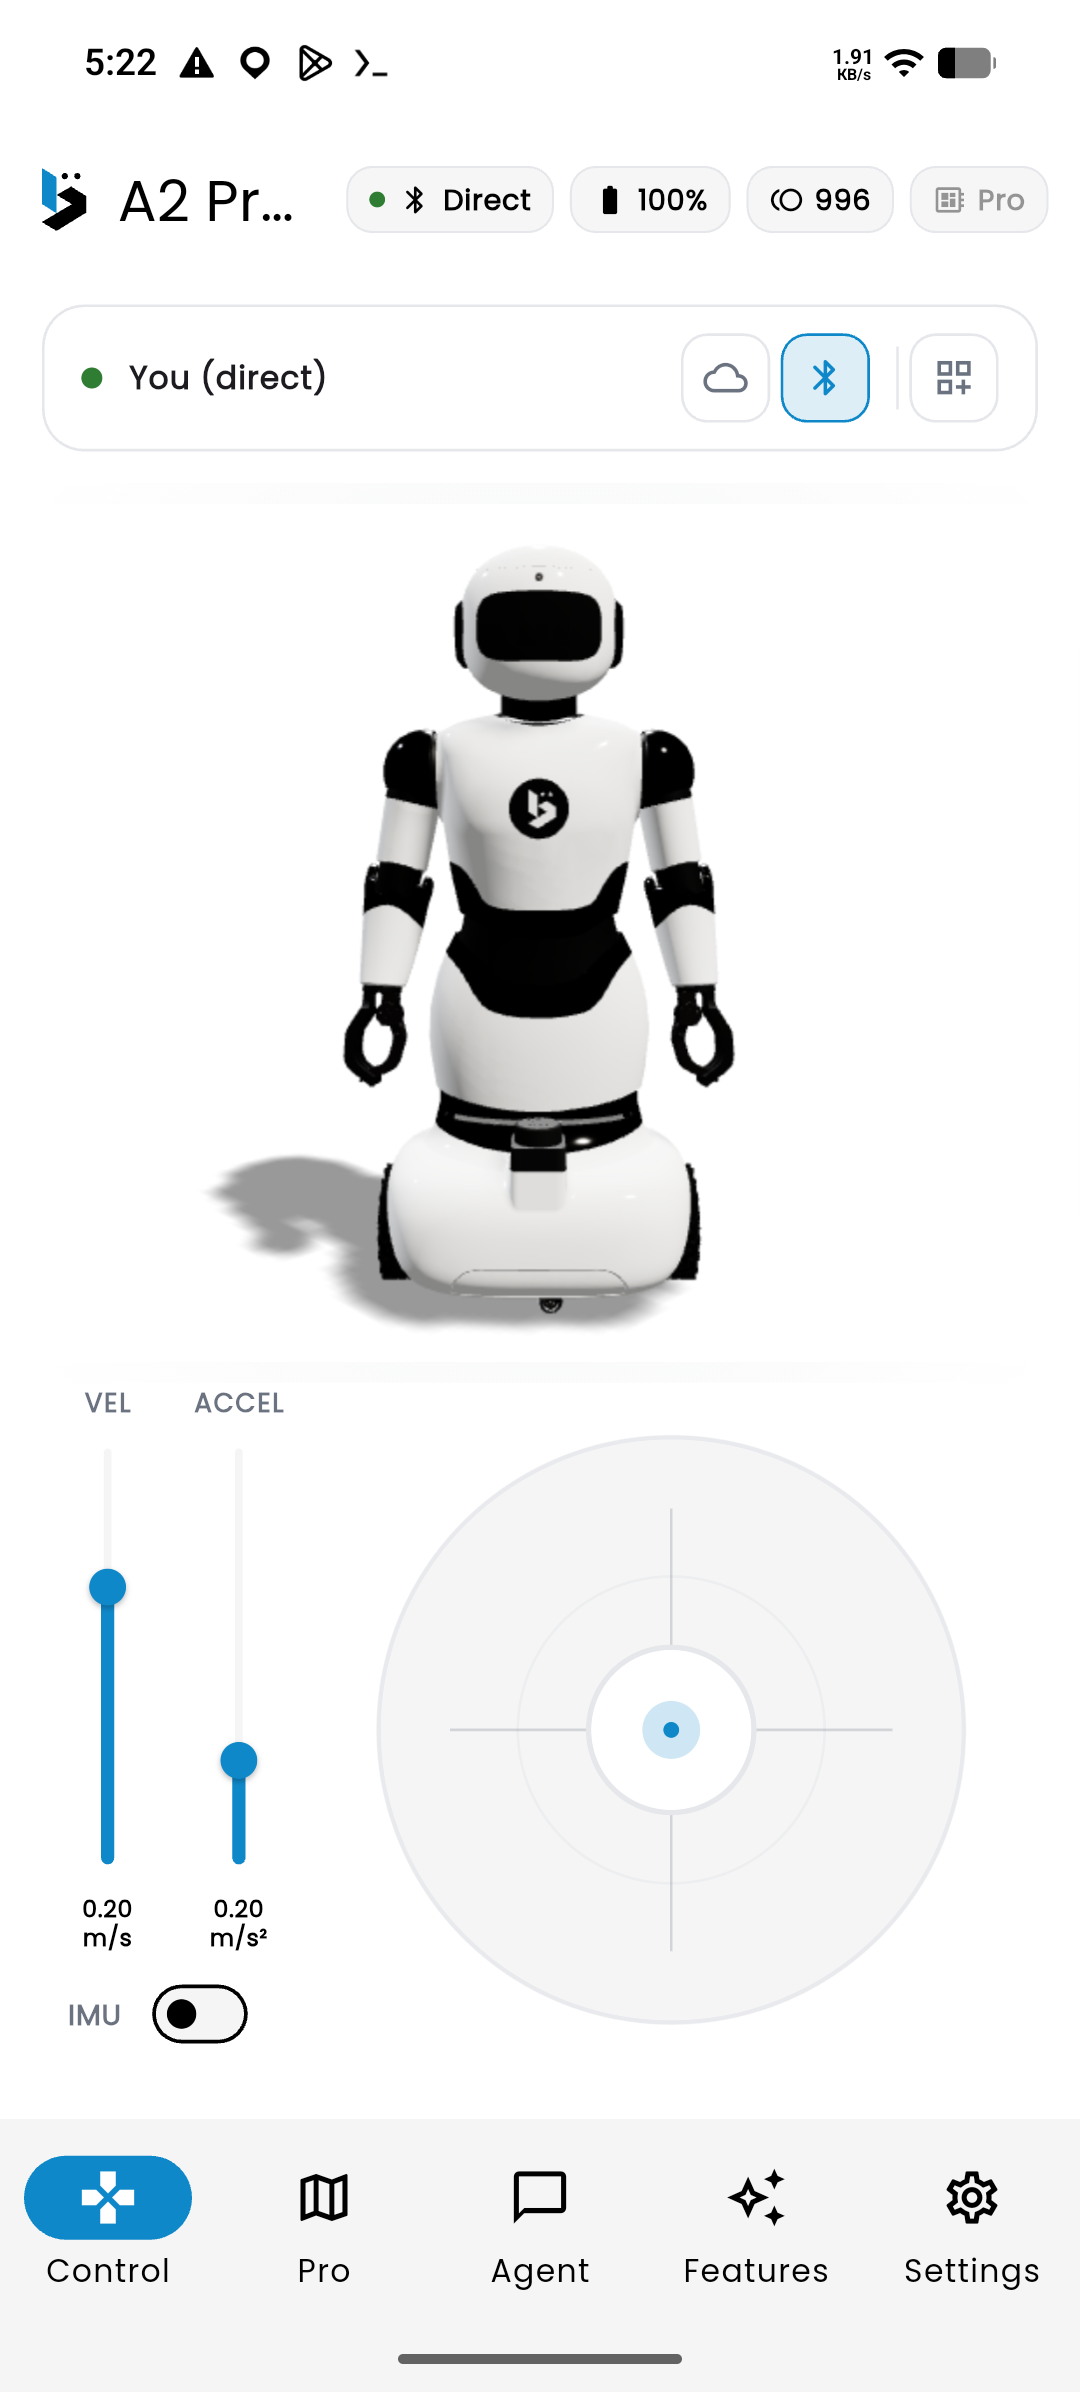
Controller App shown.
Tip: If working in an area without internet, select Force connect in the Connect Bar to link directly via Bluetooth without requiring a cloud connection.
Step 3: Drive with the virtual joystick
- Ensure the Control tab is selected from the bottom navigation bar.
- In the default Simple view, use the on-screen Virtual Joystick:
- Push forward to drive straight ahead.
- Pull backward to reverse.
- Push left or right to turn in place.
- To stop driving, simply release your finger from the joystick. The joystick automatically returns to center to bring the robot to a stop.
- You can adjust the Vel (velocity) slider on the left to set a safe maximum speed (up to
0.3 m/s).
Movement starts immediately: Unlike the BonicAI web dashboard (which uses a Sync to Robot safety toggle that defaults to off), the Controller App sends movement commands to the robot immediately whenever connected in Direct Mode or holding an active Cloud connection. There is no standby switch; moving the joystick or joint sliders moves the physical robot in real time.
Stopping and emergency halt: In the Controller App’s Advanced mode, you can select the red STOP button at the center of the directional pad to command a quick stop. Always supervise the robot while driving and maintain safe clearance from people, walls, and drop-offs.
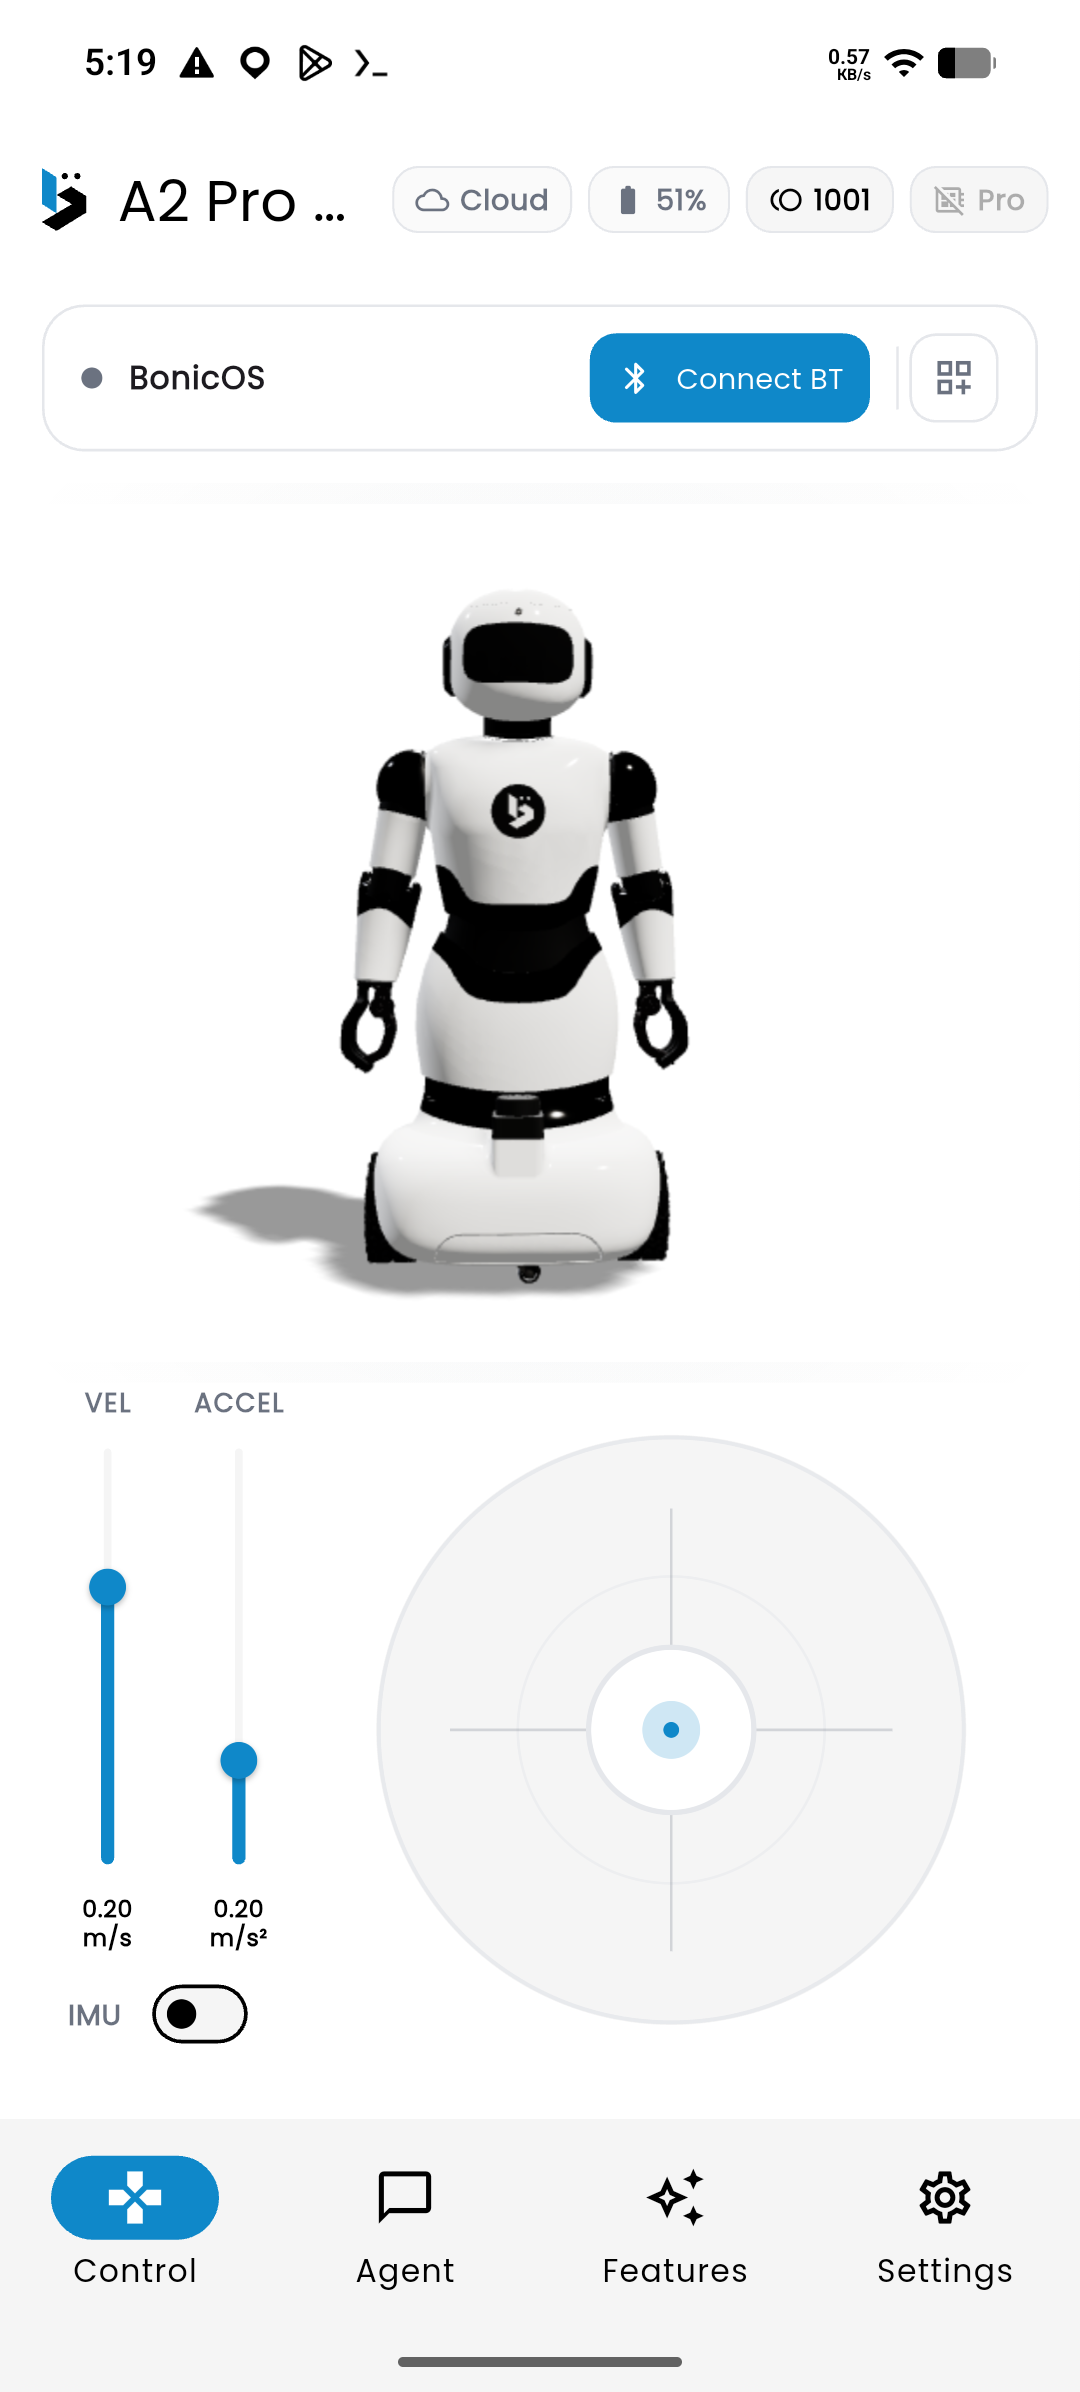
Controller App shown.
You should see: the physical robot drive and turn smoothly in response to your joystick gestures.
Move the head, arms and hands in Controller
Keep clear of the moving joints. The available joints match the hardware fitted to your selected robot.
- Open Control and establish your connection as described above.
- In Simple view, select a head or arm joint on the 3D robot model. Its angle slider replaces the base-driving controls.
- Move the slider gradually to adjust that joint. Select another joint on the model to control it.
- Select Center to command the selected joint to its centre position. Check that its path is clear first.
- Select Base to return to the driving joystick.
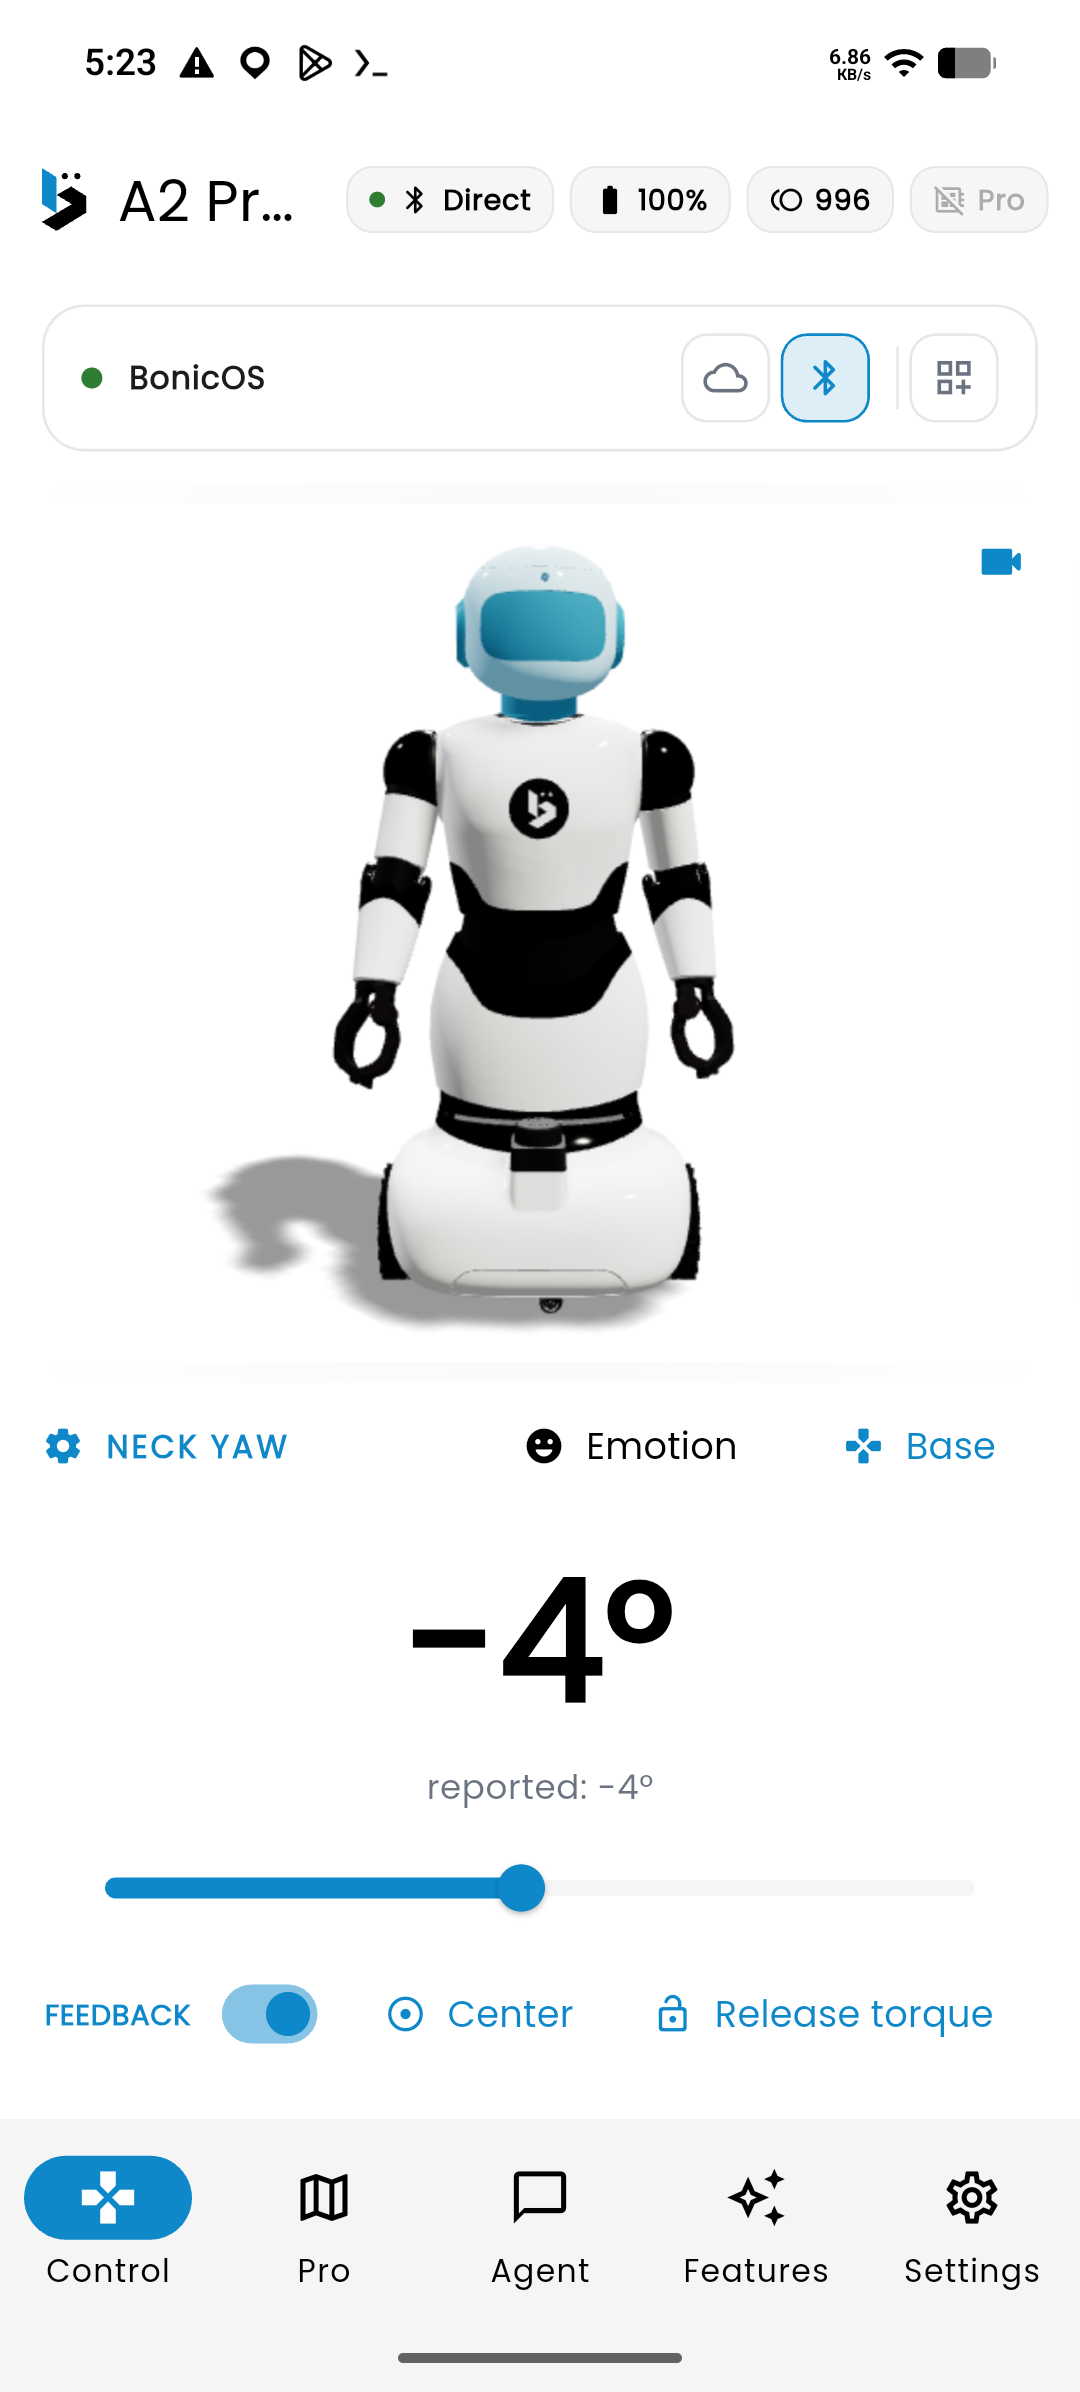
Controller App shown.
You should see: the selected joint’s angle update and the connected robot move in response.
For grouped controls, use the Switch to Advanced view button in the connection bar. Select Motion (or All) and find the ACTUATORS card, then use the RIGHT HAND, LEFT HAND, or HEAD group. Adjust the individual sliders; Speed and Acc set the movement parameters. Only fitted joints appear, so wrist and gripper controls vary by robot.
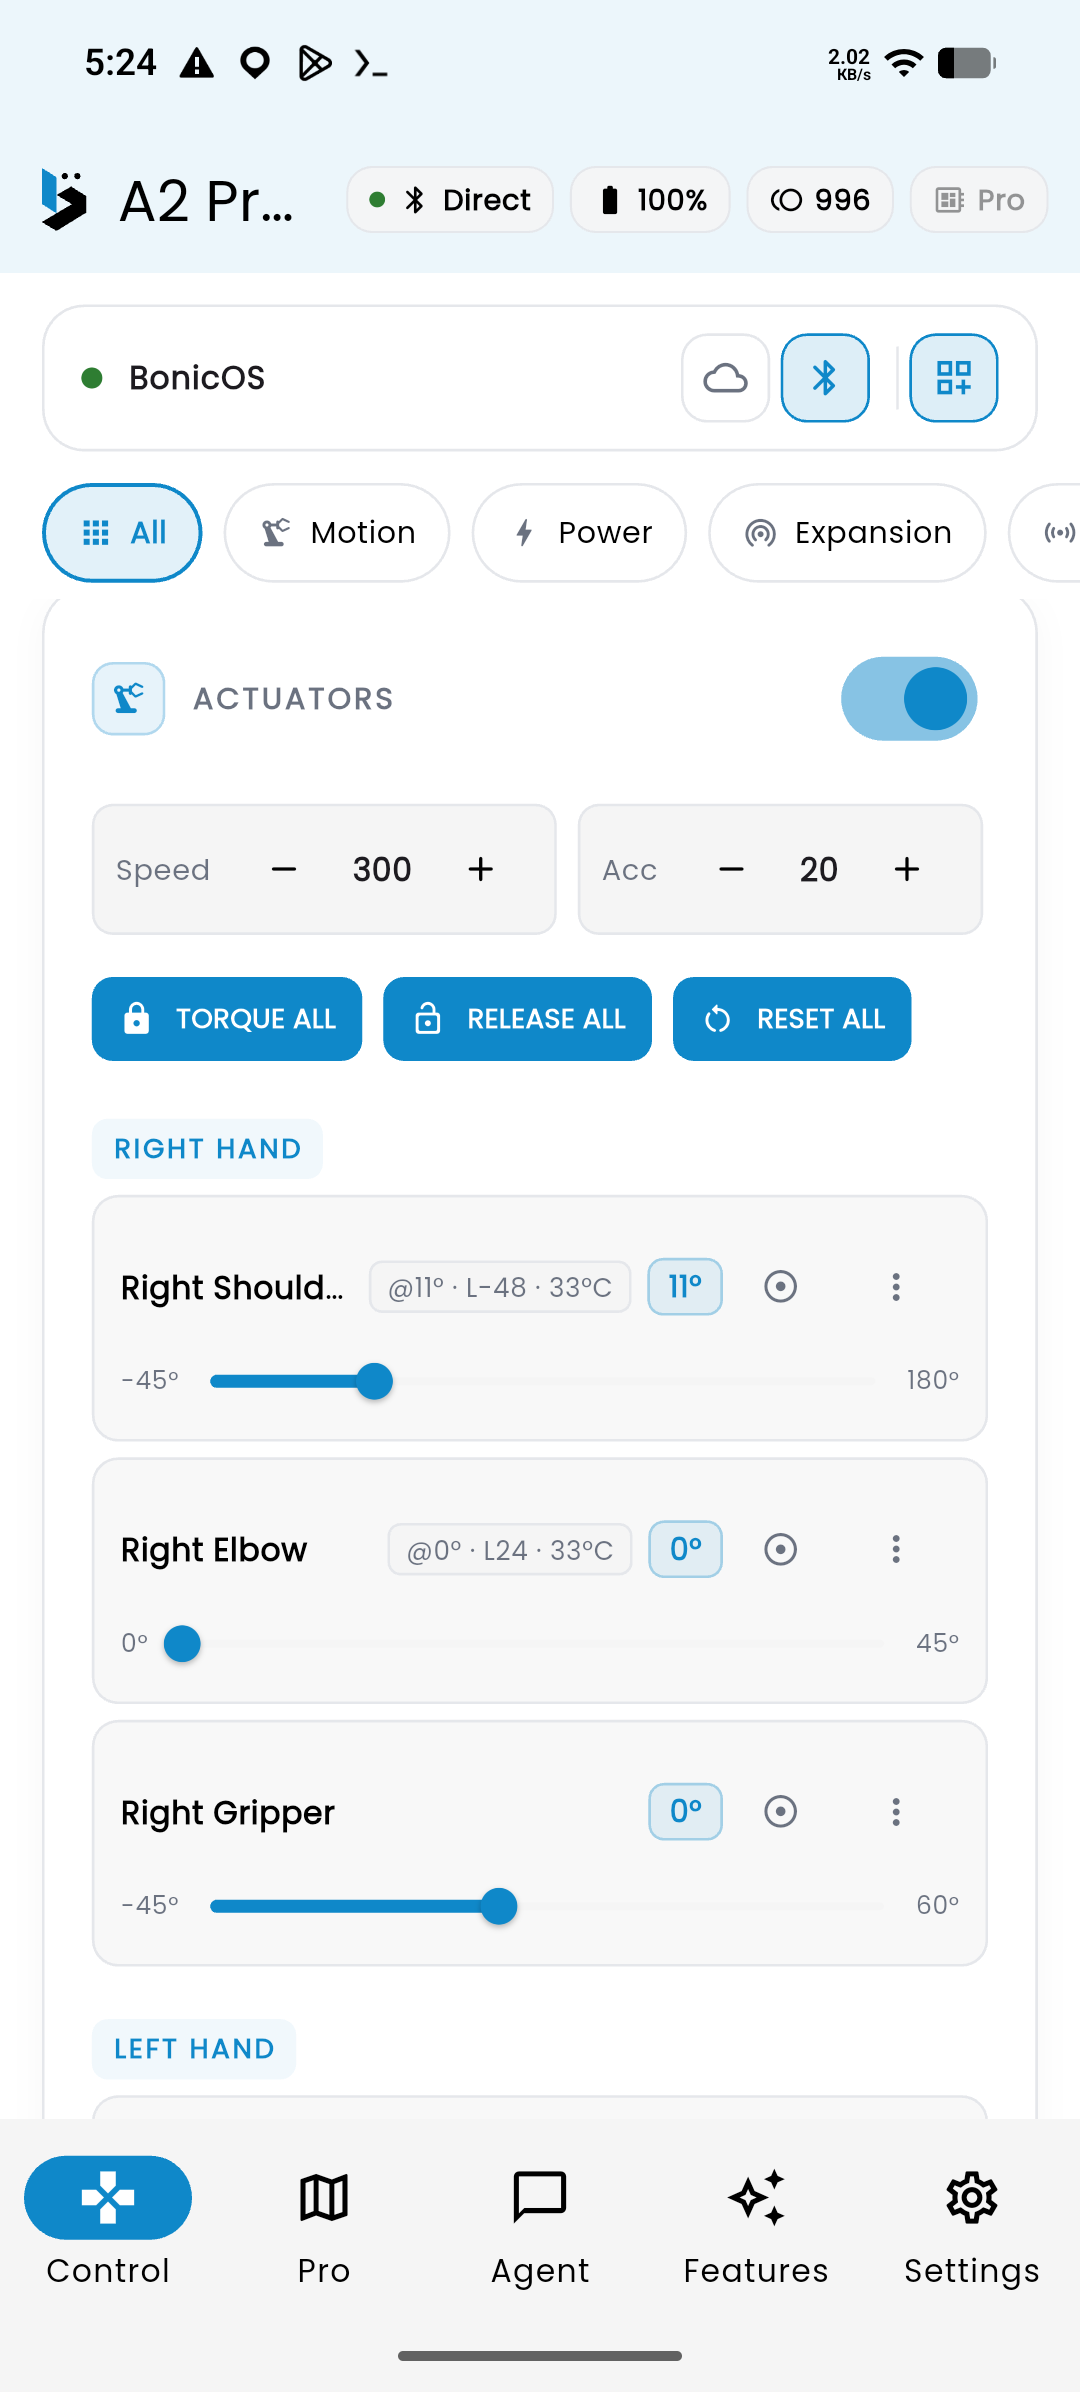
Controller App shown.
Warning: Release torque and RELEASE ALL let joints move freely. Arms can drop. These are not stop controls; support the arms before releasing them. Center and RESET ALL can cause physical movement.
Change the display in Controller
- For an A2 or S1, select a head joint in Simple view.
- Select Emotion, then choose an expression.
- Select Emotion again to return to the joint slider.
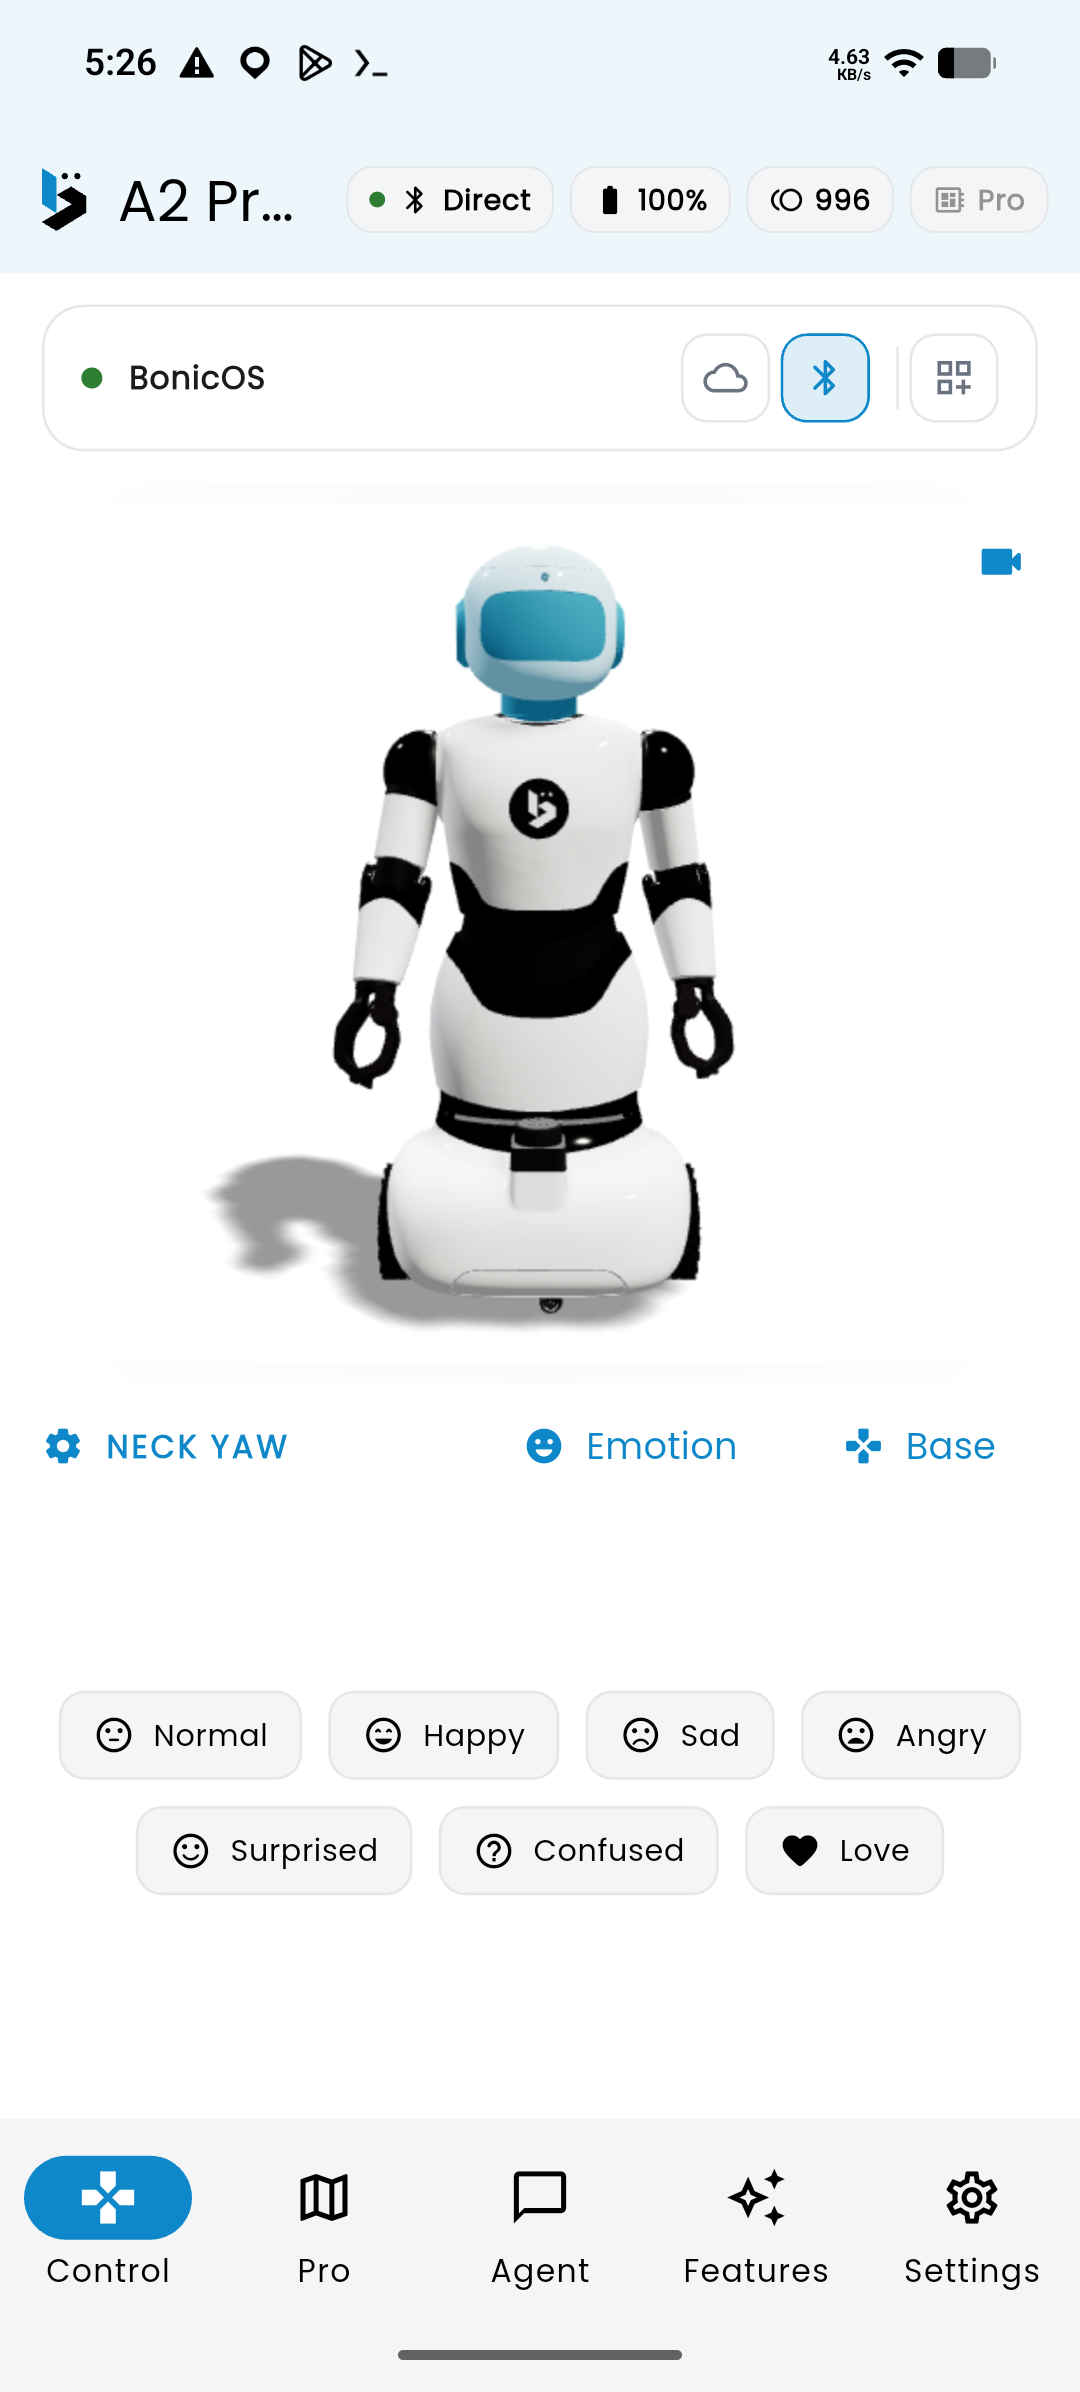
Controller App shown.
You should see: the supported head display change to the selected expression.
In Advanced view, select Sensors (or All) and find the display card. A2 shows LED MATRIX DISPLAY; S1 shows HEAD ANIMATION. Follow Display options by model for the available controls. M1 does not offer emotion controls in this interface.
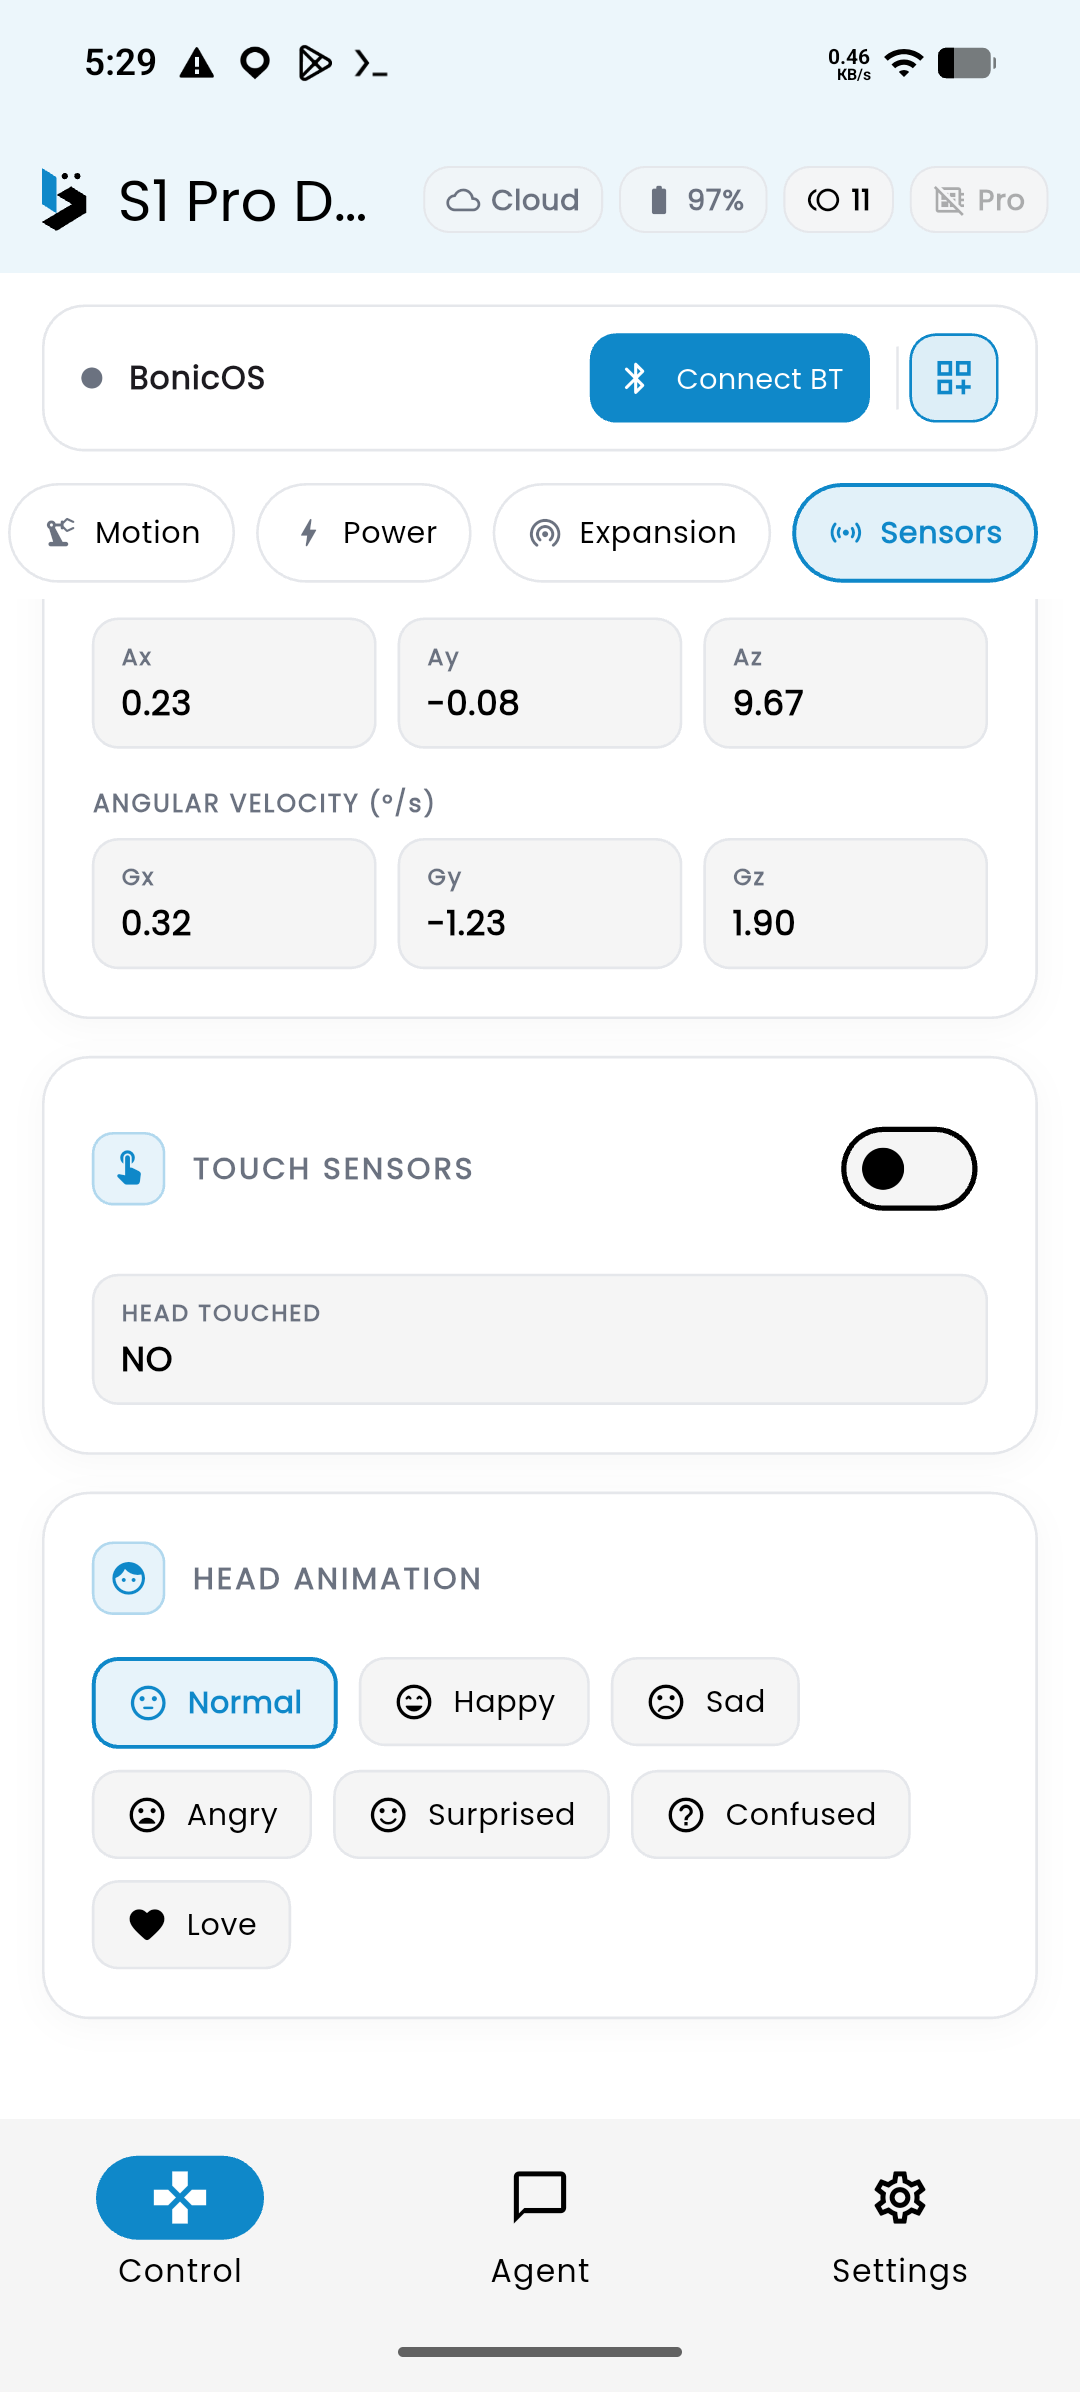
Controller App shown.
Step 4 (Optional): Speaker connections explained
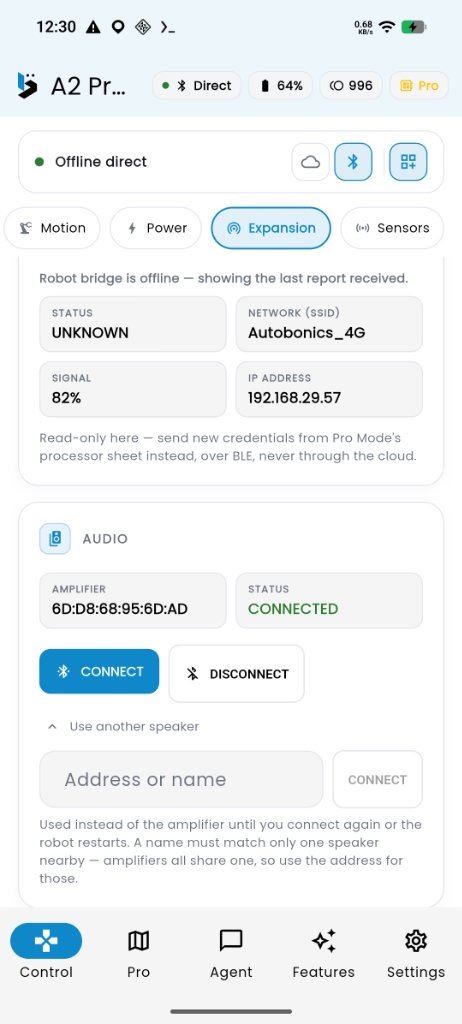
1. Controller Processor Audio Card
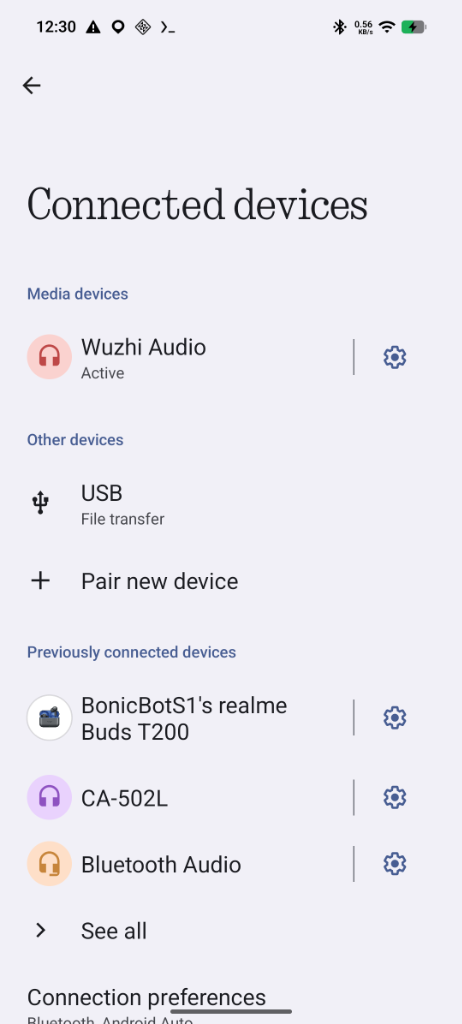
2. Phone Bluetooth Media Pairing
There are two distinct speaker connections to understand depending on what audio you are playing:
-
Managing the robot processor’s amplifier link (A-Series Pro only): On BonicBot A-Series Pro robots, the onboard processor connects directly to the robot’s internal hardware amplifier so that navigation alerts and autonomous sounds play through the robot.
- In the Controller App’s Control tab, switch to Advanced view and open the Expansion tab.
- Locate the AUDIO card. When the processor holds the audio link, its status displays green: CONNECTED.
- Crucial rule for mobile agent speech: The internal Bluetooth amplifier can only connect to one audio source at a time. When the processor is CONNECTED, the amplifier will not appear in your phone’s Android Bluetooth device list. To pair your phone for mobile agent conversation, tap DISCONNECT in this Audio card first.
-
Pairing your Android phone with the robot speaker (for mobile audio and agent speech): When using features in the Controller App where audio originates from your mobile device—such as talking to an AI agent in the Agent tab or playing music in Robot Dance—the sound streams directly from your phone:
- First, ensure the processor is disconnected from the amplifier in the Controller App (as described above).
- On your Android phone, open Settings > Connected devices > Bluetooth.
- The robot’s speaker appears in the device list as Wuzhi Audio.
- Tap Wuzhi Audio to pair and connect it as your active media output device.
- Now, when you speak with the AI agent or play dance music, the voice and sounds stream aloud through the robot’s physical speaker!
After checking your Controller connection and controls, continue to conversations. If you are switching to another interface, use the interface choices.
Method B: Driving with BonicOS (S1, M1, and A2 with add-on)
Use this method when standing directly in front of an S1, M1, or BonicOS-equipped A2 robot to perform quick position adjustments or release the wheel locks without opening the mobile app.
First-time sign-in: If this is your first time powering on the robot, sign in on the chest screen using an account with User or Admin robot access to link your robot (see First-time sign-in on BonicOS). Once linked, BonicOS remembers your robot and boots straight to the home screen on every startup.
Tip: Because the chest touchscreen is locked in kiosk mode, operators cannot access standard tablet menus. If you need to connect the robot to local Wi-Fi or configure the onboard speaker, select the Settings (gear) icon and open WiFi networks or Bluetooth speaker directly on-screen.
Driving via System Diagnosis
- On the BonicOS home screen, select the Settings icon (gear) in the top-right corner.
- Under the System Diagnostics section, select Diagnosis.
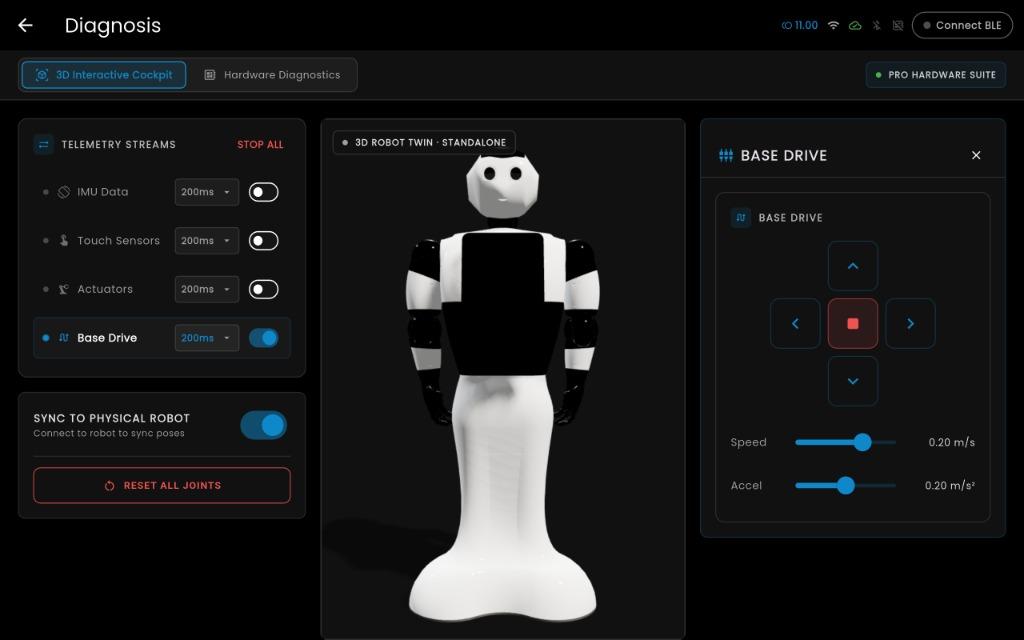
- Select the Base Drive card (or tap the robot’s base on the 3D model).
- Use the on-screen Directional Pad (D-Pad):
- Press and hold the Up Arrow to drive forward.
- Press and hold the Down Arrow to reverse.
- Press and hold the Left or Right Arrow to turn in place.
- Release your touch at any time to bring the robot to a stop.
- You can also tap the red STOP button at the center of the D-Pad to stop.
- Use the Speed slider to adjust the travel speed between
0.0and0.3 m/s.
BonicOS shown.
You should see: the physical robot’s base wheels drive smoothly in response to each directional touch press.
Move the head, arms and hands in BonicOS
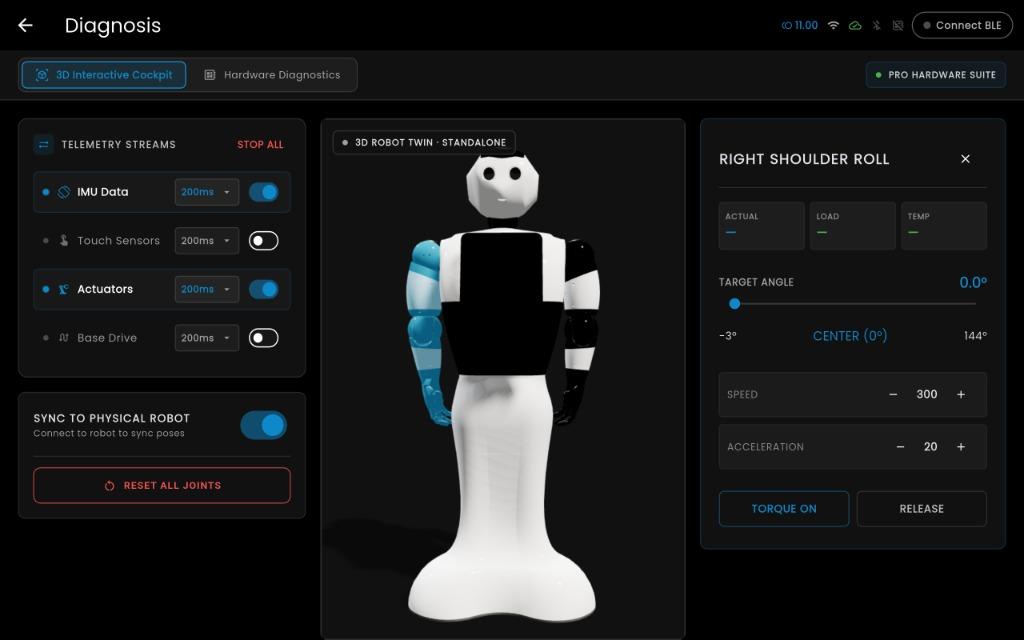
- Open Settings > Diagnosis and select 3D Interactive Cockpit.
- Under Telemetry Streams, turn on Actuators. You can also tap any joint directly on the 3D Robot Twin to select it.
- In the actuator control card (e.g., Right Shoulder Roll), adjust the Target Angle slider or tap alignment presets like Center (0°).
- Use the Speed and Acceleration controls to tune joint movement dynamics.
- Use Torque On or Release to engage or disengage servo holding power.
BonicOS shown.
You should see: the joint angle update and the connected robot’s selected joint move. Groups and sliders appear only for joints fitted to that robot.
Warning: Joint menu actions such as Set Middle and torque controls can move or release joints. Support the arms before releasing torque and keep people clear of their movement path.
Change the display in BonicOS
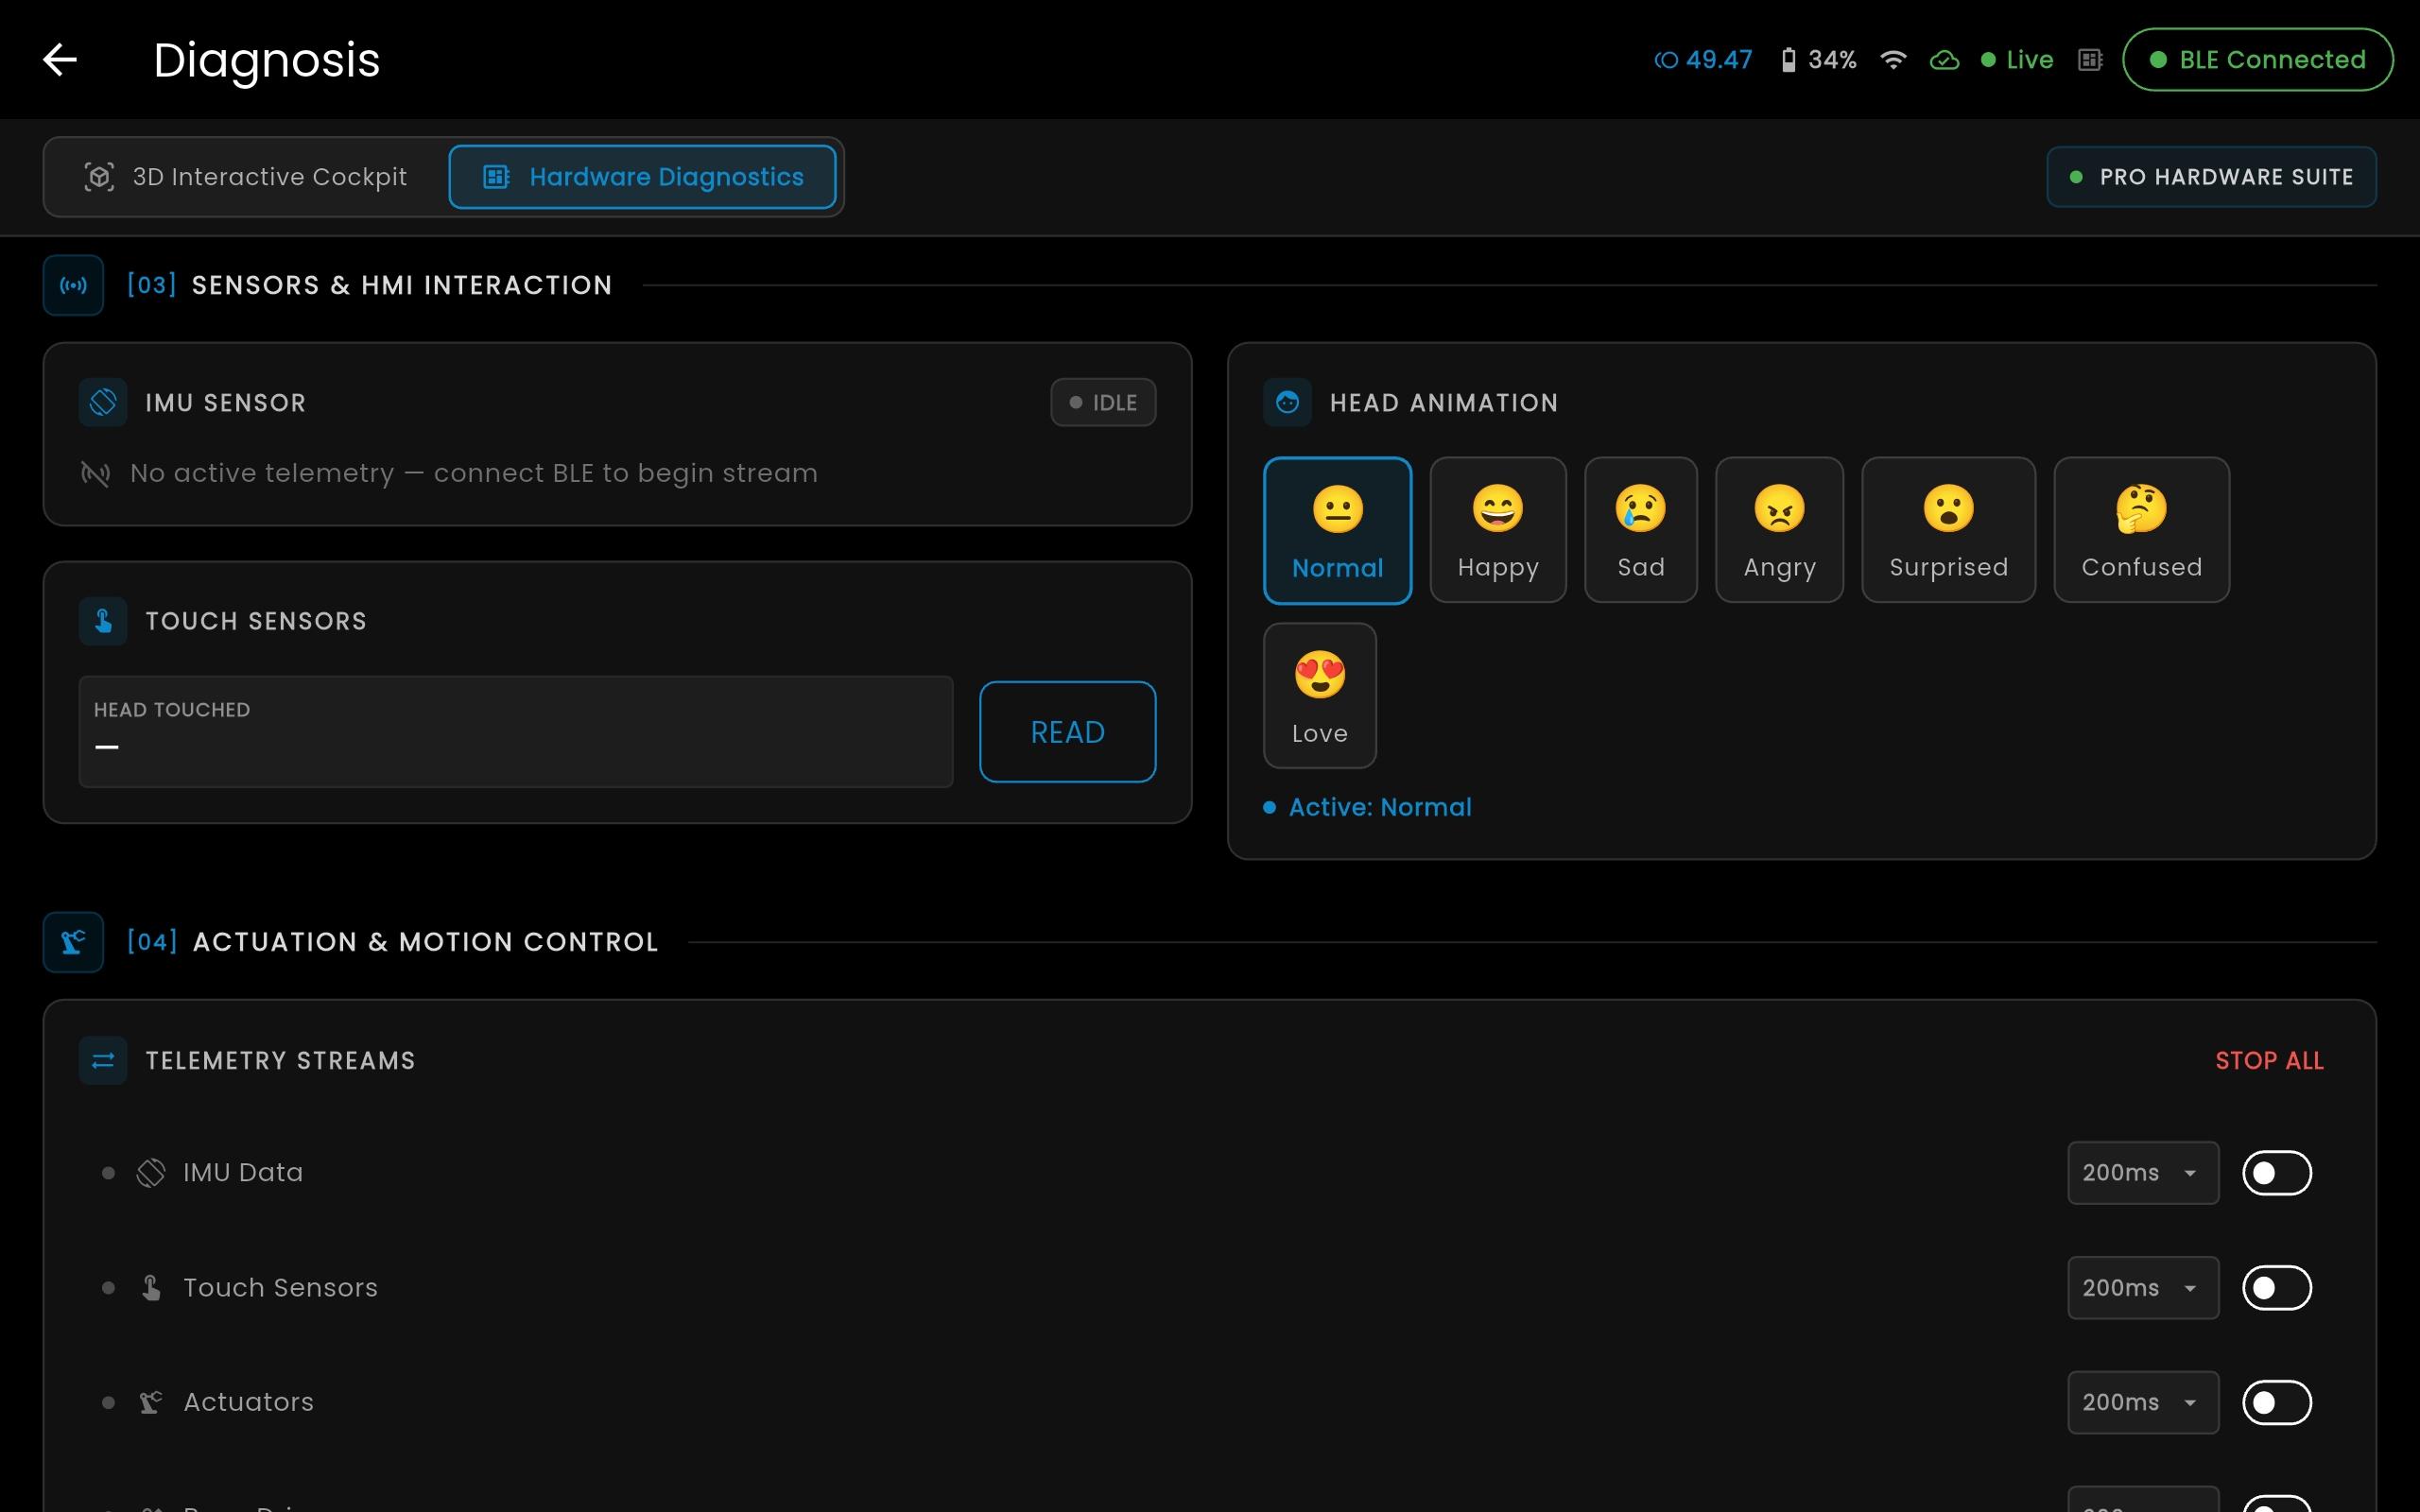
- Open Settings > Diagnosis.
- Under Sensors & HMI Interaction, open LED MATRIX DISPLAY on A2 or HEAD ANIMATION on S1.
- Select an emotion or animation preset.
BonicOS shown.
You should see: the robot’s supported head display change to your selected preset.
M1 does not offer emotion controls here. For additional A2 controls, use the options below.
Display options by model
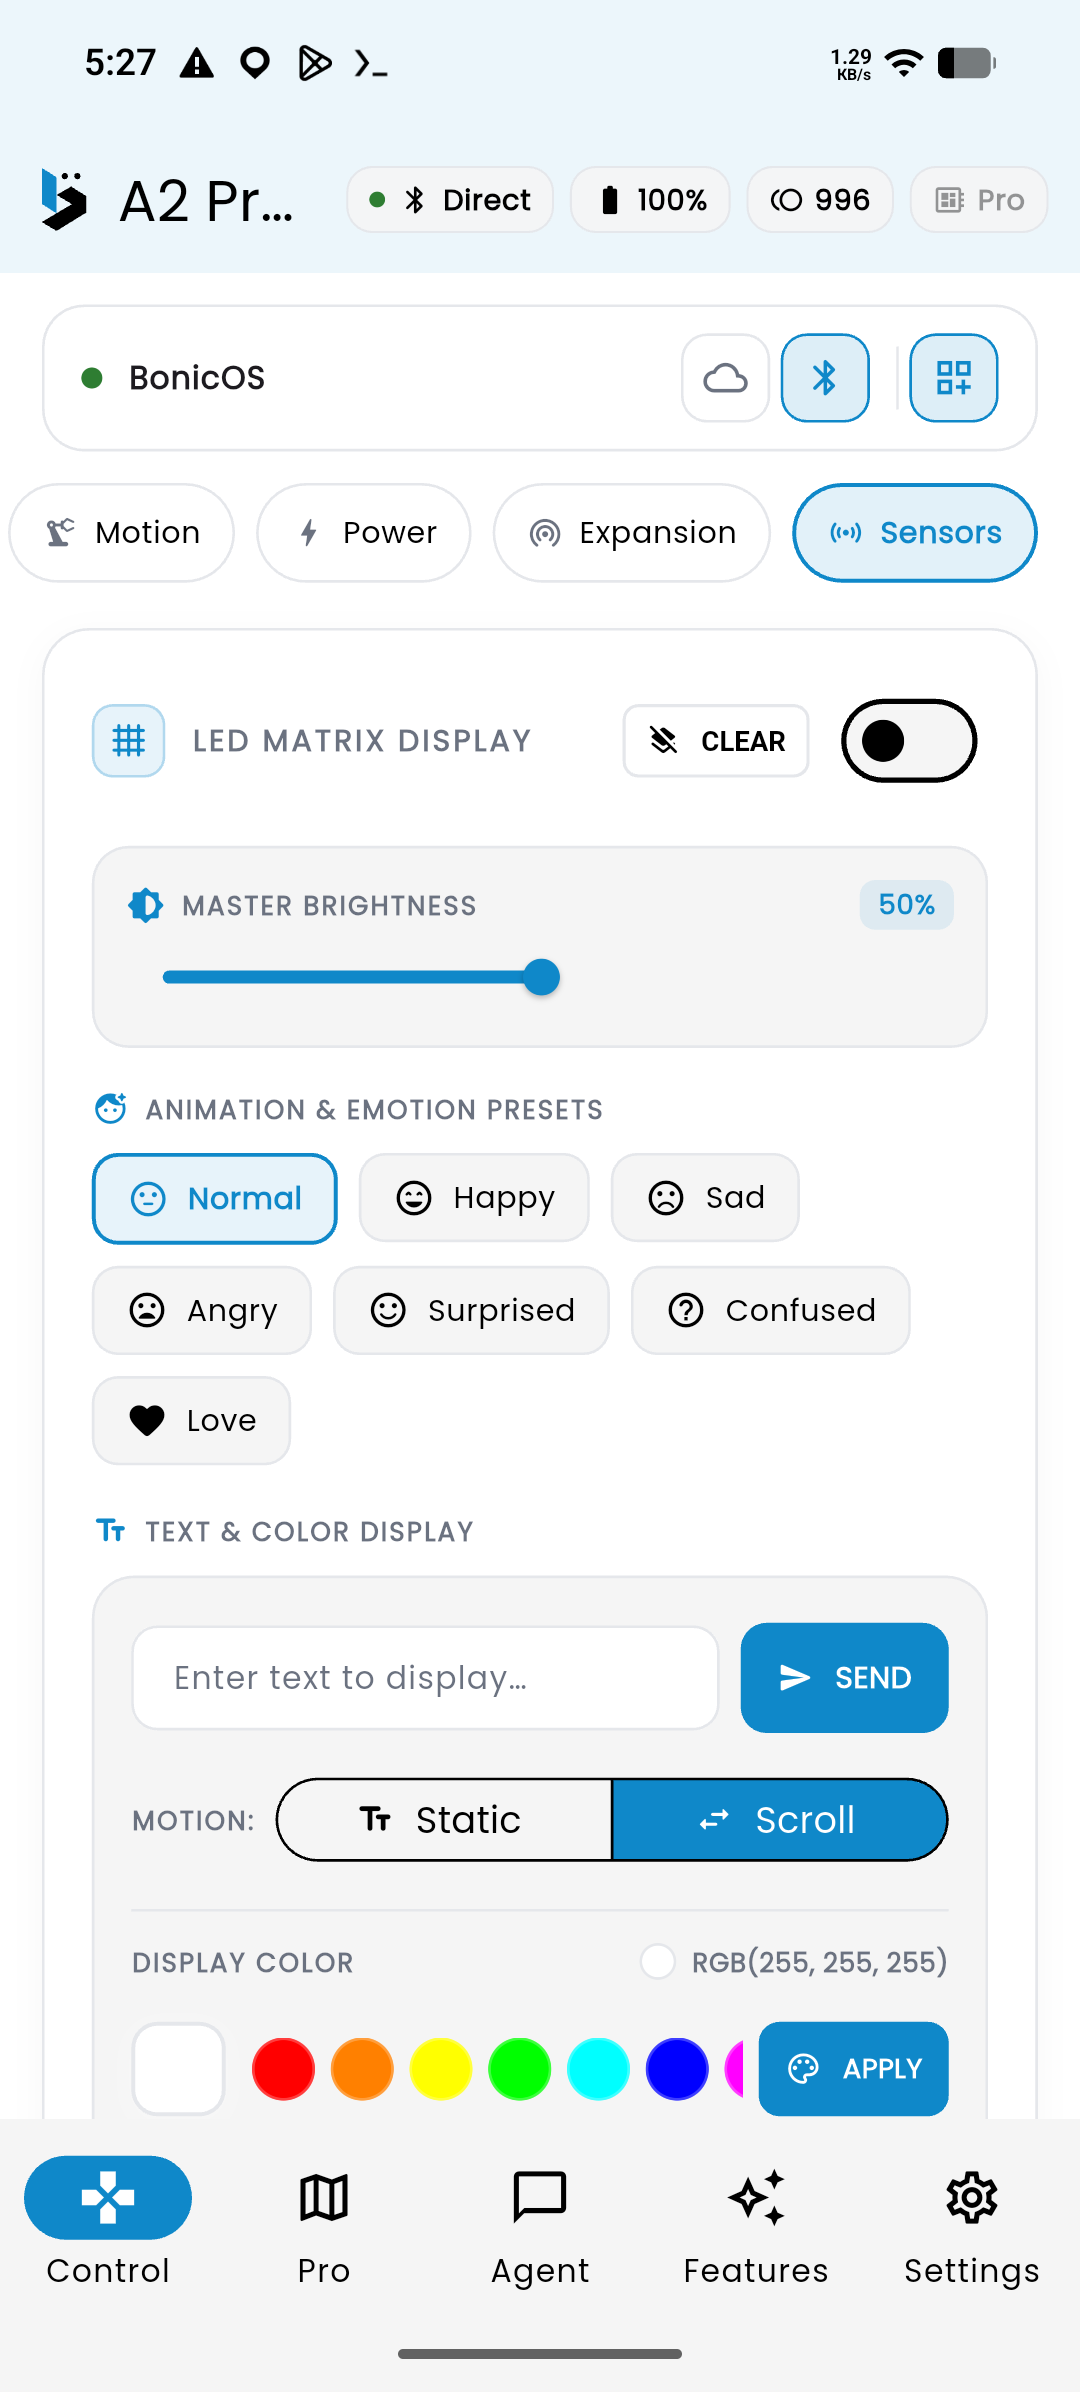
Applies to: BonicOS and the Controller App. The screenshot below shows the Controller App; open the corresponding display card in your chosen interface.
These controls affect the robot’s face display. BonicOS chest-screen brightness is adjusted separately in Settings.
| Model | Available display controls in these panels |
|---|---|
| A2 | Emotion/animation presets, matrix brightness, text and colour |
| S1 | Head animation/emotion presets |
| M1 | No emotion or full matrix-control panel |
On an A2, use LED MATRIX DISPLAY in either interface:
- Adjust MASTER BRIGHTNESS to change the face brightness.
- Under TEXT & COLOR DISPLAY, enter the text you want to display.
- Choose Static or Scroll, then select SEND.
- To change colour, adjust the colour controls and select APPLY.
- Select CLEAR at the top of the card to clear the matrix display.
Controller App shown.
You should see: the A2 face display show the text and colour you selected, with the selected text motion and brightness.
The DRAW ON THE FACE controls are covered separately in the planned Special Features documentation.
Releasing the wheel locks for manual positioning
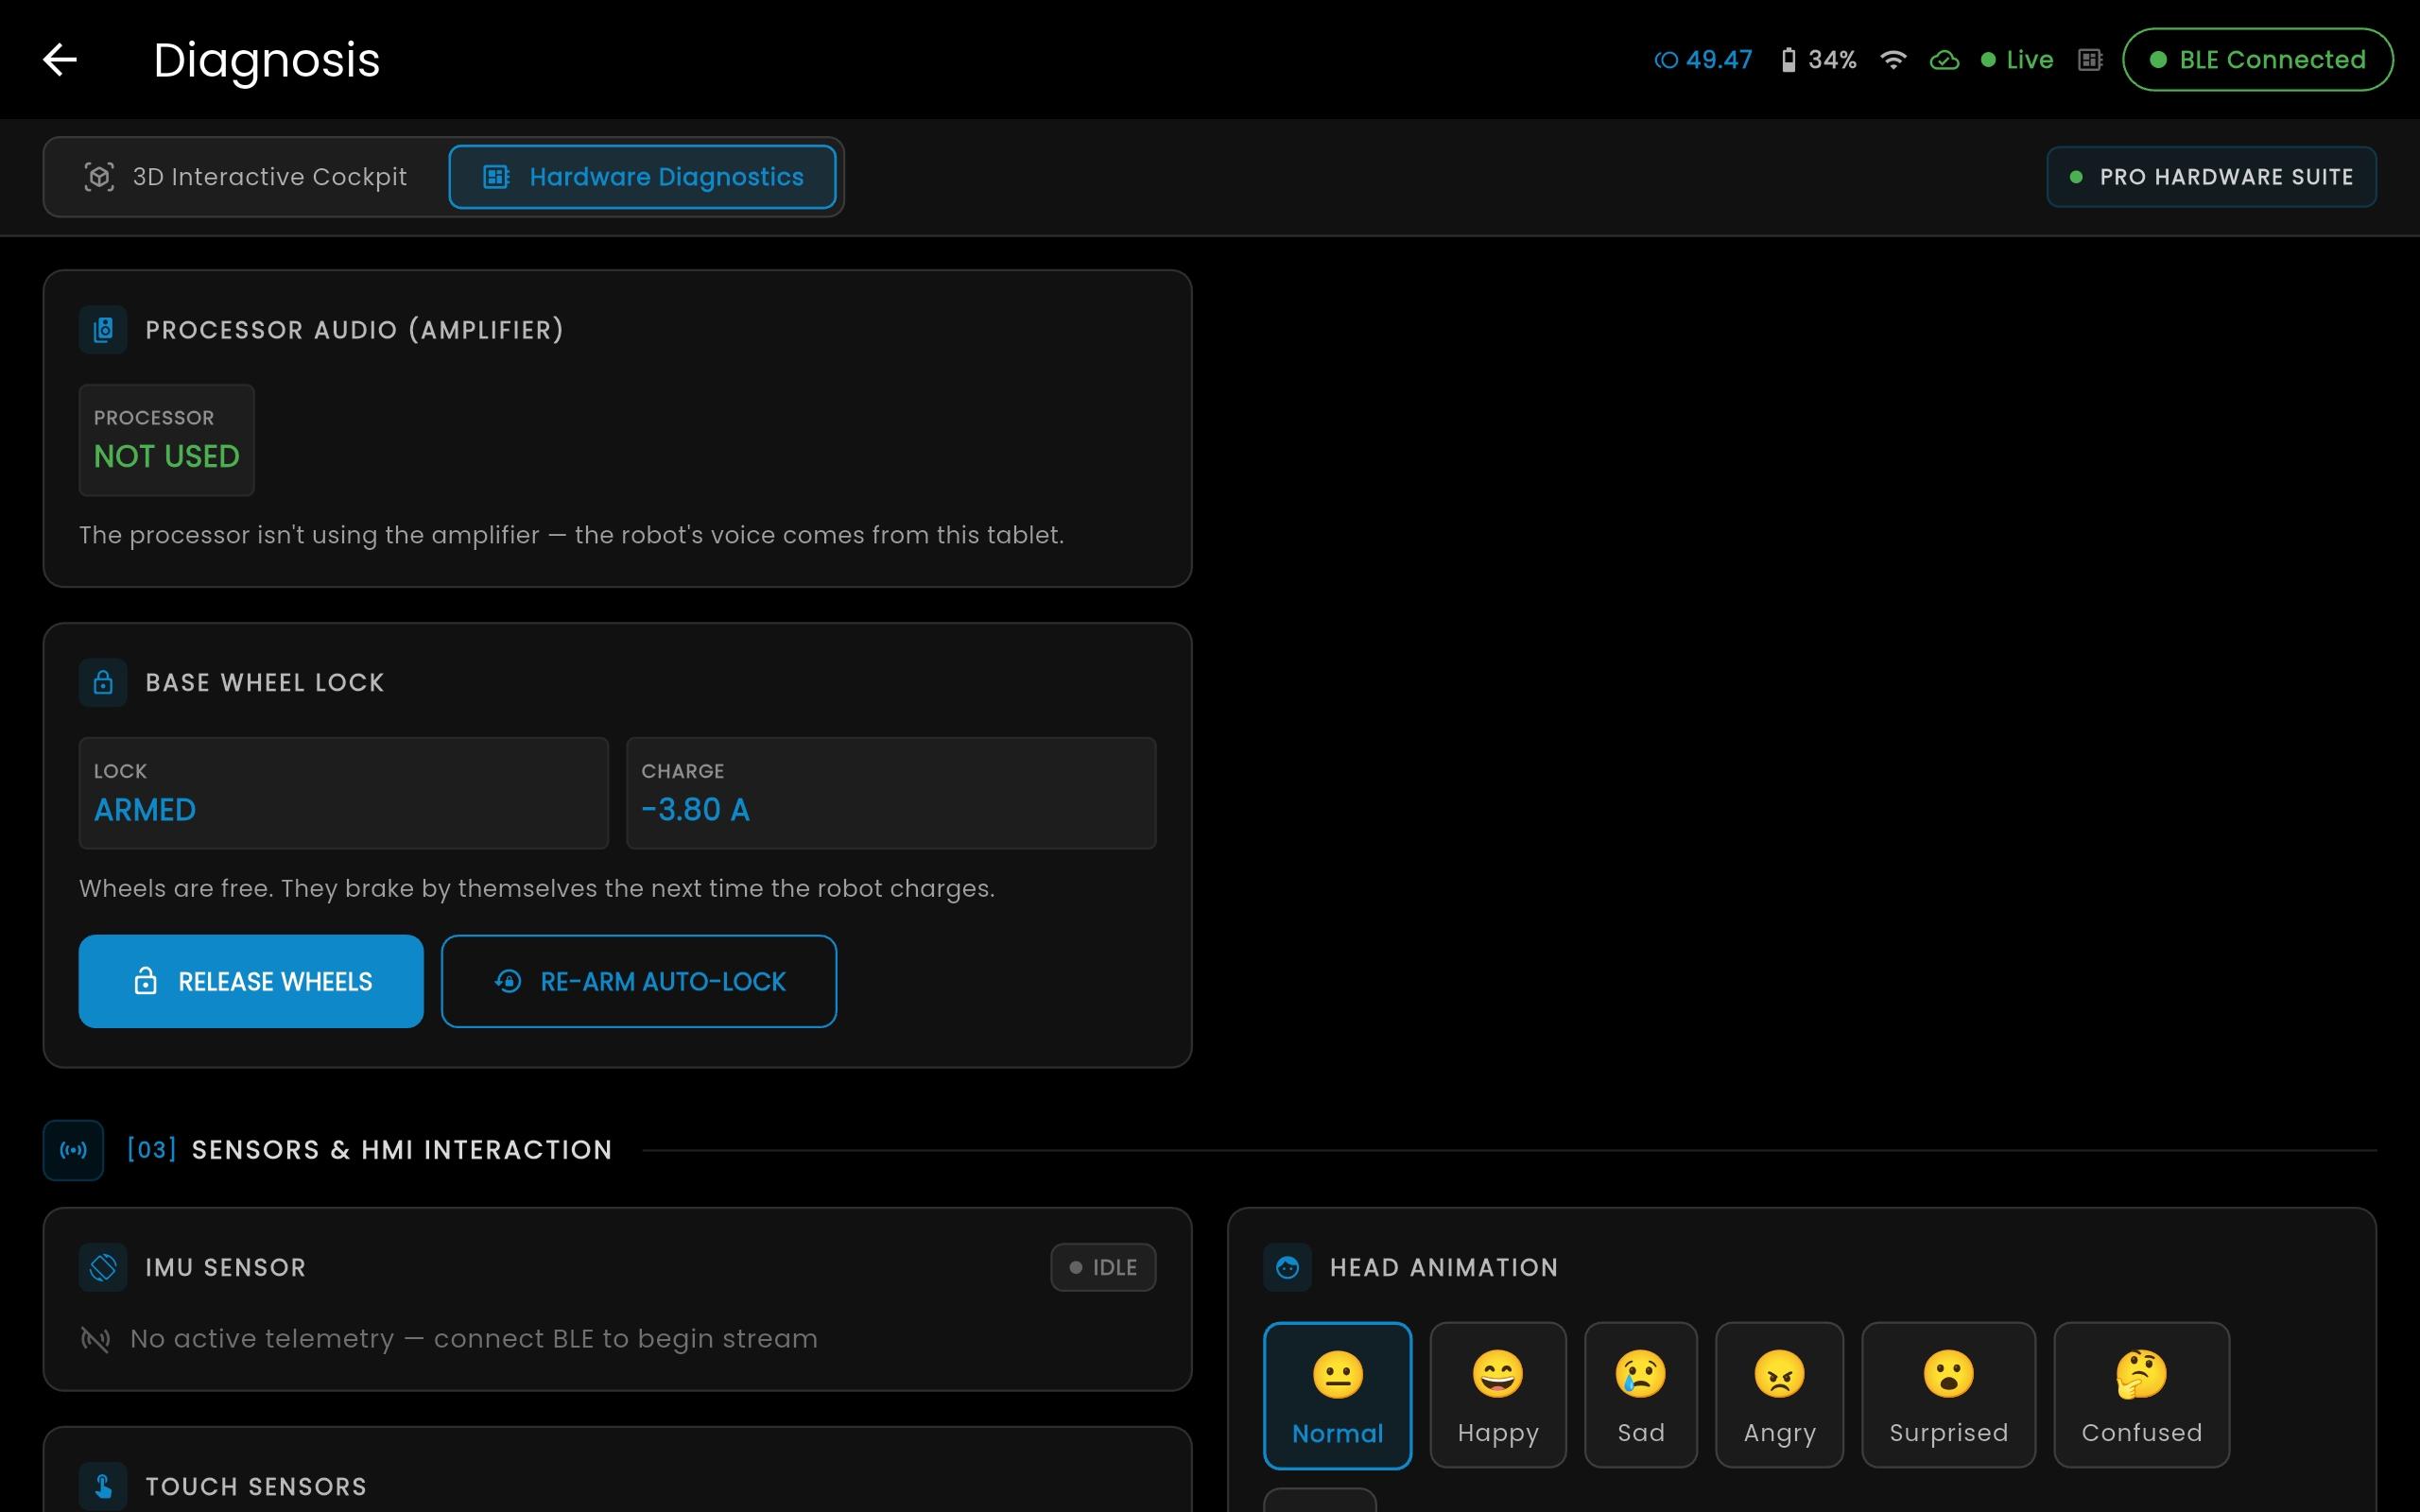
When an S1 or M1 robot is charging or docked, its motorized wheels are electronically locked in place. If you need to push or position the robot by hand:
- In the Diagnosis screen, scroll down to the Base Wheel Lock card.
- Select RELEASE WHEELS.
- Move the robot manually by hand to your desired position.
- Select RE-ARM AUTO-LOCK when finished so the wheels automatically brake the next time the robot docks or charges.
Tip (Pro Models): On S1 Pro and M1 Pro robots, you can also drive using an on-screen virtual joystick directly from the Pro Navigation map overlay on the Home screen.
BonicOS shown.
BonicOS settings
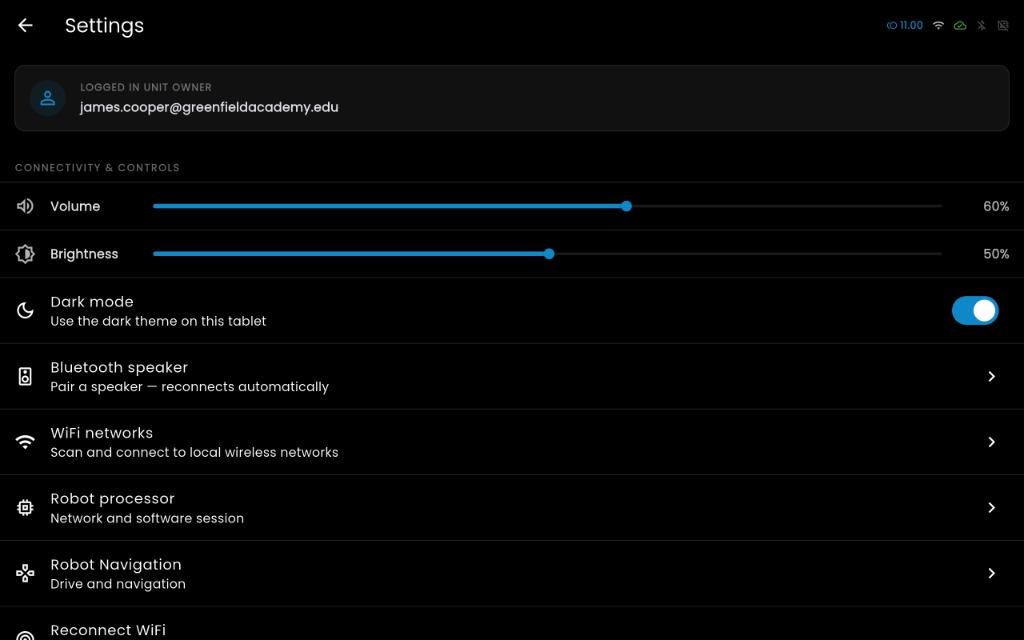
Open the Settings gear on the BonicOS home screen to adjust the chest tablet and its connections.
Adjust volume, screen brightness and theme
- Open Settings.
- Move Volume to adjust the tablet’s audio output level (shown as a percentage).
- Move Brightness, where available, to adjust the chest screen (shown as a percentage). This does not change the robot’s face display.
- Turn Dark mode on for a dark theme or off for a light theme.
BonicOS shown.
You should see: the volume, supported screen brightness and theme change as you adjust them.
Connect the chest tablet to Wi-Fi
- Open Settings > WiFi networks.
- Select your wireless network from the list.
- Enter its password if requested and select Connect.
- Check that the selected network shows as connected.
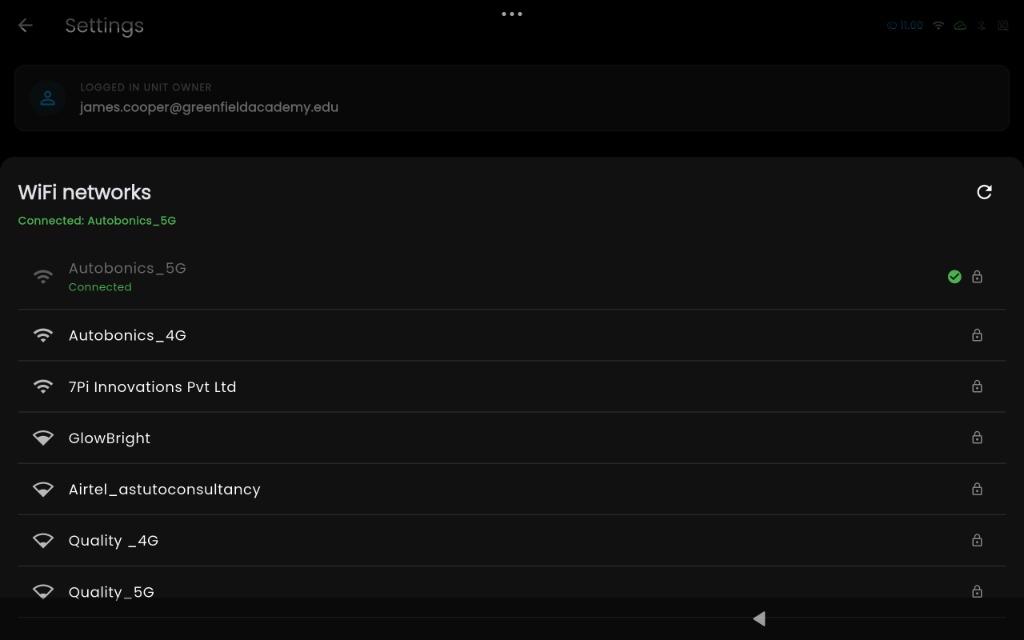
BonicOS shown.
You should see: the chest tablet connected to your chosen network with a green checkmark.
For Pro mapping, also connect the robot processor to the same network.
Pair or reconnect the robot speaker
- Open Settings > Bluetooth speaker.
- In the Bluetooth speakers sheet, find the robot’s amplifier (typically named Wuzhi Audio) under Paired or Available devices.
- Select the speaker to pair or reconnect. Paired speakers reconnect automatically whenever they are switched on.
- To unpair a speaker, tap Forget next to its name.
- Adjust Volume in Settings and test a conversation response.
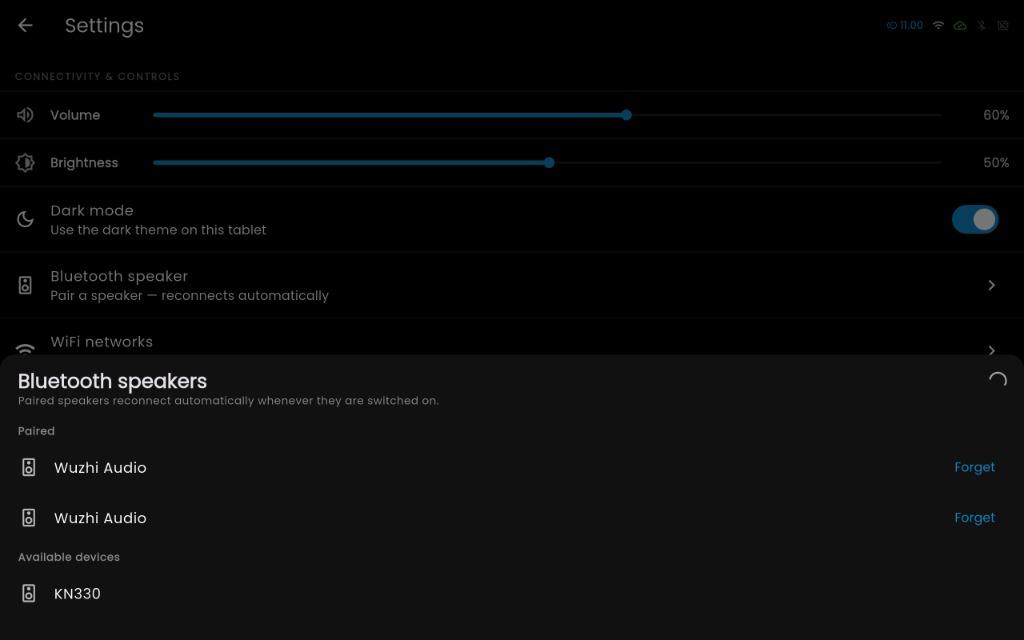
BonicOS shown.
You should see: the speaker paired and ready, with audio playing through the robot’s internal speaker.
Update robot software
Who can do this: People with Admin access to the robot
- Open Settings > Robot software.
- Review the release status. If no new release is pending, the screen displays No update found with the installed release description. Select Check again to refresh if needed.
- When an update is available, review the release details and resolve any prerequisite checks before proceeding.
- Select Update to begin installation. Keep the robot and tablet on and undisturbed until the process finishes. The app restarts automatically when the update completes.
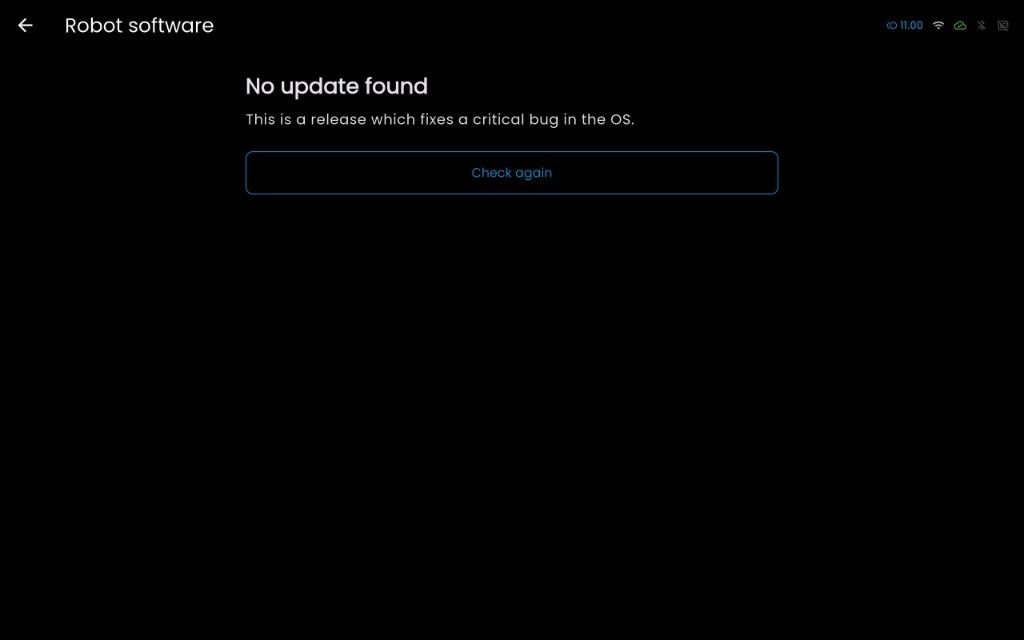
BonicOS shown.
You should see: update progress followed by the app restarting. Reopen Robot software to verify the updated release.
For everyday use, continue to conversations, or return to interface choices.
Method C: Controlling through the BonicAI Dashboard
Who can do this: People with User or Admin access to the robot
Use the web dashboard to drive the base, move the head and arms, or change facial expressions. For account setup, see Account and access setup.
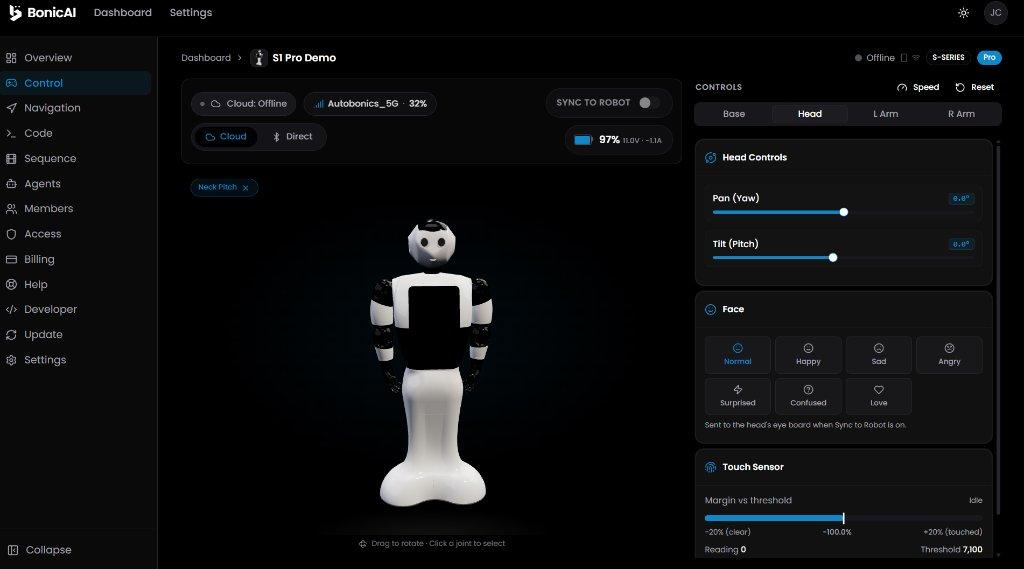
BonicAI web dashboard shown.
Open Control and connect
- Sign in to bonic.ai .
- On the Dashboard, select your robot under Your robots, then select Control in its sidebar.
- In the connection bar, choose a connection:
- Cloud: control the robot over the internet when it is online.
- Direct: connect over Bluetooth when the robot is nearby. Enable Bluetooth and use a browser that supports Web Bluetooth, such as Chrome or Edge.
- For Direct, select Connect and choose your robot from the browser’s device list.
You should see: the connection status show that the robot is connected. The page displays a 3D model and Base, Head, L Arm, and R Arm controls.
Enable physical movement
Sync to Robot is OFF by default. While off, adjustments update the 3D preview. Switching it on sends your adjustments to the physical robot.
- Check that the robot has clear space around its base, arms and head.
- Switch Sync to Robot on when you are ready to operate it.
You should see: subsequent control adjustments move the physical robot as well as the preview.
Warning: Keep people, loose items and cables clear of moving joints. Keep the robot in view while operating it.
Drive the base
- Select Base.
- Set the Speed and Acceleration sliders. Start with low settings.
- Hold an on-screen arrow button or a keyboard arrow key to drive forward, reverse or turn.
- Release the button or key to stop. You can also select the red stop button or use Space to send a stop command.
You should see: the robot drive while the direction control is held, then stop when released or when a stop command is sent.
Move the head and arms
- Select Head, L Arm, or R Arm.
- Adjust one joint slider at a time. Pan (Yaw) turns the head; Tilt (Pitch) tilts it. Arm sliders control the fitted shoulder, elbow, wrist and gripper joints.
- To adjust joint speed limits in Head, L Arm, or R Arm, select Speed above the tabs and adjust the Velocity limit slider beneath the relevant joint. These controls affect joint speed. Base-driving speed is adjusted separately using the Speed slider in Base Movement.
- Select Speed again to hide the joint speed sliders.
When Sync to Robot is enabled, changing a joint’s Velocity limit applies the speed limit immediately to the physical robot. Move the slider right to increase the speed limit or left to reduce it.
You should see: the selected joints change position in the preview and on the connected robot while Sync to Robot is on.
Reset the pose
- Check that there is room for the head and arms to move.
- Select Reset above the joint tabs to return the head and arm joints to their reset pose. Reset does not affect the base wheels.
You should see: the 3D preview return to its starting pose. When Sync to Robot is enabled, Reset also resets the physical robot, so keep its movement path clear.
Change the facial expression
- Select Head and find the Face card.
- Select an expression, such as Normal, Happy, or Surprised.
You should see: the robot’s eye display change expression while Sync to Robot is on.
If web controls do not respond
- If the status is Offline, check power and the selected connection before retrying.
- If only the preview moves, check the connection and Sync to Robot.
- If Direct pairing fails, check Bluetooth and the browser’s permission to access the robot. Avoid sending further movement commands until the connection is restored.
If pairing still fails, see Reset a saved BonicAI browser Bluetooth pairing. Settings is Admin-only; if you have User access, ask a robot Admin for help with your browser’s saved pairing.
Essential robot settings in BonicAI
Who can do this: People with Admin access to the robot
These are the selected robot’s Settings in BonicAI, separate from your personal account settings and the BonicOS on-screen Settings menu.
Change the robot’s display details
- In BonicAI, open your robot and select Settings.
- Under Robot Settings, edit Name or Description. If needed, select the logo upload area to choose a robot logo.
- Select Save Changes. The button becomes available after a field changes.
You should see: the updated robot details in the dashboard. This changes the robot’s display details, not organisation-wide branding.
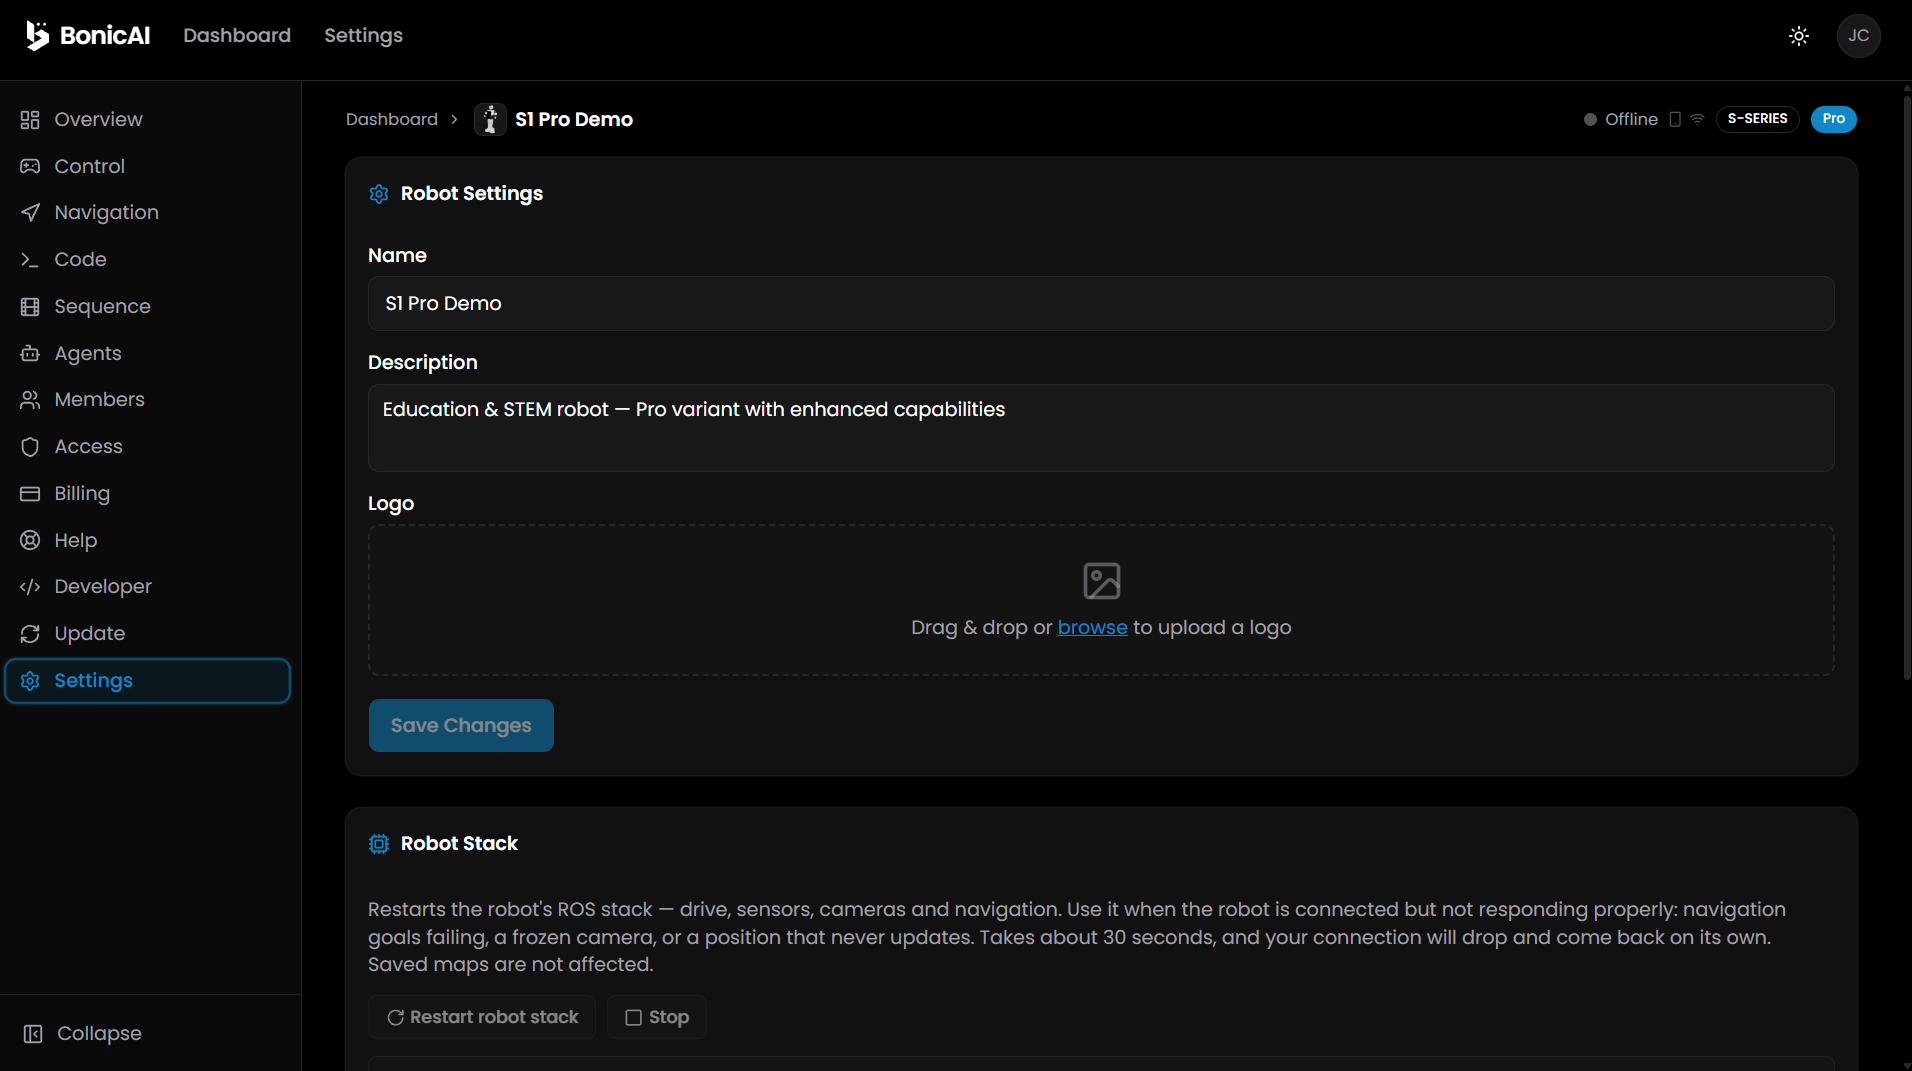
Send Wi-Fi details from BonicAI
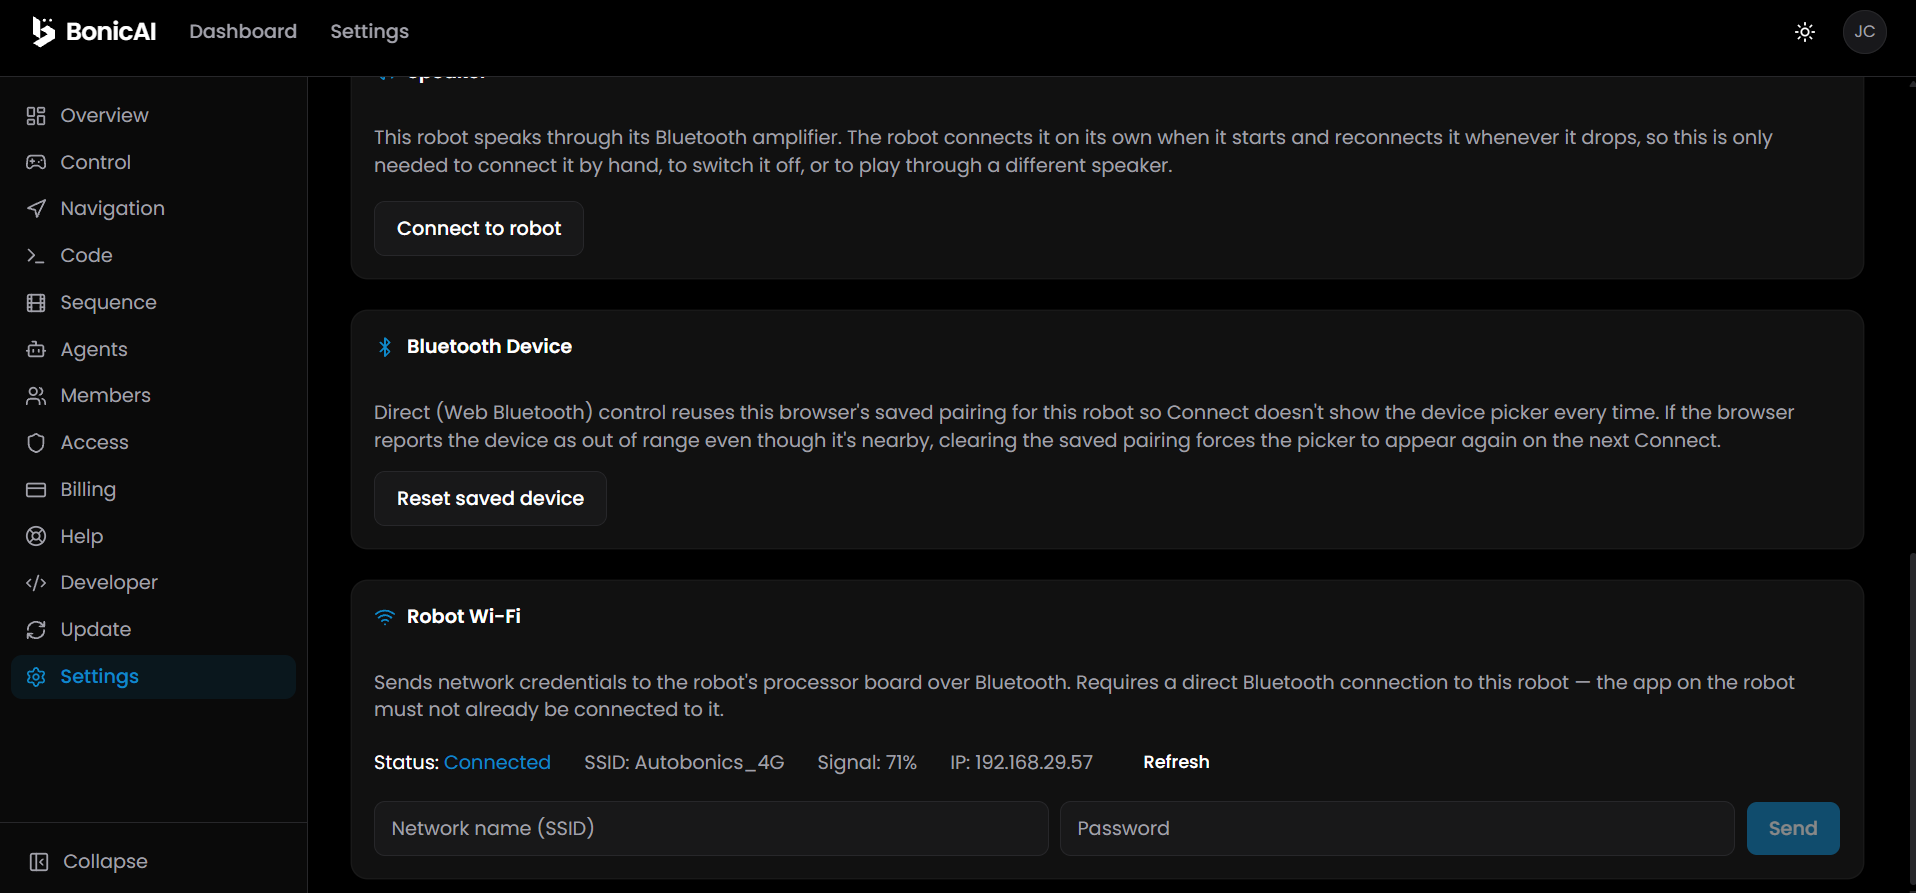
Before you begin: Power on the robot, enable Bluetooth on your computer and keep it nearby. Use a browser with Web Bluetooth support, such as Chrome or Edge. Disconnect another app’s active robot Bluetooth connection if it prevents pairing.
- In the robot’s Settings, find Robot Wi-Fi.
- Select Connect via Bluetooth and choose your robot in the browser’s pairing prompt.
- Enter the Wi-Fi network name in Network name (SSID) and its password in Password.
- Select Send and check the robot’s reported connection status. Use Refresh to request an updated status if needed.
You should see: the robot report Online after joining successfully. For Pro navigation, also complete the separate processor network setup; the dashboard’s online status alone does not establish navigation readiness.
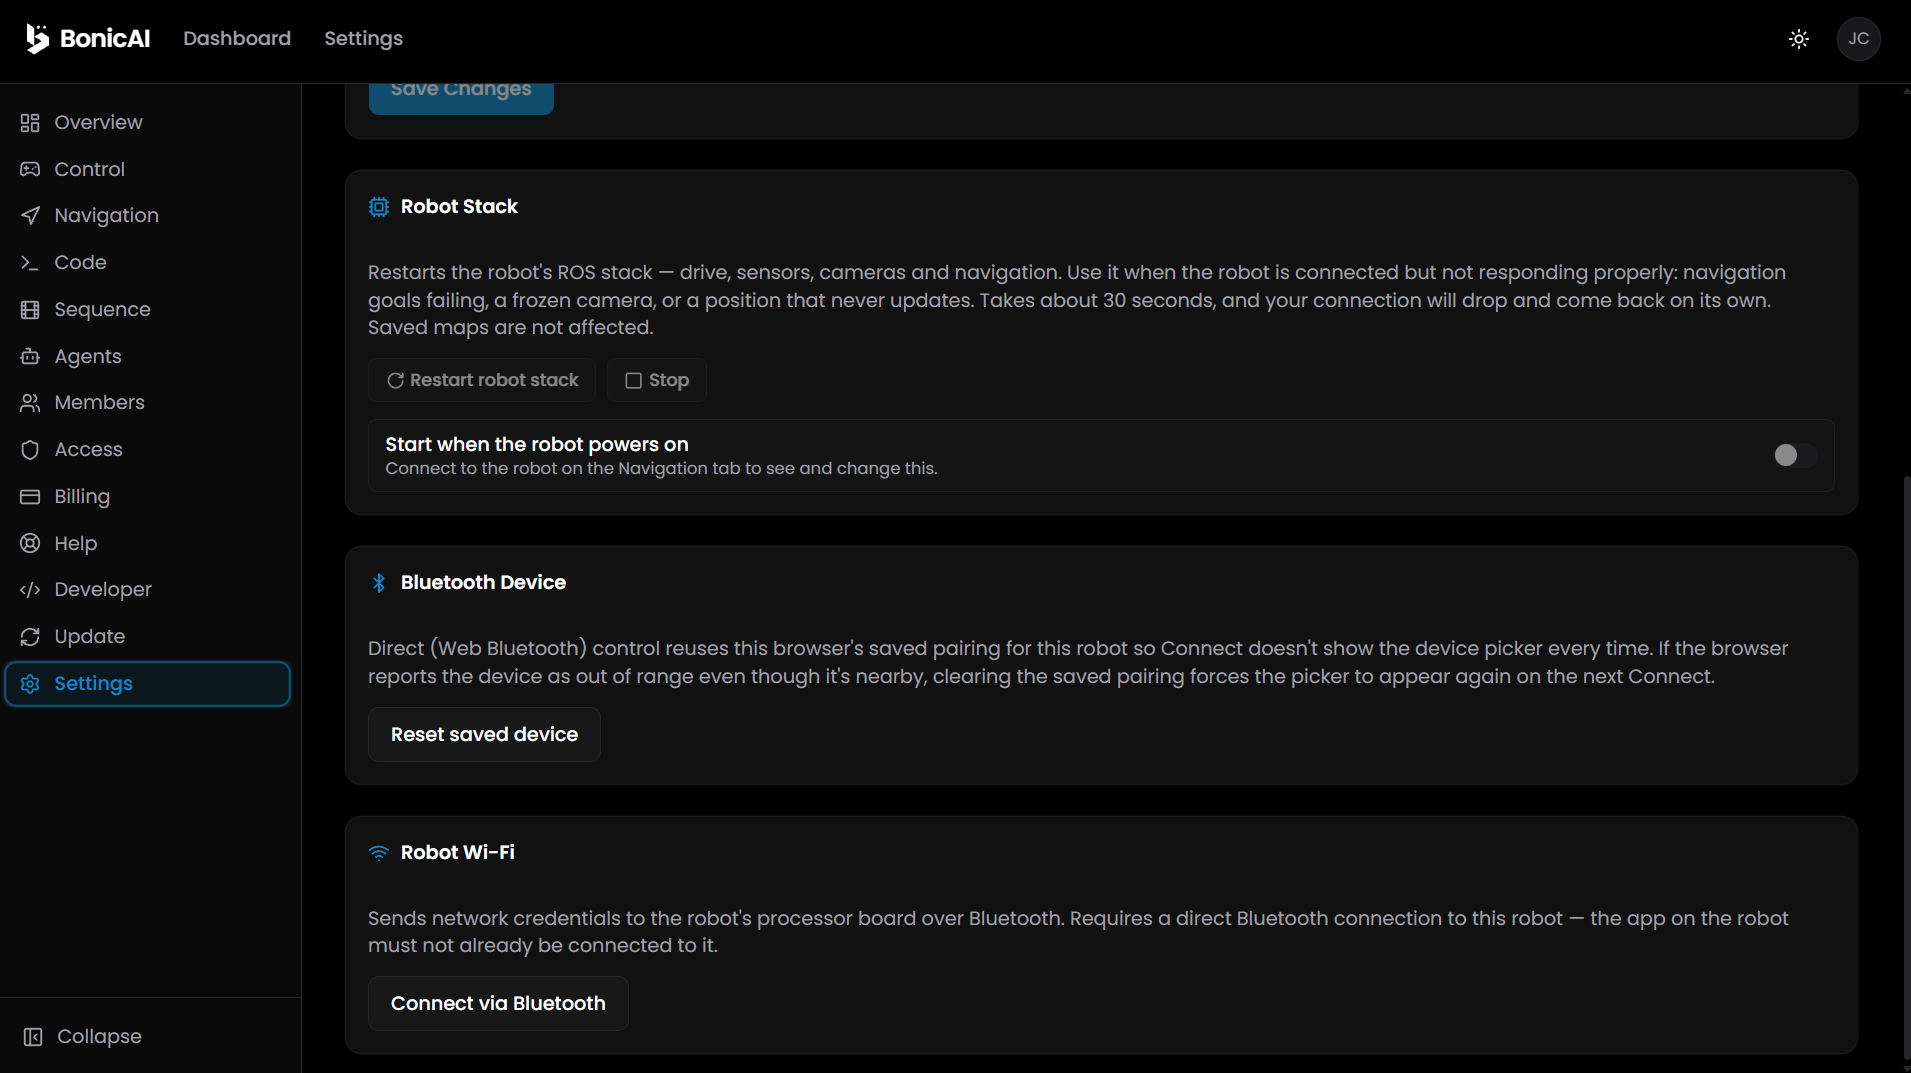
Pro robot software controls
The Robot Stack section appears on Pro models. For normal startup, use Launch the robot software. Restart robot stack and Stop affect navigation services; stop travel before using maintenance controls.
To configure Start when the robot powers on, first connect through BonicAI Navigation, then return to Settings. Check the displayed software status before navigating.
Check updates in BonicAI
Who can do this: People with Admin access to the robot
For updates directly on the chest screen, use Update robot software. The web dashboard provides a separate Update page.
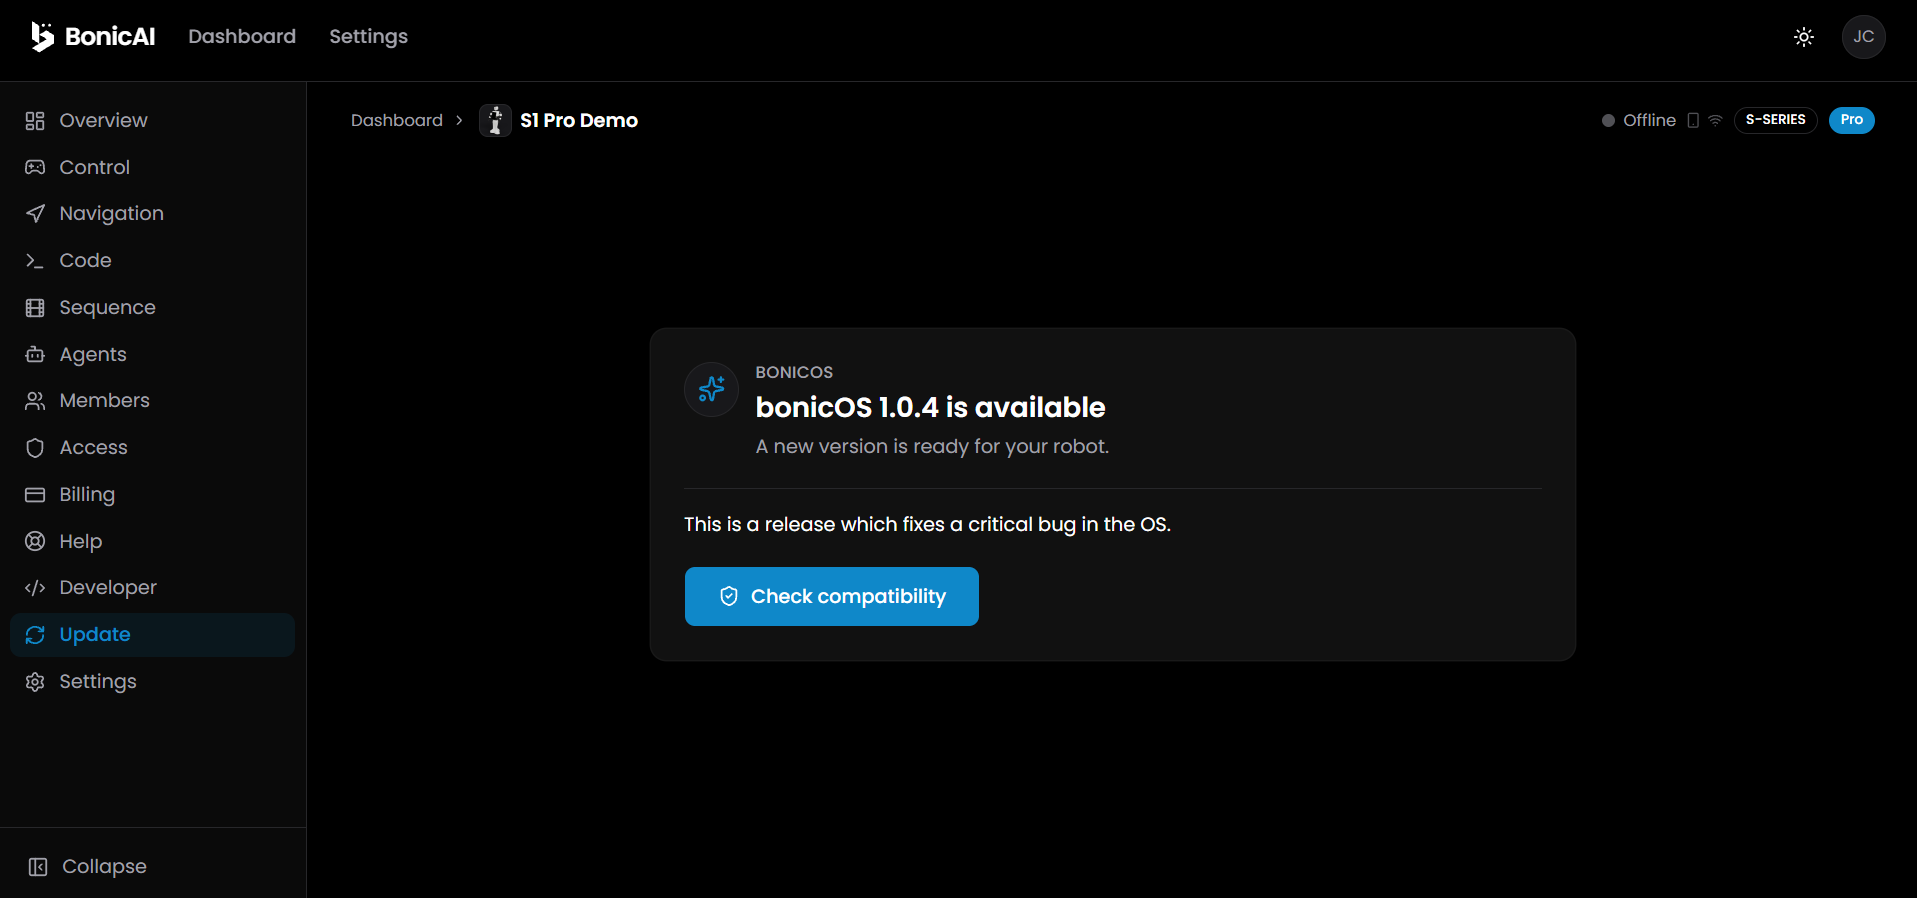
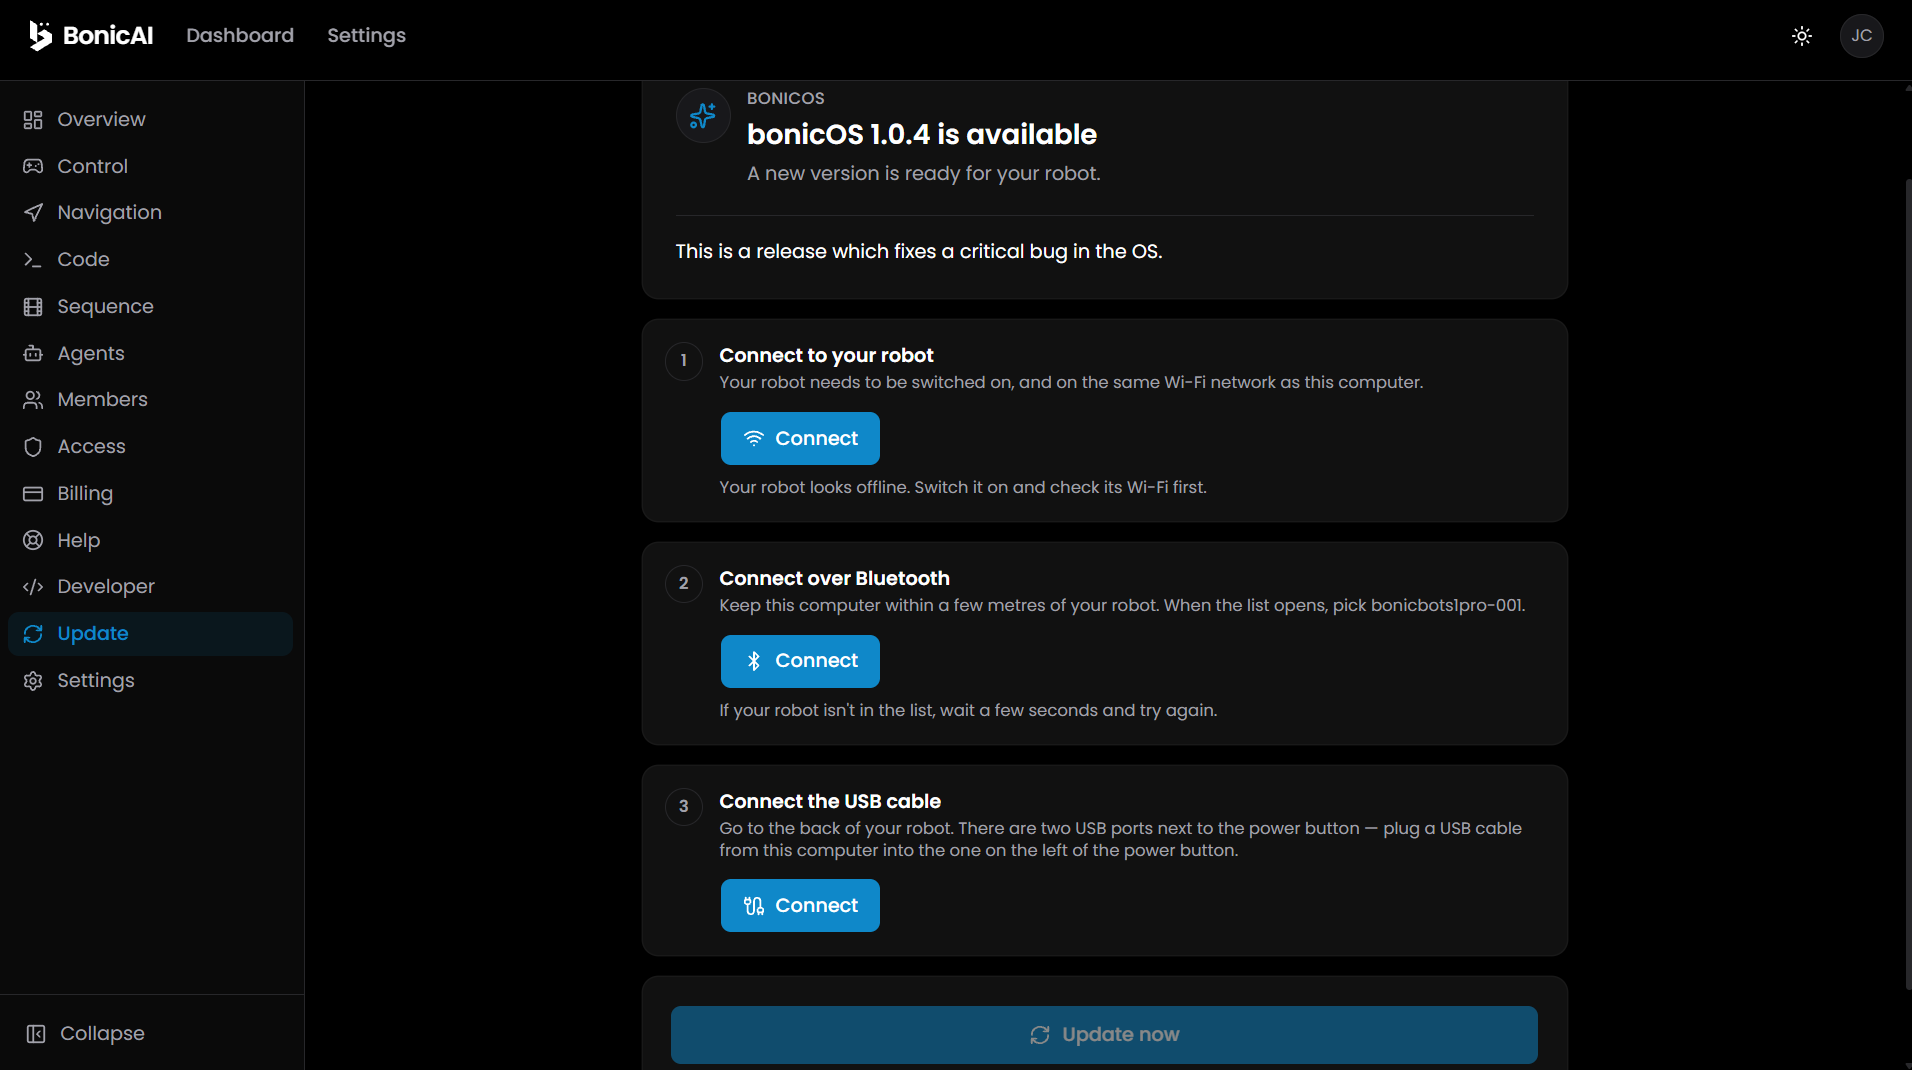
- In BonicAI, open your robot and select Update.
- If the page says No updates yet, there is nothing offered to install from this page.
- If a release is offered, review its version and release notes, then select Check compatibility where shown.
- Follow the page’s connection checks: Connect to your robot on the same Wi-Fi network, Connect over Bluetooth, and Connect the USB cable if required for the offered update.
- Once all required checks pass, select Update now. Keep the robot powered on and leave required cables connected until installation completes.
- Wait for the completion status and any requested restart, then check the installed version.
You should see: either no update offered or installation progress followed by a completion status. If readiness checks fail, resolve the displayed problem before retrying.
Programming is optional. Continue below only if you want to try Code, or go to conversations.
Try programming with Code
Optional — BonicAI Dashboard: Use this section after basic setup if you want to explore programming.
Who can do this: People with User or Admin access to the robot
Use BonicAI Code to explore a Python example in the browser’s simulator. You can try the simulator before connecting the physical robot. Full programming lessons and the programming reference are covered separately.
Understand the workspace
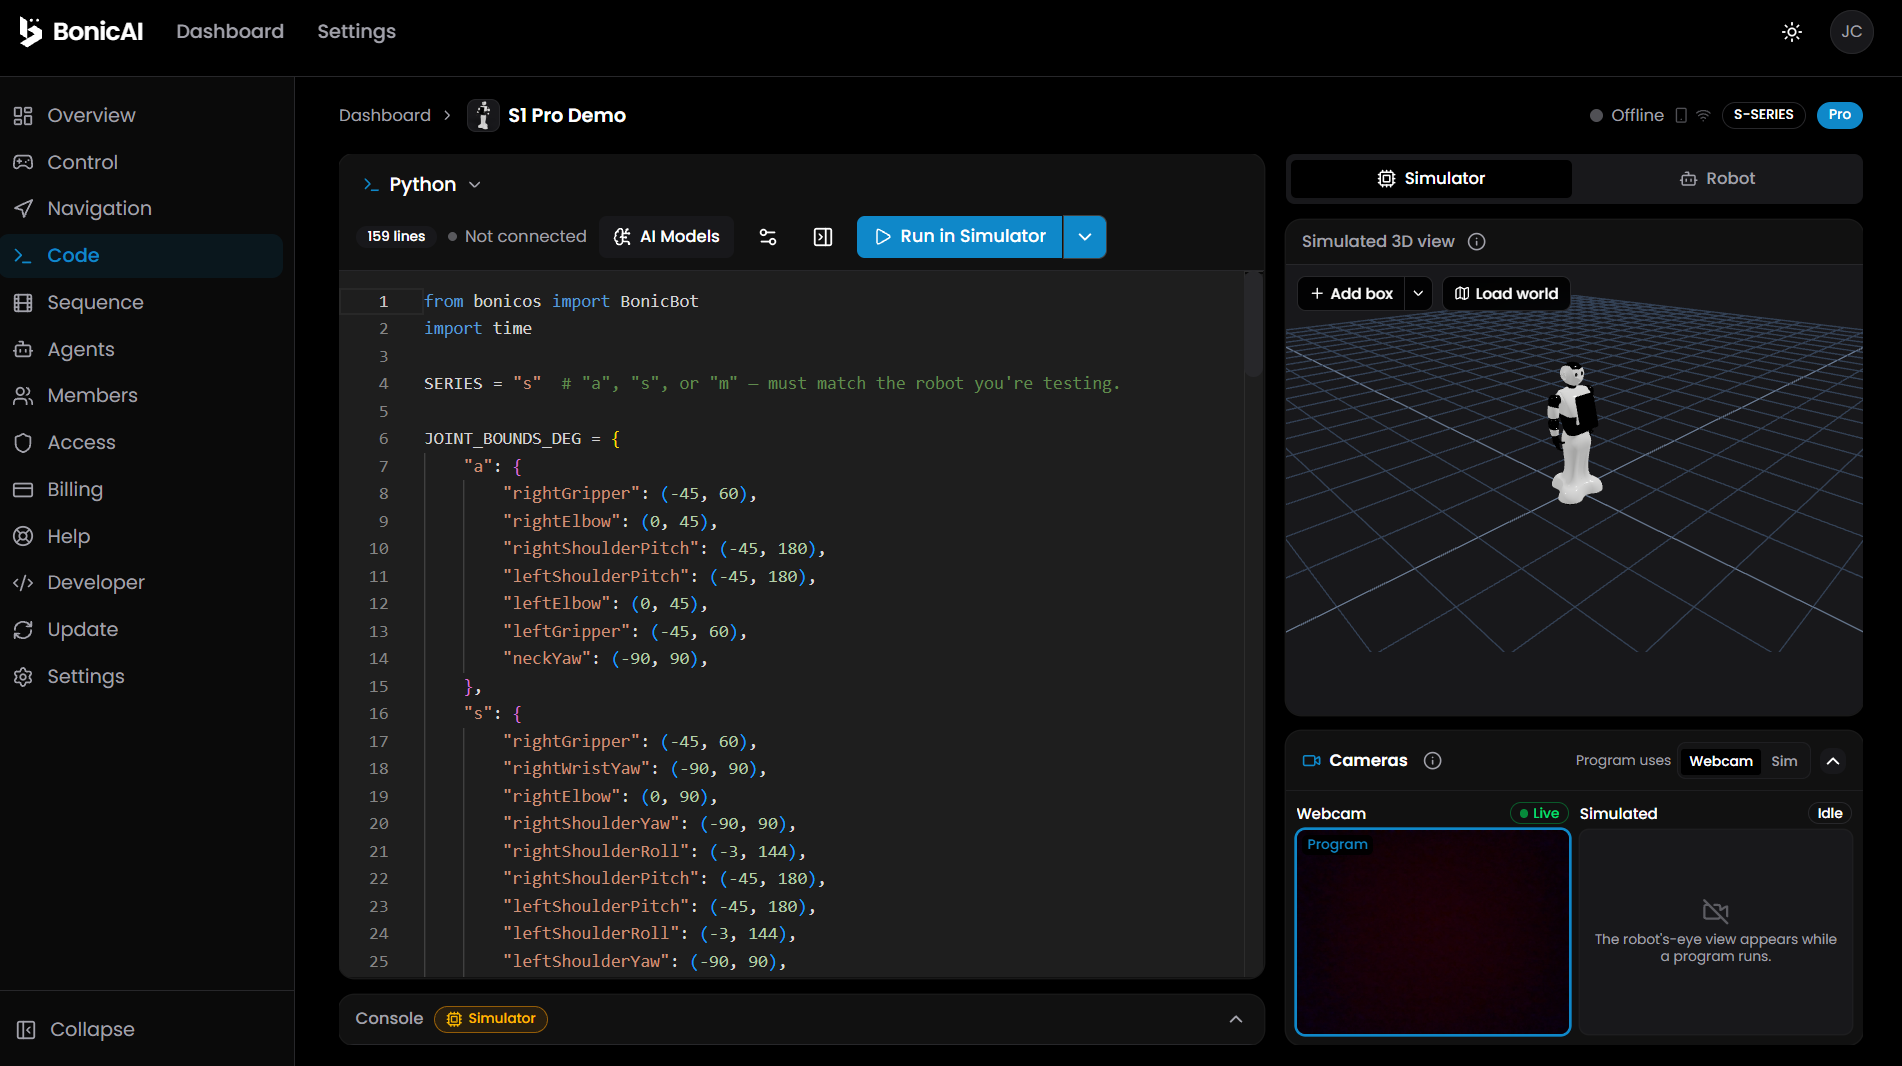
| Area | Purpose |
|---|---|
| Python editor | Read or edit the program; review its instructions before running |
| Simulator | View the virtual robot and test the program in the simulated environment |
| Robot | Open the connection panel for physical-robot execution |
| Run in Simulator | Run the program in the simulator |
| Console | Read program output and error messages |
Run an example in the simulator
Before you begin: Sign in to BonicAI in a computer browser and open a robot you can access. The physical robot does not need to be connected for simulator testing.
- Select Code in the robot’s sidebar.
- Select Simulator in the right panel. Check that the run button says Run in Simulator.
- Read the example already in the editor, if present. Check that it matches your selected robot series before running it. If the editor is empty, use an approved example provided by BonicAI support.
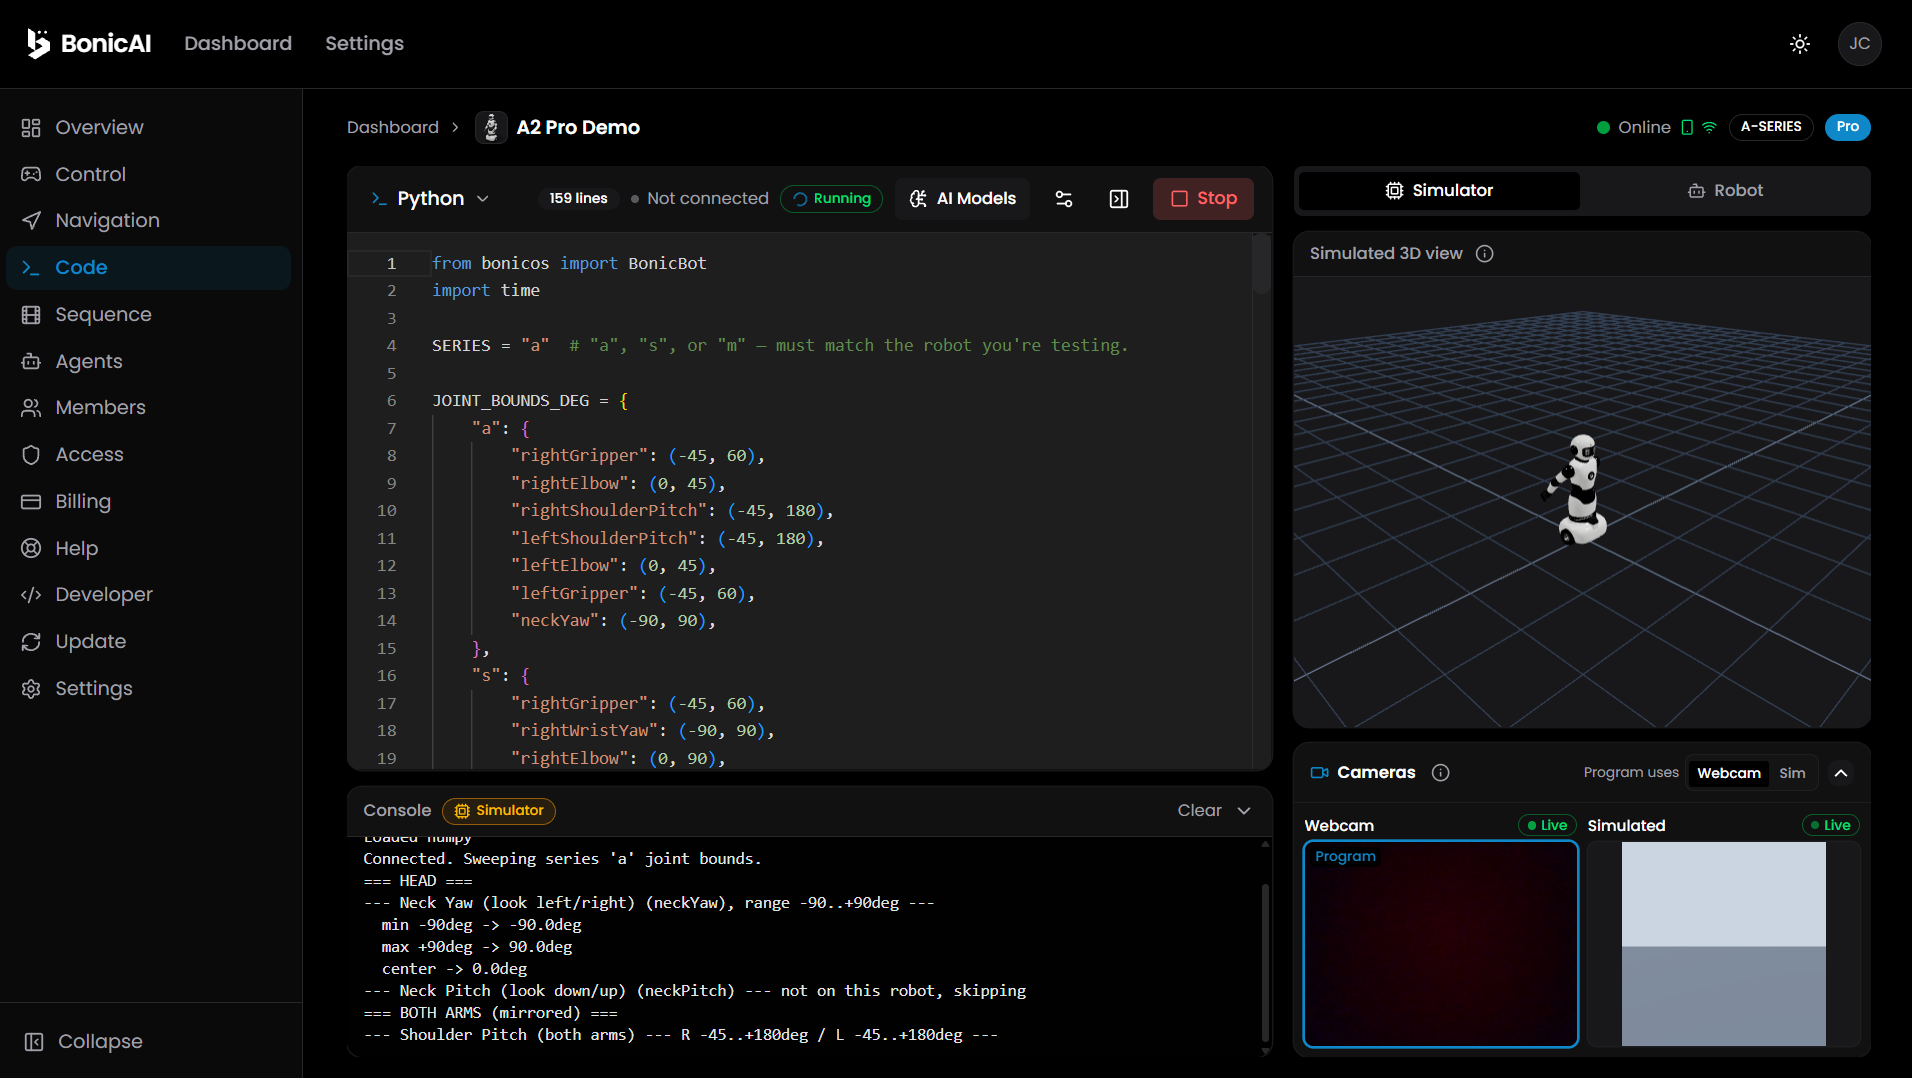
- Select Run in Simulator.
- Watch Simulated 3D view and open Console to read output or errors. A program without movement commands may finish without moving the virtual robot.
- While Running appears above the editor, select Stop in the top-right of the editor toolbar to end simulator execution.
You should see: the simulator respond to the program, with output or errors in Console. Check the run status before assuming execution has ended.
Understand physical-robot execution
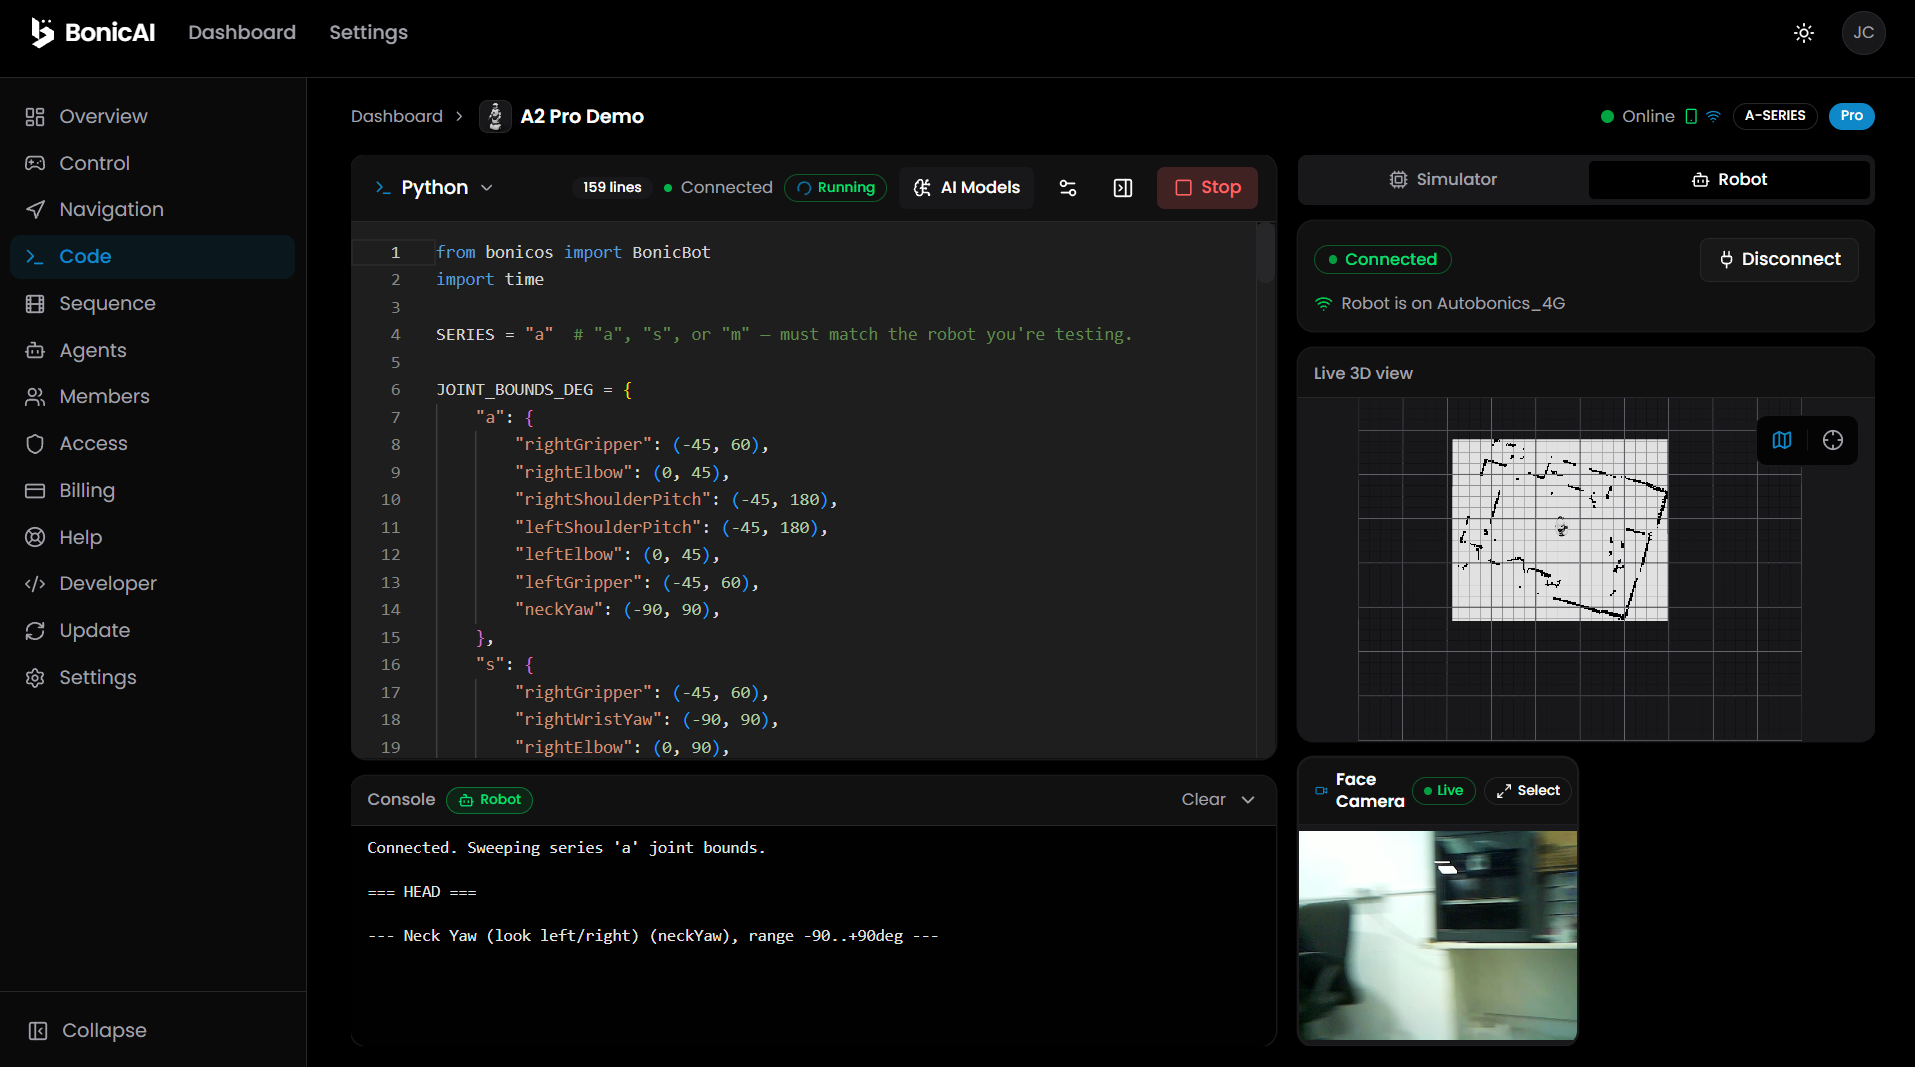
Simulator tests a virtual robot. Run on Robot sends the program to physical hardware and can cause movement. A successful simulation does not establish that a movement is safe on your robot.
Before considering physical execution:
- Review and test the program in the simulator first.
- Power on the robot and keep the computer and robot on the same local Wi-Fi network.
- Open Robot and use Connect under the Direct link is off panel when shown. This network Direct Link is separate from Bluetooth Direct control.
- Wait for a connected status. Keep the robot in view and clear the area around its base, head and arms.
- Locate Stop above the editor before selecting Run on Robot. Contact BonicAI support if model support is unclear.
To stop a program running on the physical robot, select Stop above the editor. This stops both base movement and head/arm movement. Check that the robot is stationary.
Do not treat closing the page, disconnecting, or stopping spoken audio as a physical robot stop. Check the robot’s actual state before approaching it.
If the program does not run
- Open Console and read the error message and line number.
- Check whether Simulator or Robot is selected and confirm the intended run target.
- For physical execution, check the network connection before retrying. Observe the robot before sending another run request.
- If the issue remains, record the error and contact support. Share only code and media you are permitted to disclose.
You should see: output identifying the failure or a successful run after the issue is corrected. AI Models, custom worlds, camera programming and detailed Python lessons are outside this introduction.
Turn off your robot
For a Pro robot, first follow Shutting down the processor cleanly.
- Press and hold the same push button on the upper part of the robot’s back until the ring light turns off.
You should see: the ring light turns off. This power-button instruction applies to both Lite and Pro models.