Creating and assigning agents
Use an existing agent or configure one to speak, greet visitors, and answer questions.
Want to talk with your robot? Go directly to Talk with your robot. Creating a new agent is optional; follow the setup options below only if you want to customise it.
Every BonicBot robot uses an agent — the AI personality that defines its voice, greeting, behavioral instructions, and knowledge. Depending on your role and operational needs, you can use the pre-loaded Default Agent, create a custom Robot Agent, or deploy a knowledge-backed Department Agent.
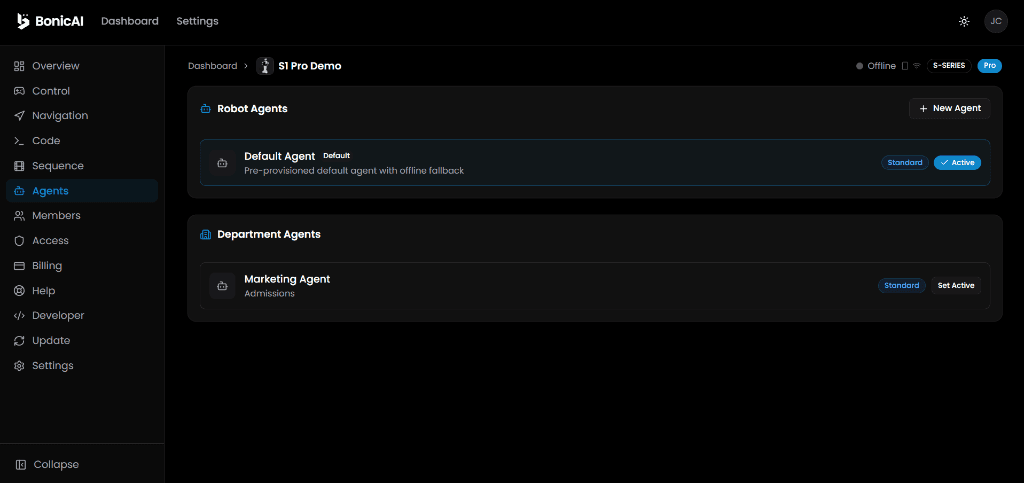
BonicAI web dashboard shown.
Three ways to use agents
| Agent Type | Created Where | Key Capabilities | Who Can Set Up |
|---|---|---|---|
| Default Agent | Pre-loaded on every robot | Instant out-of-the-box conversation, zero setup required | Ready to use for all direct robot members |
| Robot Agent | Directly on the robot (Your robots > [Your Robot] > Agents) | Custom voice, personality prompt, and offline capability for that specific robot | Robot Admins |
| Department Agent | In your department (Departments > Agents) | Custom personality plus Knowledge Bases (PDFs/handbooks) and Security Gates (face/RFID) | Department Managers and Organisation Owners |
Option 1: Fast start with the pre-loaded Default Agent
Every BonicBot robot arrives with a Default Agent already installed and active:
- Direct robot members (users with User or Admin access) do not need to create or configure anything to begin conversing.
- The Default Agent answers everyday questions, demonstrates natural voice speech, and allows you to test microphone and speaker hardware immediately.
To verify the Default Agent:
- On the BonicAI Dashboard, find Your robots.
- Select your robot from the list, then select Agents in the sidebar.
- You will see the Default Agent row with a green Active badge and a Default tag.
Option 2: Create a Robot Agent (Robot Admins)
If you manage a specific robot and want to customize its instructions, tone, or conversation tier without connecting it to a department knowledge base, create a Robot Agent.
Who can do this: Robot Admins
-
On the BonicAI Dashboard, find Your robots.
-
Select your robot, then select Agents.
-
Select New Agent at the top right of the page.
-
Complete the agent setup:
- Name: Enter a descriptive title (e.g., Campus Guide or Lab Greeter).
- Description (optional): Enter a brief summary of the agent’s function.
- System Instruction: Enter the guiding prompt and personality rules (for example, “You are a polite assistant for the engineering laboratory. Welcome visitors and speak in short, informative sentences.”).
- Tier: Select your conversation tier:
- Premium: Real-time fluid voice streaming with natural cadence.
- Standard: Turn-based conversation model.
- Edge / Basic: Supports offline conversations on the robot after setup (0 conversation credits). The first time you activate an Edge agent on BonicOS, the robot downloads the required on-device conversation files and your chosen offline language pack over Wi-Fi. After setup, you can use offline conversations without internet. Choose from the supported offline languages listed in the agent’s Configuration in BonicAI. See Prepare offline conversations on BonicOS.
-
Select Create Agent.
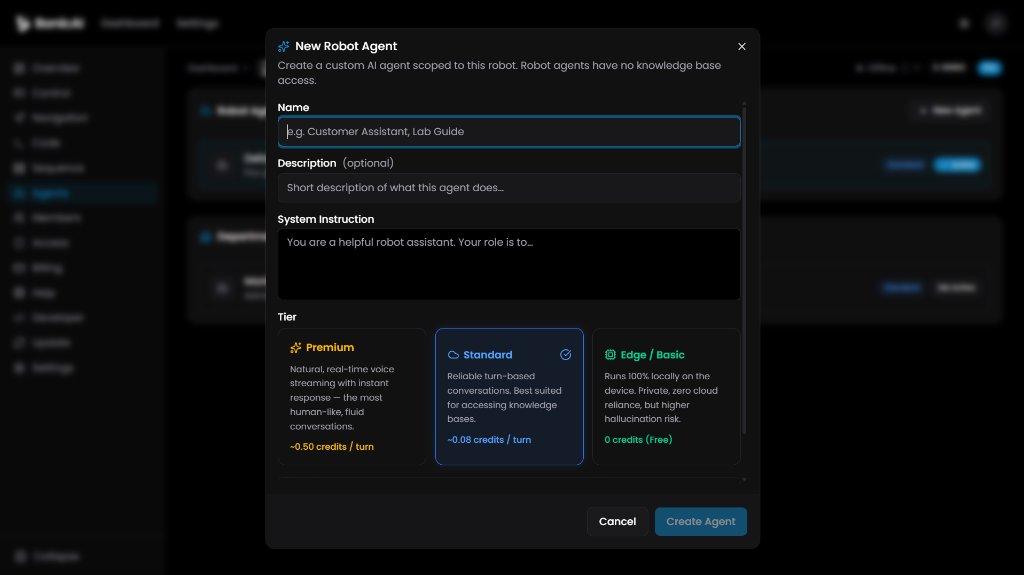
BonicAI web dashboard shown.
You should see: the new agent appear in the Robot Agents list. To make it the active voice profile, select Set Active.
Option 3: Create a Department Agent with Knowledge Base (Department Managers)
When you need an agent that answers questions from your own uploaded documents (such as school handbooks, product brochures, or company FAQs) or enforces security gates, create a Department Agent.
Who can do this: Department Managers and Organisation Owners
Before you begin: Create the department and grant robot access. Use this option only if the robot needs answers from your own documents; the Default Agent and robot agents do not require department setup.
Step 1: Create the agent and upload knowledge
- In the BonicAI Dashboard sidebar, select Departments.
- Select your department, then select Agents.
- Select + New Agent at the top right of the page.
- Enter the agent details:
- Name: Enter a title (e.g., Admissions Counselor).
- System Instruction: Describe the agent’s role, tone, and behavioral bounds.
- Agent Tier: Choose Premium, Standard, or Edge.
- Select Create Agent.
- Open your department’s Knowledge page. Create a knowledge group with + New Knowledge Group, or open an existing group with Manage >.
- Select Upload File and upload your reference documents. Wait for the files you want the agent to use to show the green Ready status.
- Return to your agent and open its Knowledge tab. Select the knowledge base containing those documents, then select Save Changes. The selection is not saved automatically.
- Use Test Knowledge Base to check a question answered by a ready document before testing the robot conversation.
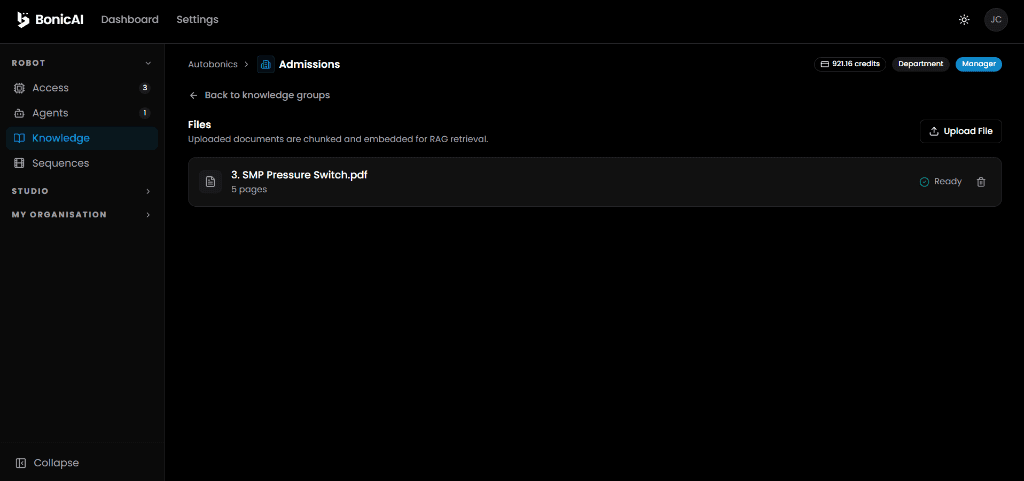
BonicAI web dashboard shown.
You should see: the knowledge base selected for the agent and its uploaded documents marked Ready. Files still processing are not ready for answers.
Enable security for a department agent (Optional)
Who can do this: Department Managers and Organisation Owners
Use this when only permitted people should be able to talk with the department agent. Robot agents do not support these security settings.
-
In BonicAI, open Departments > [Your Department] > Agents.
-
Select your department agent and open Security.
-
Switch on Require Authentication.
-
Select the access groups permitted to use the agent. Arrange group membership and the required identity setup before testing.
-
Under Authentication Methods, enable at least one method:
Method What the person needs Face Recognition An enrolled facial profile and the robot’s camera RFID Card A registered badge assigned to their account and the robot’s reader Email & Password Their BonicAI account email address and password -
Select Save Changes.
-
Start a new conversation on BonicOS and test with a permitted person using an enabled method.
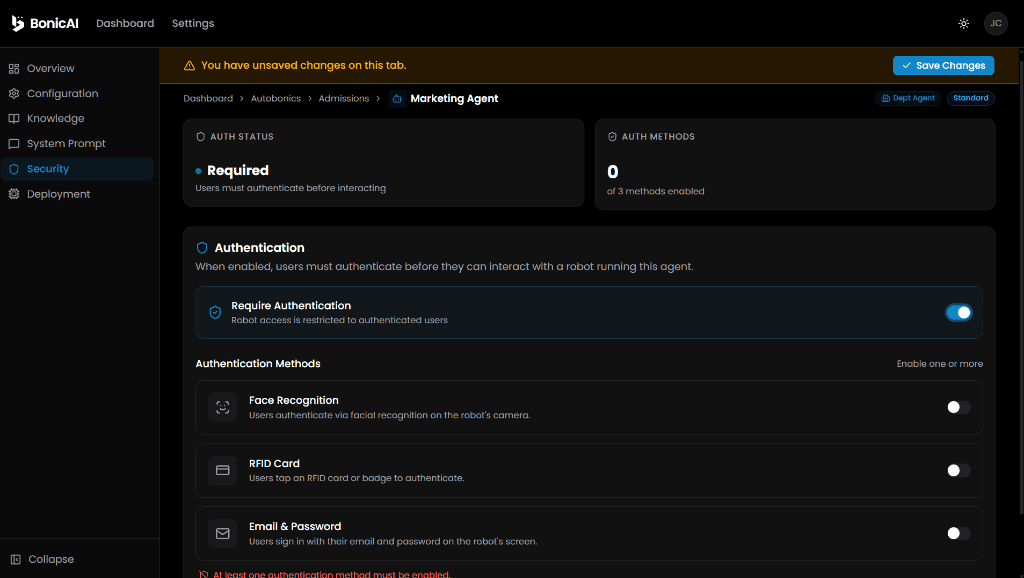
BonicAI web dashboard shown.
You should see: BonicOS request identity verification before opening the conversation. Only the authentication methods enabled for this agent are offered.
Important: Agents requiring authentication work through BonicOS. The Controller App cannot open these conversations, including agents using email/password verification. Choose an agent without an authentication requirement for Controller use.
If the agent should be available without identity verification, switch off Require Authentication and select Save Changes. This removes its sign-in protection.
Access-group administration, face enrolment and badge assignment require separate setup by the responsible Manager or Owner. See Testing the conversation for the BonicOS verification controls.
When Require Authentication is enabled and no access group is selected, any authenticated person can use the agent.
Step 2: Assign the department agent to your robot
Department agents appear on robots the department can access. Department Members cannot assign agents from the department’s Agents tab. If you are a department Member with robot access through the department, use Robot > Agents > Set Active instead.
A department Manager can use Assign to robot when the department has Admin access to that robot. If the department has only User access, the Manager must use Robot > Agents > Set Active instead.
An organisation Owner also needs Admin access to the robot to use Assign to robot.
For people permitted to assign from the department card:
- Open Departments > [Your Department] > Agents.
- On the agent’s card, select Assign to robot.
- Select the robot you want to use. Selecting it activates the agent immediately; there is no extra confirmation button.
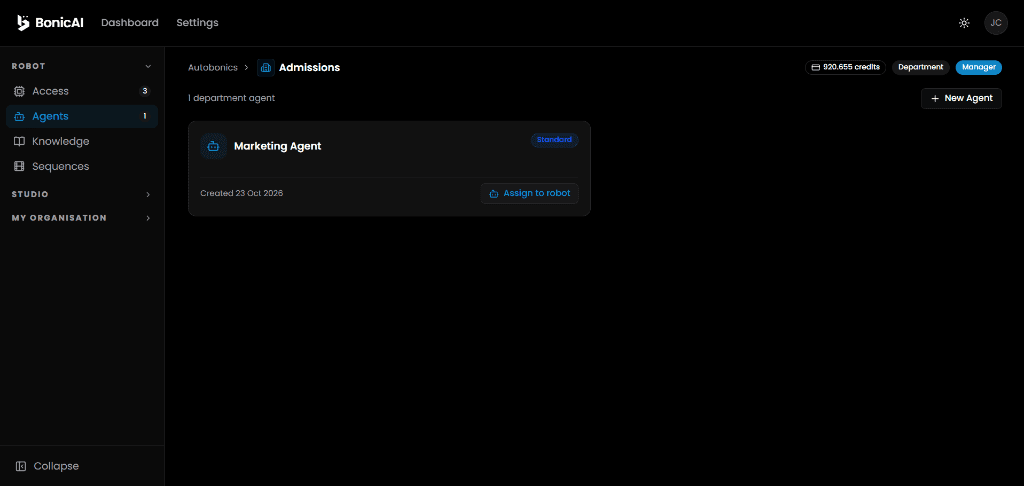
BonicAI web dashboard shown.
You should see: the agent card show an Active on badge identifying the assigned robot or the number of robots using it.
You can also activate the agent from the robot’s page; follow Choose the active agent through Robot > Agents > Set Active.
You should see: the agent display the green Active badge on the robot’s agents page. Only one agent can be active at a time.
Important: Changing the active agent takes effect when the next conversation starts. Any conversation currently in progress on the robot continues using its existing agent until ended.
Configure an existing agent
Who can do this: Robot Admins for robot agents; Department Managers and Organisation Owners for department agents. Direct robot Users cannot configure robot agents.
-
In BonicAI, open Dashboard > Your robots > [Your Robot] > Agents for a robot agent, or Departments > [Your Department] > Agents for a department agent.
-
Select the agent and open Configuration.
-
Adjust the settings you need:
Setting What to choose Tier Premium or Standard for online conversations on either interface; Edge for BonicOS offline conversations Primary language The language the agent listens for and speaks Voice output An available voice for the selected tier Speaking speed How fast it speaks; 1.00x is normal speed Greeting message What it says at the beginning of a conversation Capabilities The abilities it may use during a conversation -
Select Save Changes.
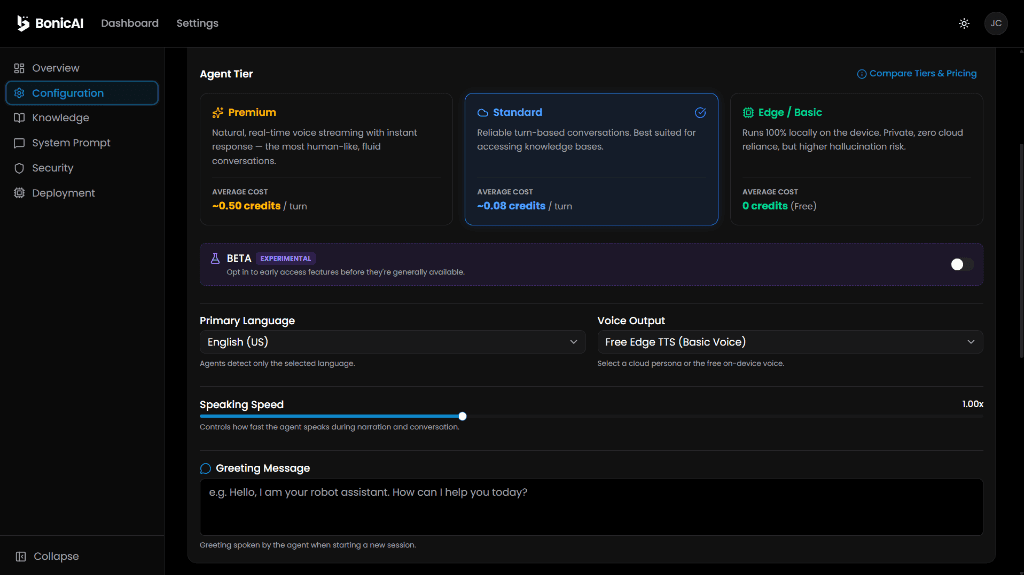
BonicAI web dashboard shown.
You should see: All changes saved after the configuration is stored. Start a new conversation to test the settings.
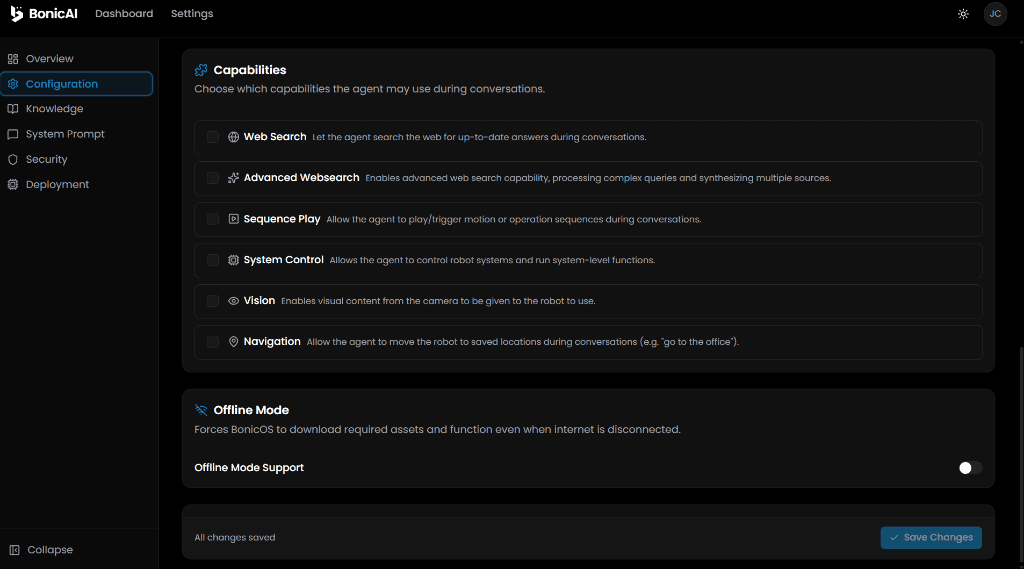
BonicAI web dashboard shown.
Enable only the capabilities your robot needs, then select Save Changes and start a new conversation.
| Capability | BonicOS Standard / Premium | BonicOS Edge | Controller Standard / Premium |
|---|---|---|---|
| Web Search / Advanced Websearch | Available with internet | Requires internet; unavailable without it | Available with internet |
| Sequence Play | Available on all models | Available on all models | Available on all models |
| Vision | Available with a working BonicOS camera | Available with a working BonicOS camera; verify your offline setup before relying on it | Not supported as an agent capability |
| Navigation | Pro models only | Pro models only | Pro models only |
| System Control | Adjust BonicOS volume and supported screen brightness | Adjust BonicOS volume and supported screen brightness | Not supported as an agent capability |
Controller does not support Edge agents. Its separate camera or manual-control features do not enable the unsupported agent capabilities above.
- Sequence Play: Enable the capability and make the saved sequence available to the agent through sequence assignment. This applies to A2, S1 and M1, including Lite and Pro variants. Physical playback requires an active robot connection; Controller requires Direct Bluetooth.
- Navigation: Enable the capability and prepare navigation on a Pro robot. Edge conversations still need the local robot connection for navigation; offline conversation support does not remove that requirement. Docking remains restricted to supported S1 Pro and M1 Pro robots.
- Vision: The agent uses the BonicOS device camera. Allow camera access and check that it works before testing a visual request.
- System Control: Screen brightness support depends on the device. This capability adjusts the BonicOS screen, not the robot’s face display.
Note: Edge does not make internet-dependent capabilities work offline. Complete the required offline conversation setup and test the capabilities you plan to use before relying on them without internet.
Edit the agent’s instructions
- Open the agent’s System Prompt page.
- Edit System Instruction to describe its role, tone, answer length and behavioural boundaries.
- Select Save Changes. The status confirms All changes saved.
- Start a new conversation and ask a representative question to test the result.
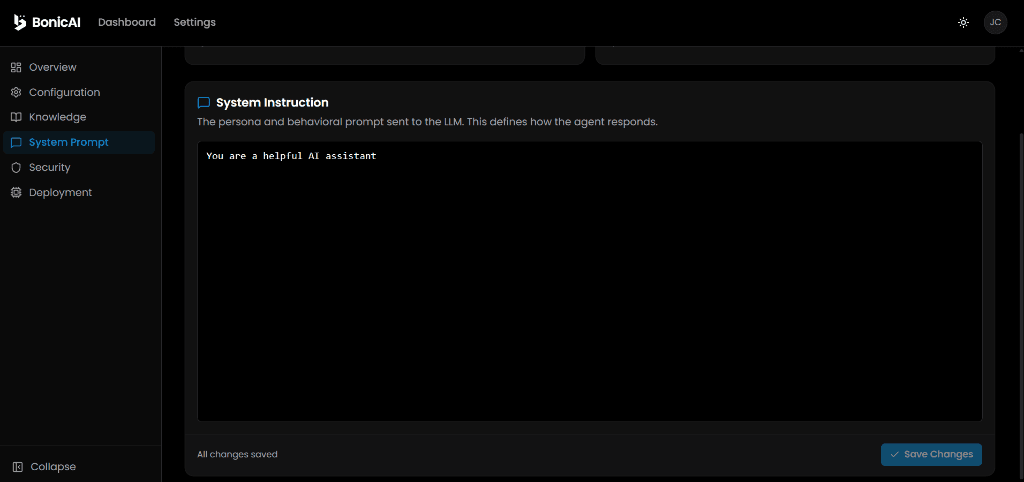
BonicAI web dashboard shown.
You should see: the updated instructions when you reopen the page.
Prepare offline conversations on BonicOS
Important: Edge tier works only in BonicOS. The Controller App does not support Edge or offline conversations. Use Standard or Premium with internet access in Controller.
- While internet access is available, open the agent’s Configuration in BonicAI.
- Enable Offline Mode Support and select the required Offline Language Pack. For an offline agent, choose Edge.
- Select Save Changes, then set the agent active.
- Open the conversation on BonicOS and complete any required conversation-file and language-pack downloads.
- Wait for setup to complete, then test a conversation before relying on offline operation.
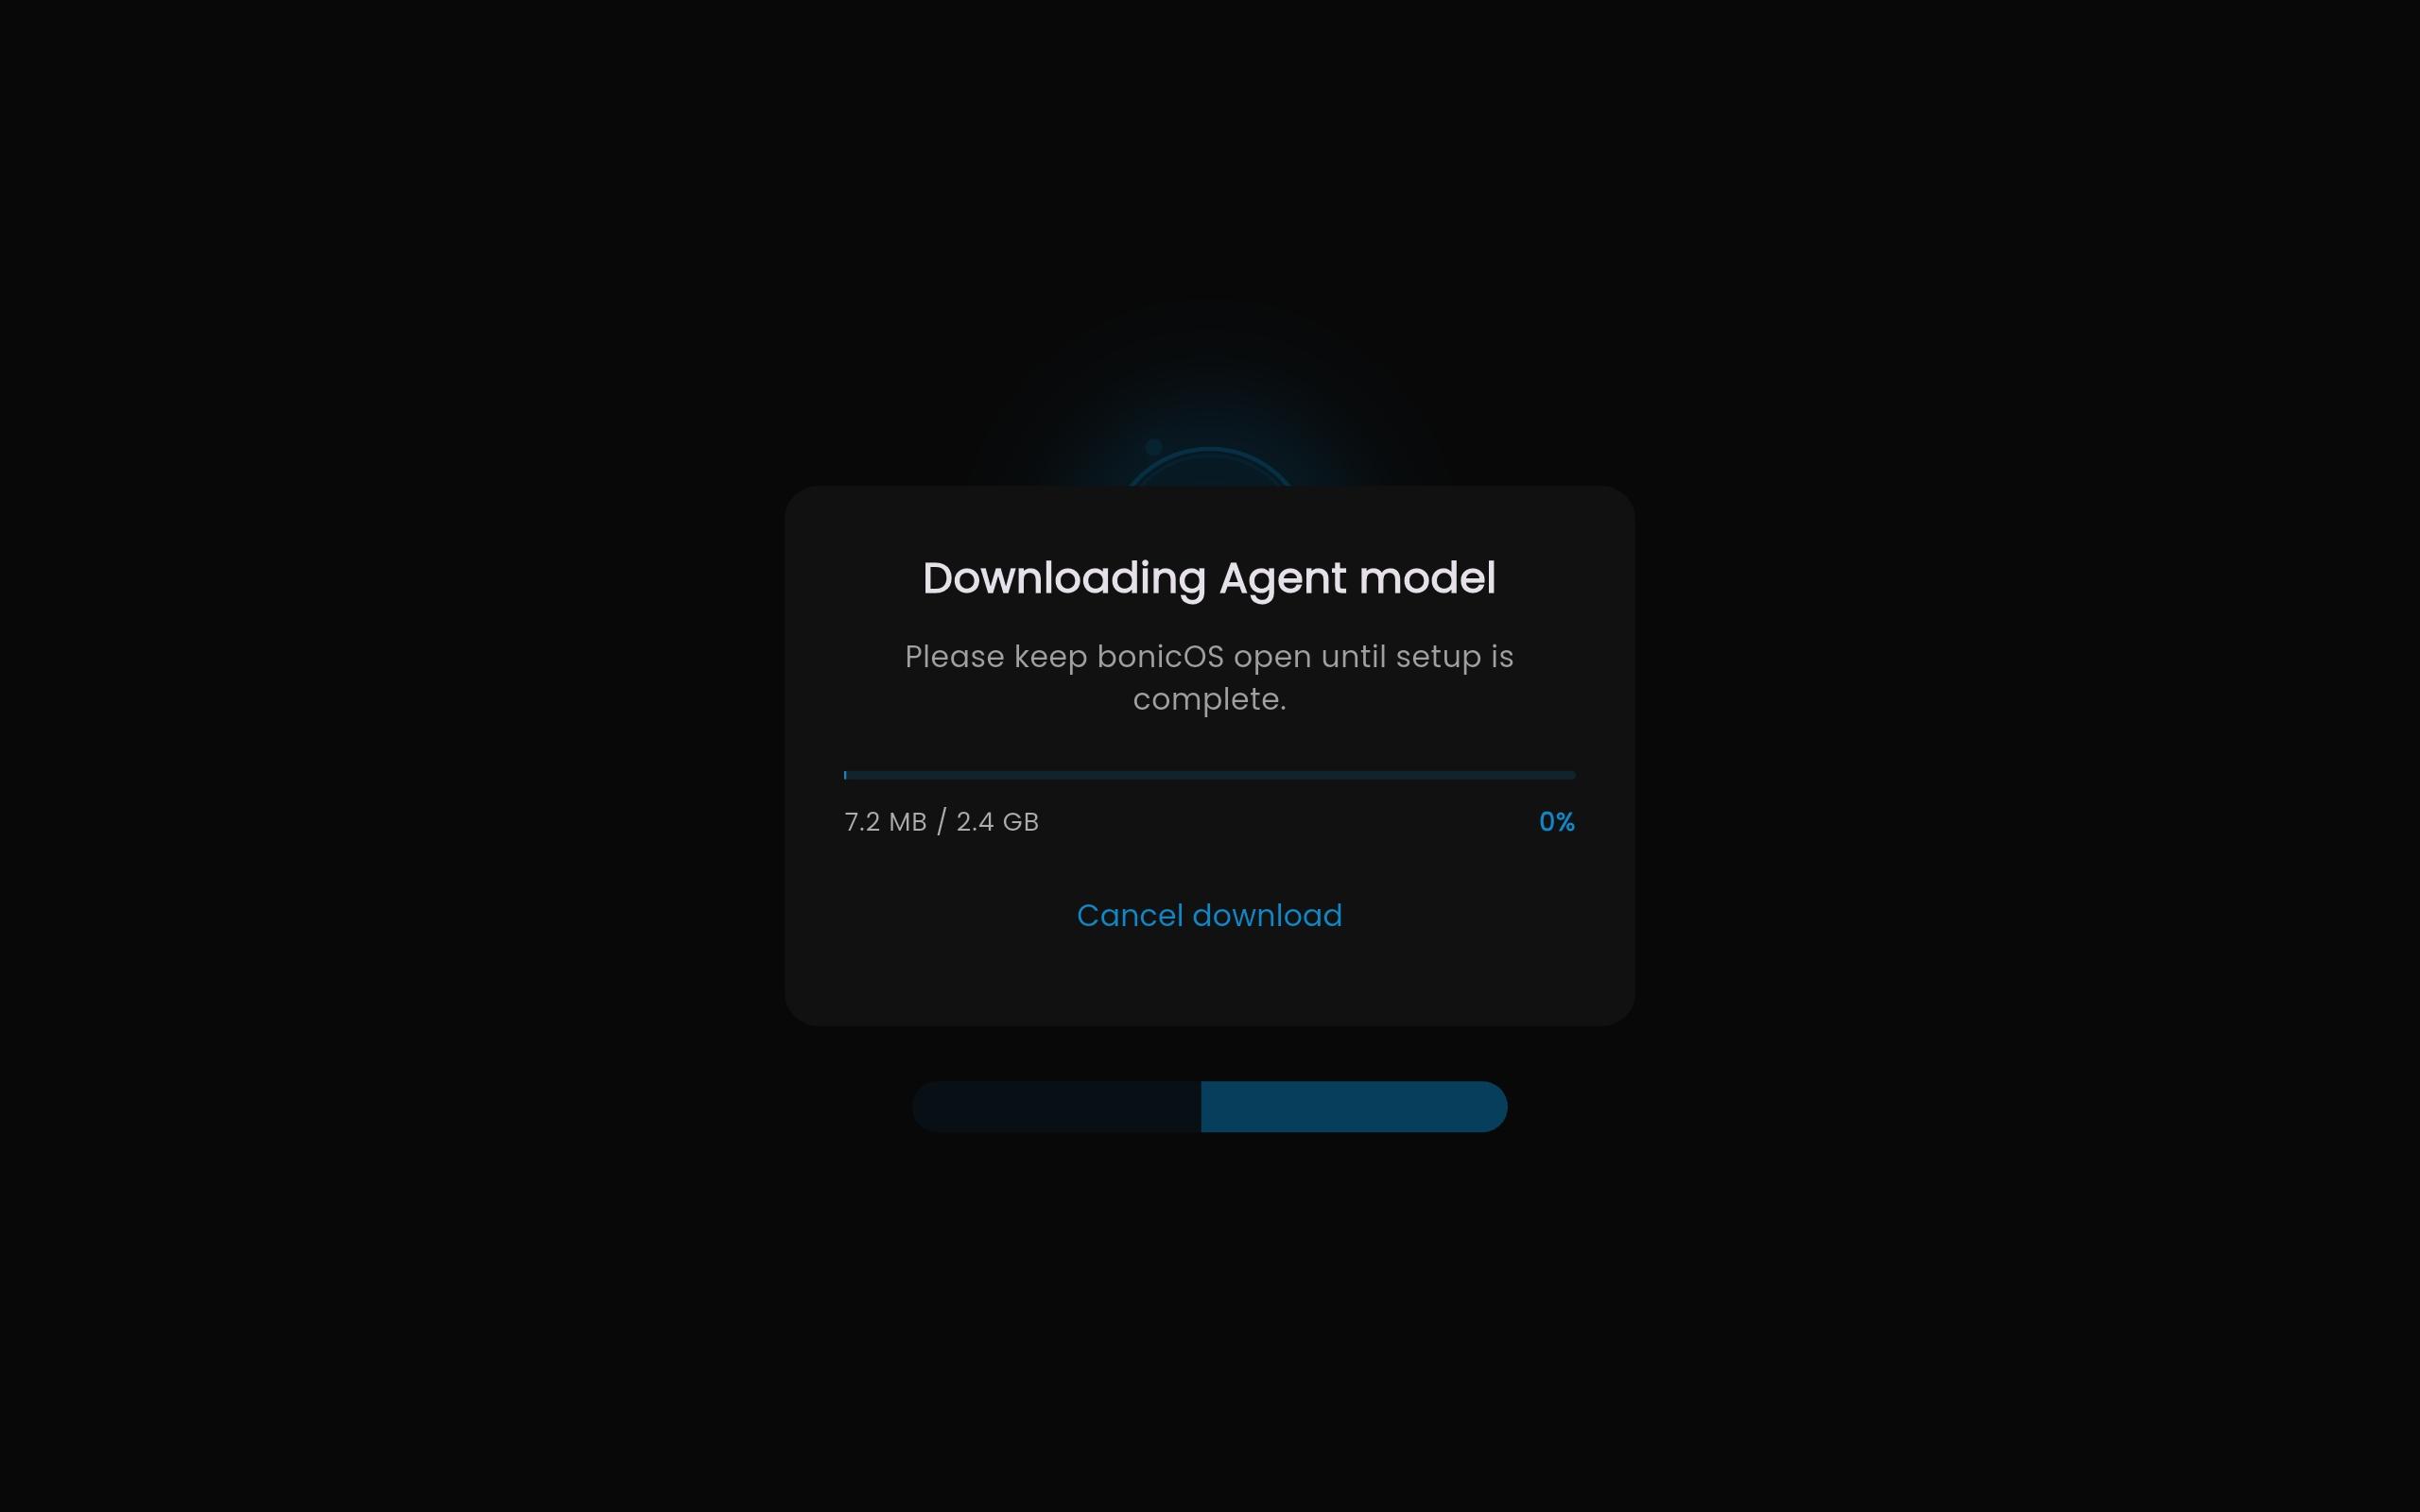
BonicOS shown.
When the system asks to download speech recognition for the selected language, select Download. Wait for Offline Speech Support setup to finish before testing offline use. The example below uses Japanese; your language and download size depend on the selected pack.
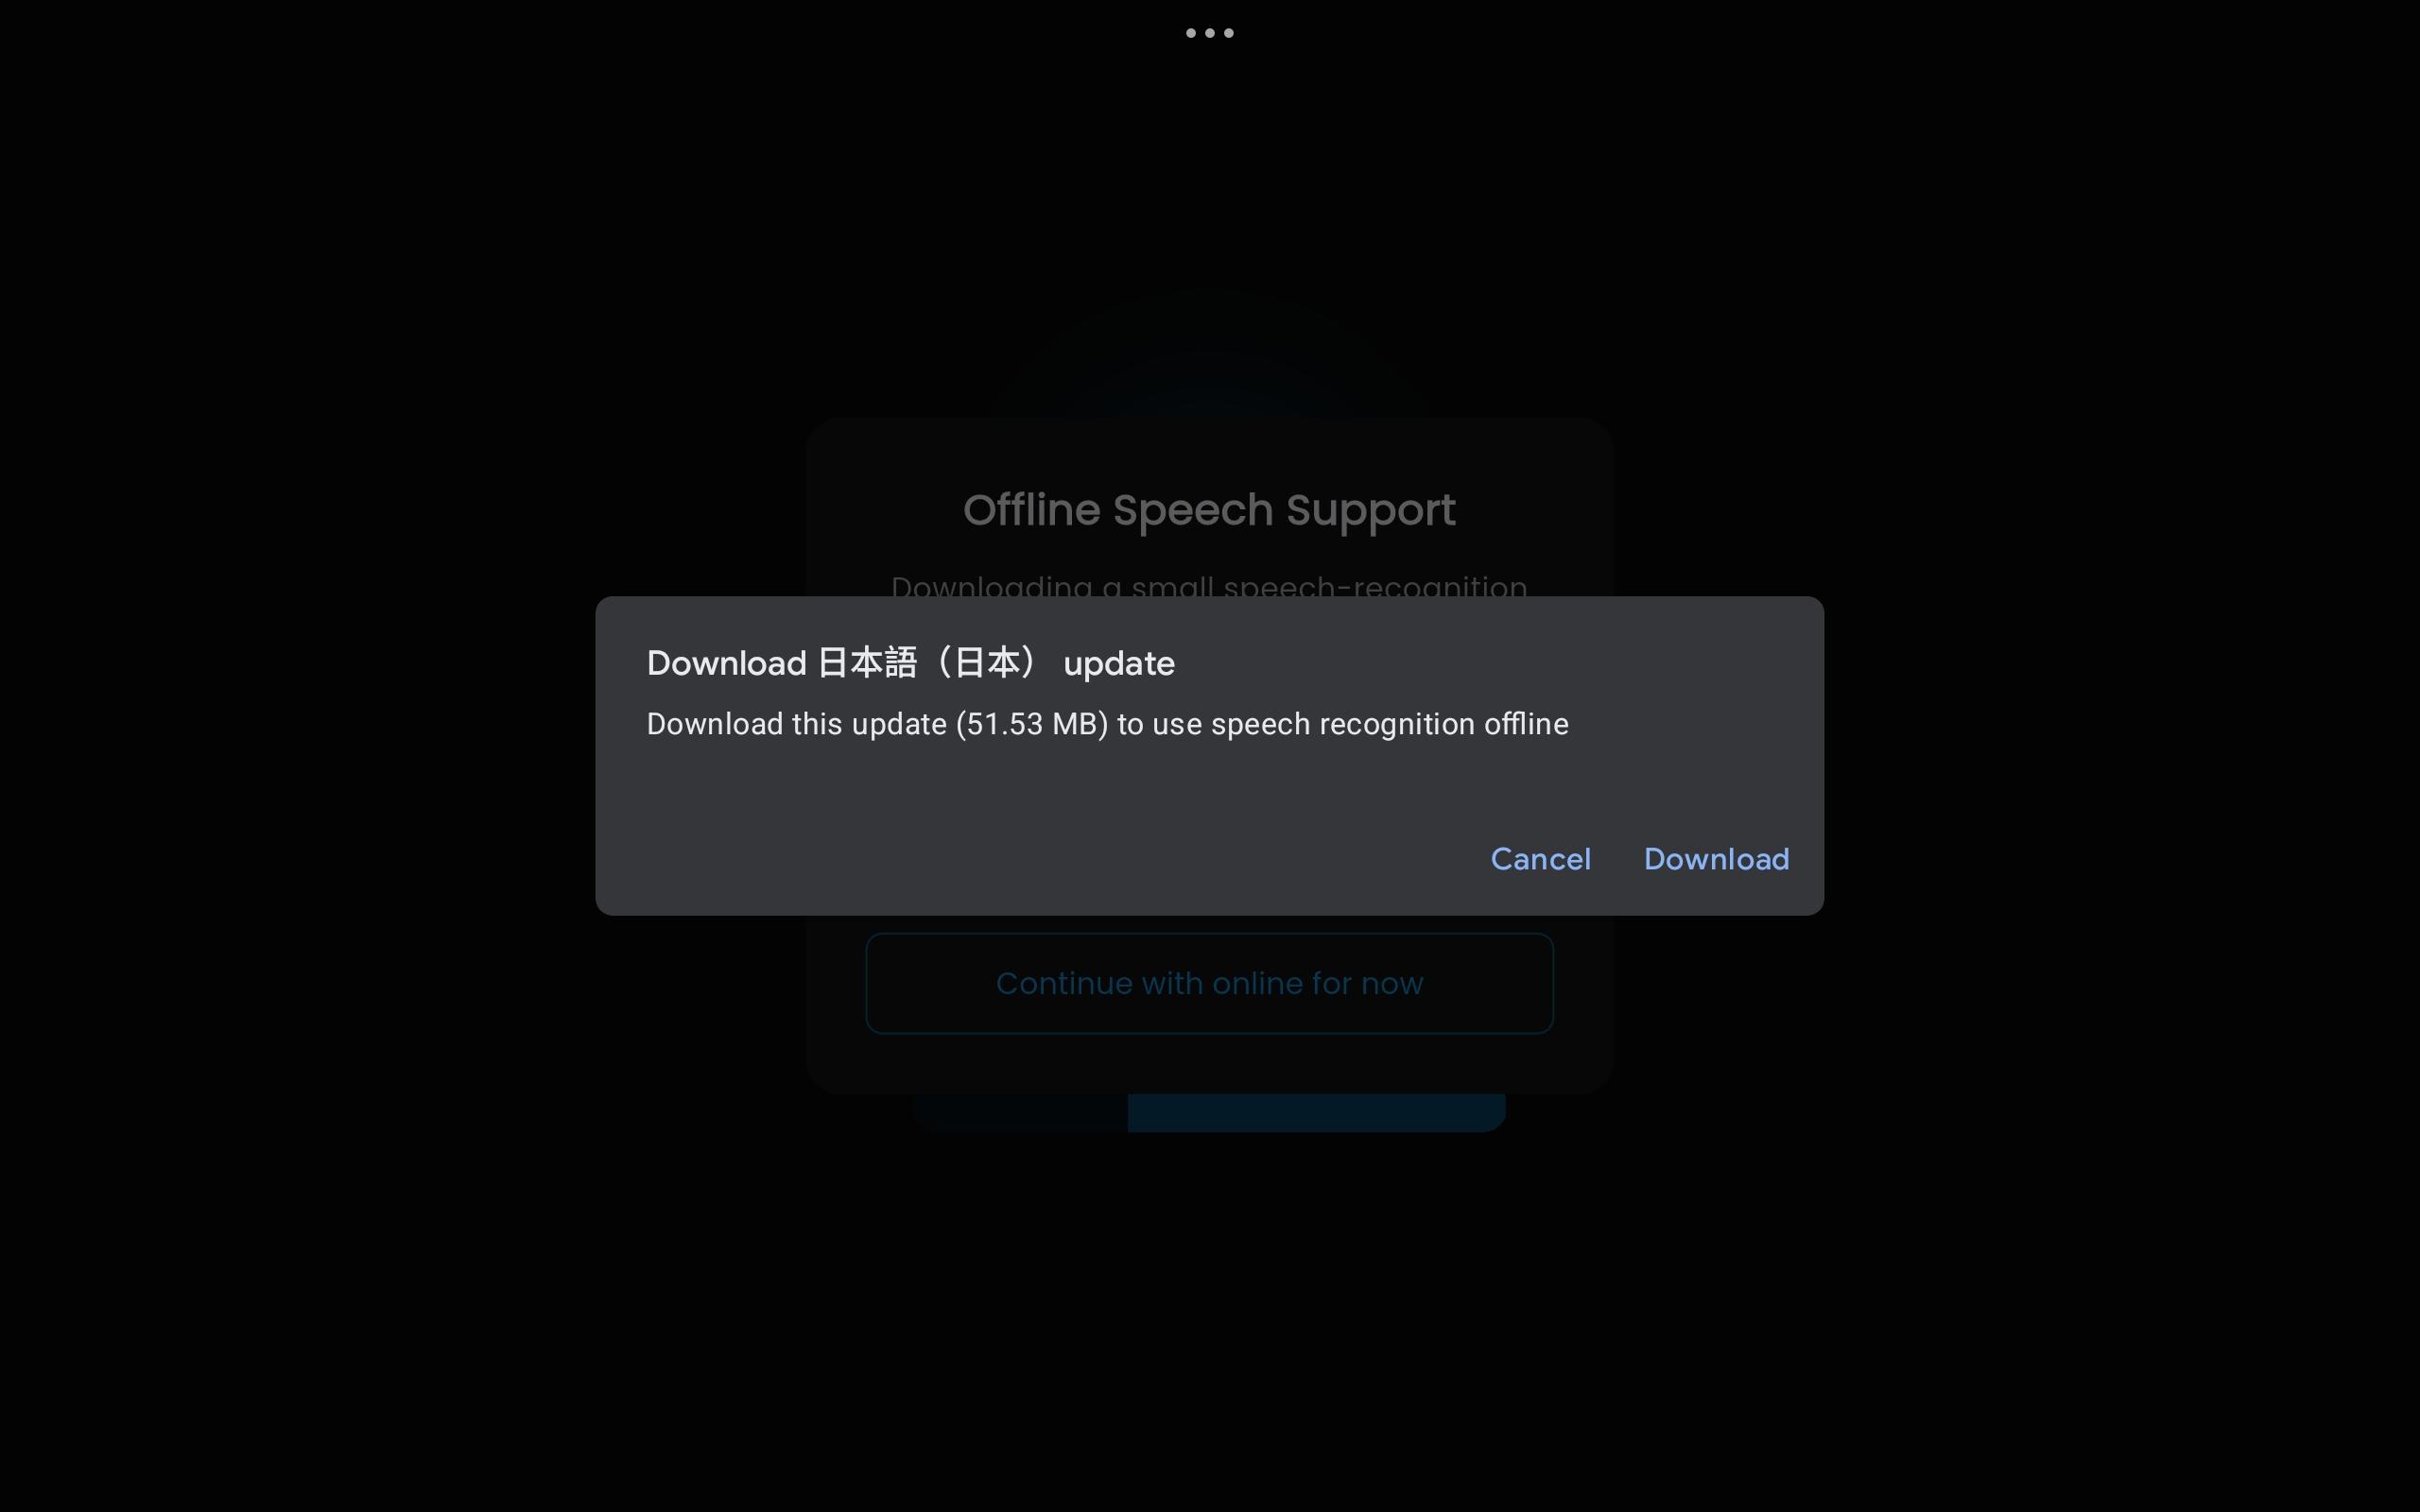
System download prompt during BonicOS setup.
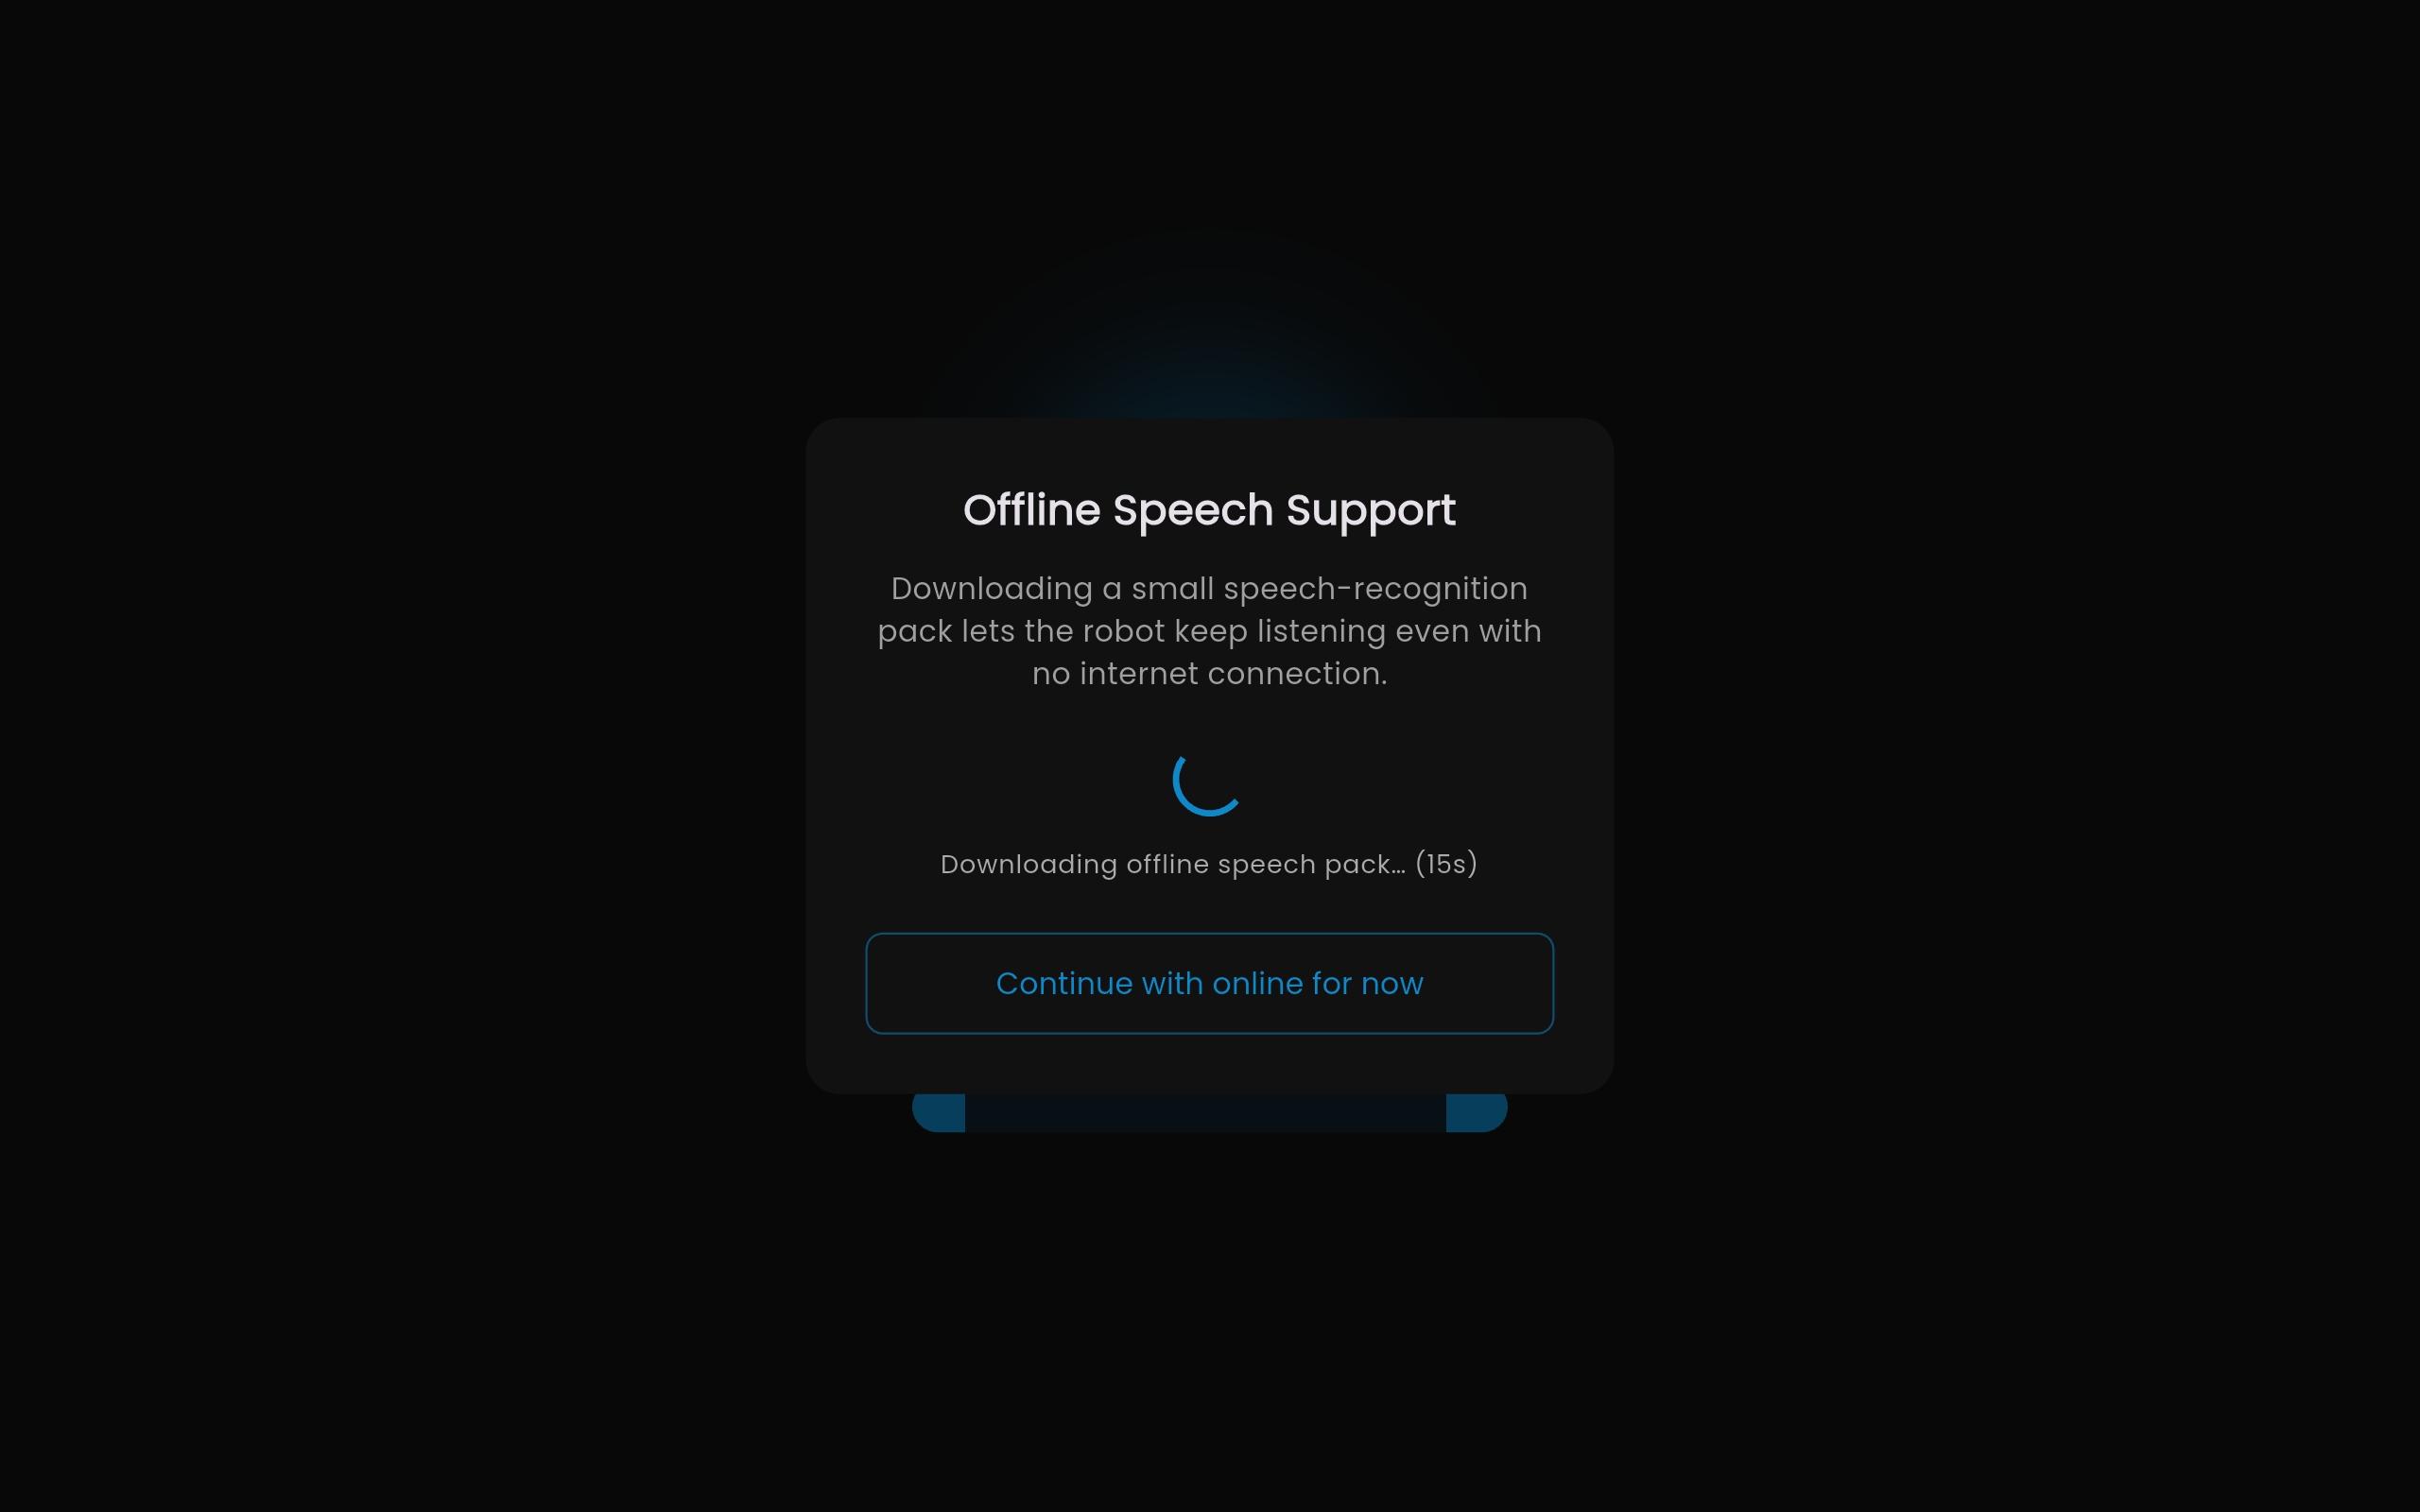
BonicOS download progress. Complete the download before relying on offline speech recognition.
You should see: BonicOS finish the required downloads and open the conversation. Cancelling required offline setup closes the conversation.
Note: Automatic offline fallback is not currently implemented. If an online conversation loses internet access, BonicOS does not automatically switch it to offline mode, even when Offline Mode Support is enabled. Choose your offline language from the supported languages listed under Offline Language Pack in BonicAI > Agent Configuration. You can use the languages listed there.
Complete the required conversation-file and selected language-pack downloads on BonicOS before using offline conversations. Once the downloads are complete, you can start offline conversations without internet, including after restarting the robot. Automatic fallback from an online conversation remains unavailable.
Choose the active agent
Who can do this: Robot Admins and Users with department robot access. Direct robot Users cannot change the active agent.
- In BonicAI, open Dashboard > Your robots > [Your Robot] > Agents.
- Find the agent you want and select Set Active.
- End any conversation already running, then start a new one.
You should see: the Active badge beside the selected agent. The next conversation uses that agent; a conversation already running keeps its existing agent.
Department Users change the active agent through Robot > Agents > Set Active.
Testing the conversation
Once an agent is set as Active, you can start talking to it through your robot. Remember that any change to the active agent takes effect on the next conversation session.
On BonicOS (S1, M1, or A2 with add-on)
- Wake up the chest display by tapping the screen.
- Verify Wi-Fi and speaker connection on-screen: Because BonicOS runs in a locked kiosk mode, you do not use Android system settings. If you need to connect to Wi-Fi or configure the speaker:
- Select the Settings (gear) icon in the top status bar.
- Select WiFi networks to scan and join your local wireless network using the on-screen keyboard.
- Select Bluetooth speaker to ensure the robot’s physical amplifier is connected under This robot’s speaker (or pair an external Bluetooth speaker if presenting in an auditorium).
- Return to the home screen and select the Conversation card to open the conversation screen.
- Authentication Gate (if enabled): If the active department agent has Authentication Required enabled, BonicOS displays the identity check-in gate before opening the conversation. You must verify your identity using whichever methods the administrator enabled for that agent in BonicAI:
- Face recognition (VERIFY WITH FACE): Look directly at the robot’s camera above the chest screen.
- RFID badge (SCAN RFID TAG): Hold your assigned RFID badge against the reader on the robot’s chest.
- Account sign in (LOGIN WITH EMAIL): Enter your BonicAI account email and password using the on-screen keyboard. After successful authentication, the conversation starts if you belong to a selected access group. If no access group is selected, any authenticated person can use the agent. Open Access agents (such as the Default Agent) bypass this gate and open immediately.
- Speak naturally into the screen microphone. If using a department agent, ask a specific question from your uploaded documents.
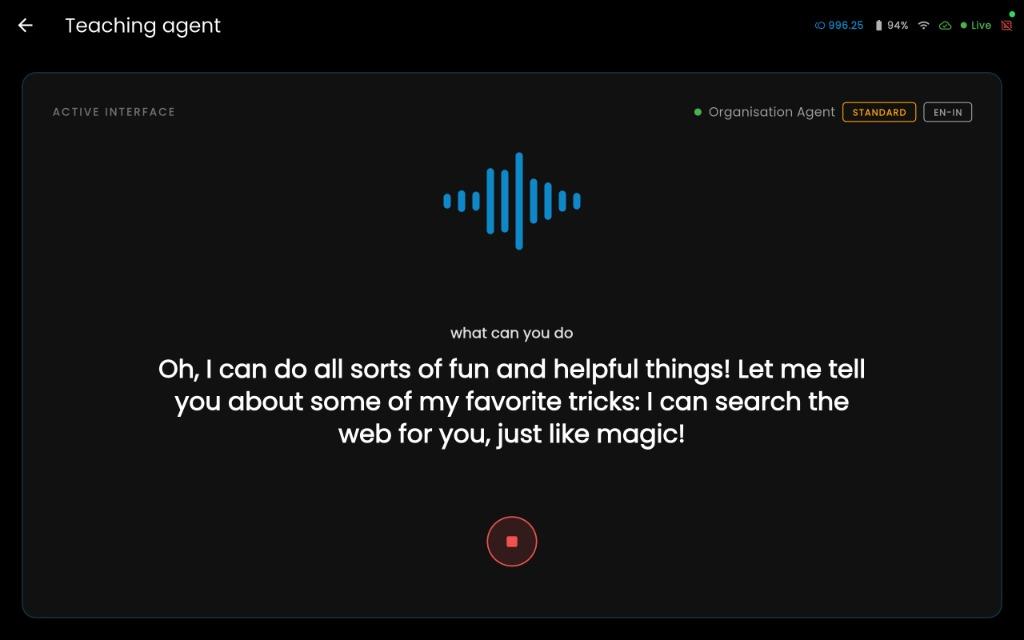
BonicOS shown.
On BonicBot Controller App (A2 or remote S1/M1)
Conversation restrictions on Controller App
Before testing conversations in the Controller App, note the following platform restrictions:
- No Authentication-Required Agents: The Controller App has no identity check-in gate (no camera face recognition or RFID hardware). If the robot’s active agent has Authentication Required enabled, the Controller App refuses to connect. Conversations requiring authentication must be conducted directly on the robot via BonicOS.
- No Edge (On-Device) Conversations: The Controller App carries no local AI model and exclusively runs cloud tiers (Standard and Premium). If the robot’s active agent is configured for the Edge tier (offline on-device), the Controller App refuses to connect. Edge conversations must be conducted directly on the robot via BonicOS.
Starting a conversation in the Controller App
-
In the Controller App, select the Agent tab in the bottom navigation bar.
-
Direct connection and phone speaker pairing:
- Pairing your phone with the robot speaker: Because conversation audio streams from your mobile device, pair your Android phone to the robot’s Bluetooth speaker in your Android system settings (Settings > Connected devices > Bluetooth). If not paired, the agent’s voice will play out of your phone’s built-in speaker instead of the robot.
- If already directly connected: If your phone is already directly connected to the robot in Direct Mode, the app opens the agent conversation screen immediately.
- If not directly connected: The app displays a Not Directly Connected prompt explaining that you can still use the agent to test its
bonic.aiconfiguration from your phone, along with a reminder:Reminder: Make sure the robot’s Bluetooth speaker is connected to this phone so the agent speaks through the robot.
Note: The Audio card under Control > Connectivity & Expansion (Pro) manages the robot processor’s internal amplifier link on A-Series Pro robots. It does not pair your Android phone to the speaker.
-
Select Continue on the prompt sheet (if shown) to enter the conversation view.
-
Select the Microphone icon and speak clearly into your phone or tablet microphone.
-
View the live response text stream and hear the agent answer aloud through the robot’s speaker.
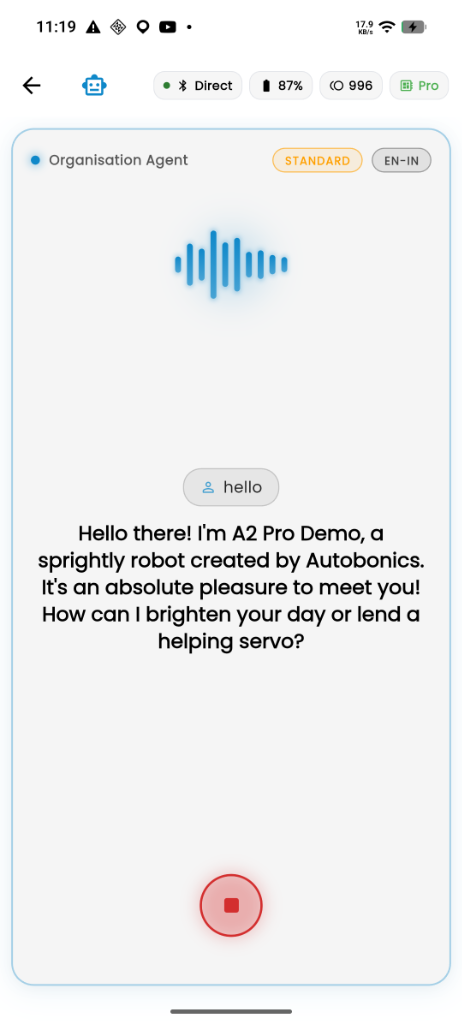
Controller App shown.
You should see: the live response text stream on your screen and hear the agent answer aloud through the connected speaker.
Note on robot movements and expressions: Accompanying physical body gestures (such as head or arm movement) and facial expressions depend on your robot model, being connected in Direct Mode (Bluetooth), and having an active Talk action sequence assigned to the robot. If connected in Cloud Mode or if no motion sequence is configured, the agent answers as voice and text only without accompanying physical movement.
Control a conversation
These controls are available in both BonicOS and the Controller App. The screenshots in this section show the Controller App; BonicOS uses a wider tablet layout. Edge remains BonicOS-only; Controller conversations use Standard or Premium.
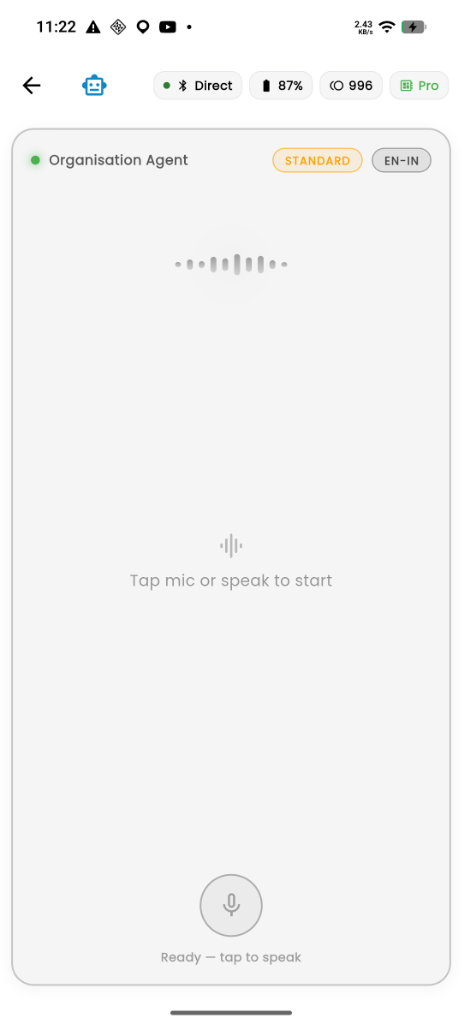
Controller App shown.
Allow the microphone and start listening
- Allow microphone access when requested.
- Wait for the agent to finish preparing. Controller may show Preparing microphone…, Loading personality…, and Connecting to AI….
- When the screen shows Ready — tap to speak, select the microphone icon.
- Speak when it shows Listening…. Select the microphone again to stop listening.
- Wait while Thinking… appears and the agent prepares its reply.
You should see: listening or response feedback and the agent’s reply. Premium conversations show the agent’s reply but may omit your spoken-input transcript.
Interrupt a spoken reply
- While the agent is speaking, select the square stop-speaking button that replaces the microphone.
- When the microphone control returns, select it if you want to speak again.
You should see: the spoken reply stop and the conversation remain open.
Note: The stop-speaking control interrupts speech. To stop robot navigation, use the navigation Stop control; see Cancelling or stopping navigation.
Recover from a permission or connection error
- If Controller says the microphone is blocked, select Open Settings when offered and enable microphone permission for the app.
- Return to the app and select I’ve enabled it — Try Again when shown.
- For a connection error, check internet access for online conversations and select Try Again when offered on the error screen.
- If the error concerns an unsupported agent, change its configuration or use the appropriate interface. Retrying does not add Edge or protected-agent support to Controller.
You should see: conversation preparation resume, followed by listening or ready status. If it still fails, record the displayed error and contact BonicAI support without sharing passwords or private conversation content.
Ending a conversation and inactivity timeout
You can end a conversation manually at any time, or allow the automatic inactivity timer to close it:
Manual exit
- On BonicOS: Select the back arrow or close button in the top bar to leave the conversation and return to the Home Dashboard.
- On Controller App: Select the back control to exit the conversation view and return to the robot workspace.
Reminder: Any change made to the active agent in BonicAI takes effect when the next conversation begins. Ending the current session allows the robot to load your newly assigned agent upon the next visit.
Automatic inactivity timeout (30-second rule)
Both BonicOS and the Controller App include an automatic silence detection timer to conserve robot battery and maintain conversational privacy:
- The 20-second threshold: After 20 seconds of silence with no voice input or screen interaction, an on-screen countdown appears displaying: Returning to home in [X]s · Speak to continue.
- The 10-second countdown: The banner counts down from 10 to 0 seconds. Speak clearly or tap the microphone before the countdown expires to continue conversing.
- Automatic session termination: If no speech is detected, the conversation automatically closes after 30 seconds of total inactivity.
- Timer pause states: The inactivity timer automatically pauses while the agent is speaking, generating an AI response, reconnecting to the network, or executing an agent-directed drive.
- Session security on BonicOS: On BonicOS, ending a conversation (manually or via timeout) closes the verified visitor session. Opening a protected agent again requires re-verifying identity through the authentication gate.
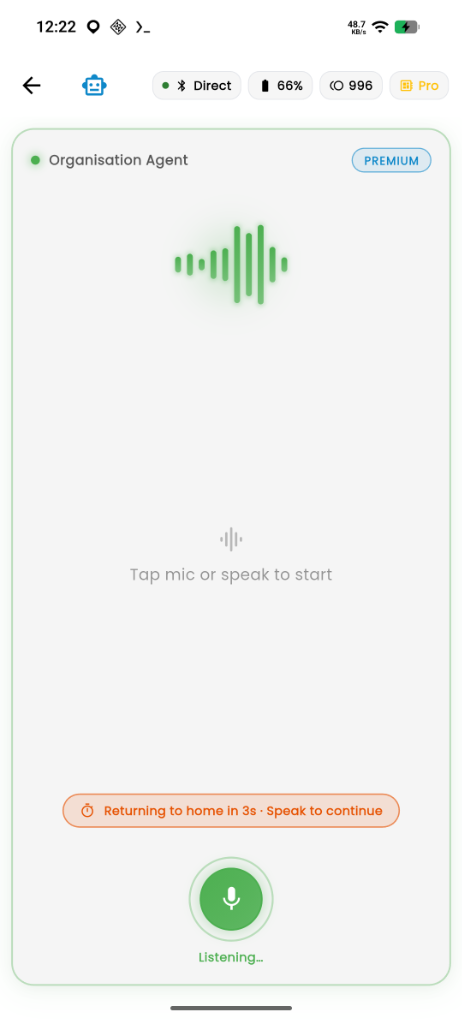
Controller App shown.
Check robot credits
Who can do this: People with User or Admin access to the robot
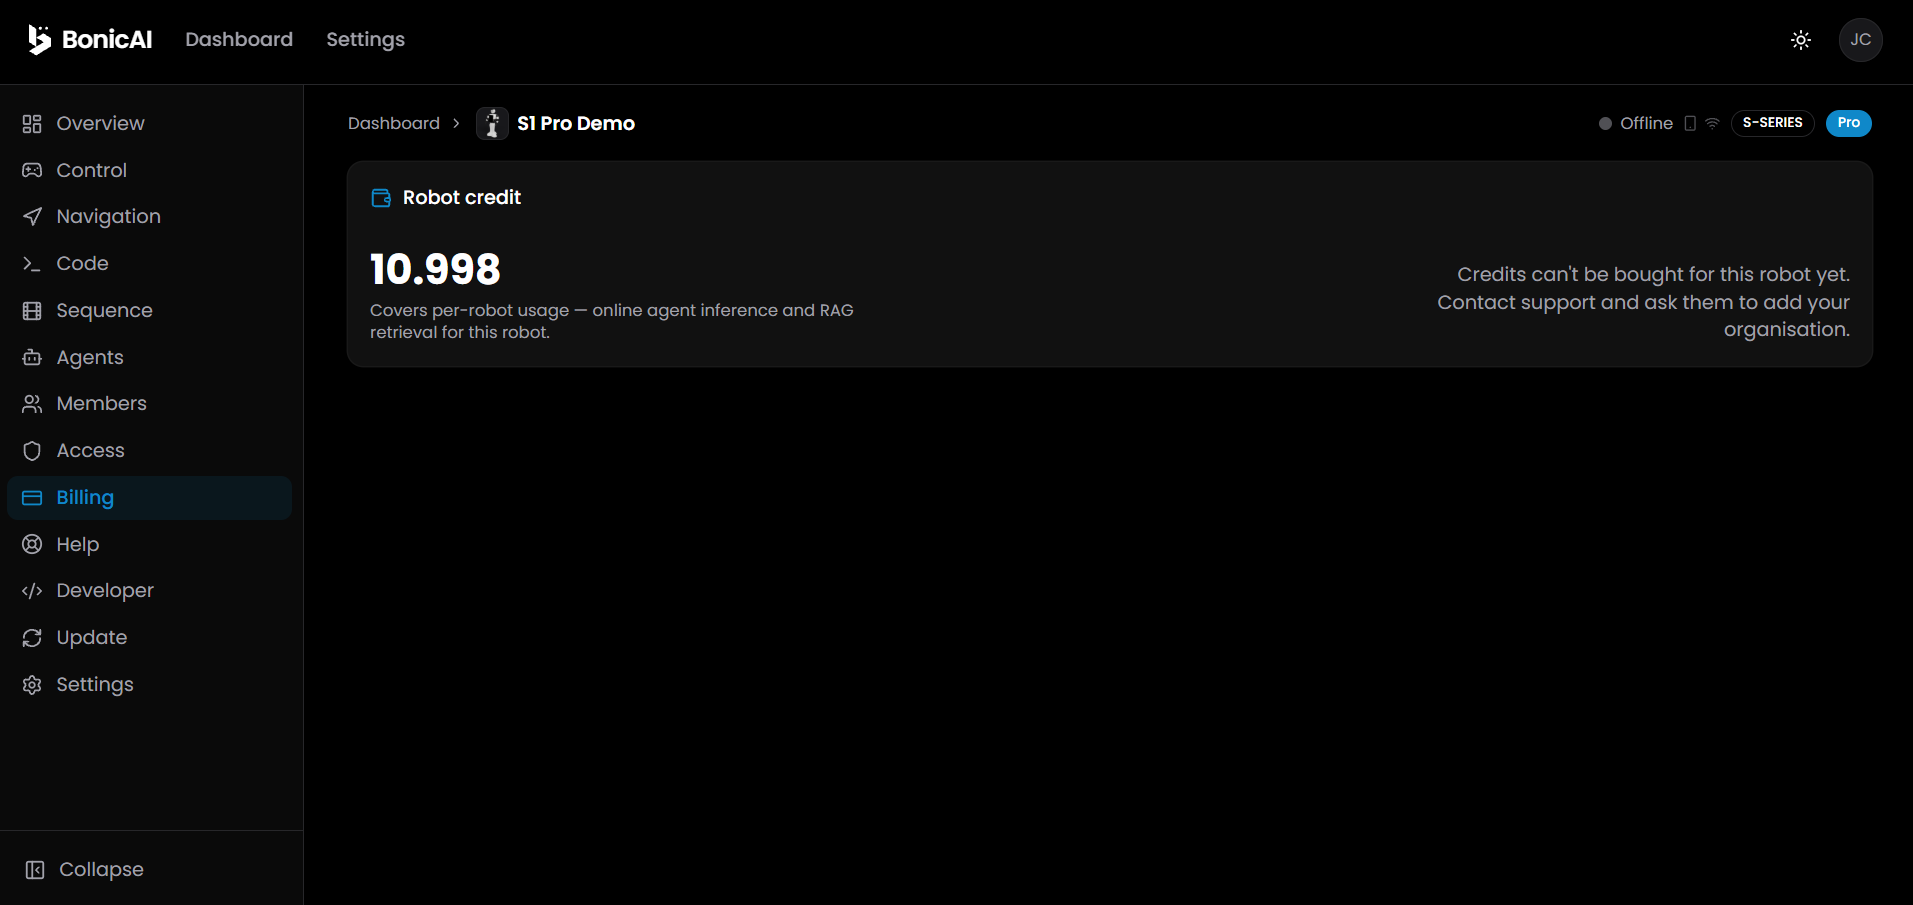
- In BonicAI, open your robot and select Billing.
- Check Robot credit. Standard and Premium conversations and online knowledge searches use robot credits.
- To review the prices offered for your agent, open its Configuration and select Compare Tiers & Pricing, where available.
- To request a top-up, contact support@autobonics.com with your organisation name and robot name or Robot Code.
- After support confirms the top-up, reopen Billing and check the balance.
You should see: the robot’s current credit balance, updated after a completed top-up.
Robot credits belong to this robot. Organisation credits cover separate organisation and Studio usage; they are not the same balance.
Next step
Optional: Record and play motion sequences. If you have a Pro robot and want to use autonomous travel, continue to Navigation and mapping.