BonicAI Department Agent — User Guide
This guide covers creating and managing a Department Agent on the BonicAI platform — the full-featured agent with knowledge base access, prompt authoring, model tier selection, and security controls, managed from within a department.
ℹ️ Department Agent vs. Robot Agent (Quick Comparison)
- Department Agent : Created at the department level. Full-featured agent object with attached Knowledge Bases for RAG retrieval, system instructions, tier options, plus department-wide Security & Auth controls (Face Recognition, RFID, Email/Password). Can be assigned to any accessible robot across the department.
- Robot Agent (configured in Robot Dashboard): Created directly on a specific robot’s Agents page. Quick to set up, but has no Knowledge Base access and no security options. Every robot also includes a pre-provisioned Default Agent as a fallback.
Department Agents Hub
To view and manage Department Agents, open your department from My Organisation (e.g. Autobonics → R&D) and select Agents under the ROBOT sidebar menu.
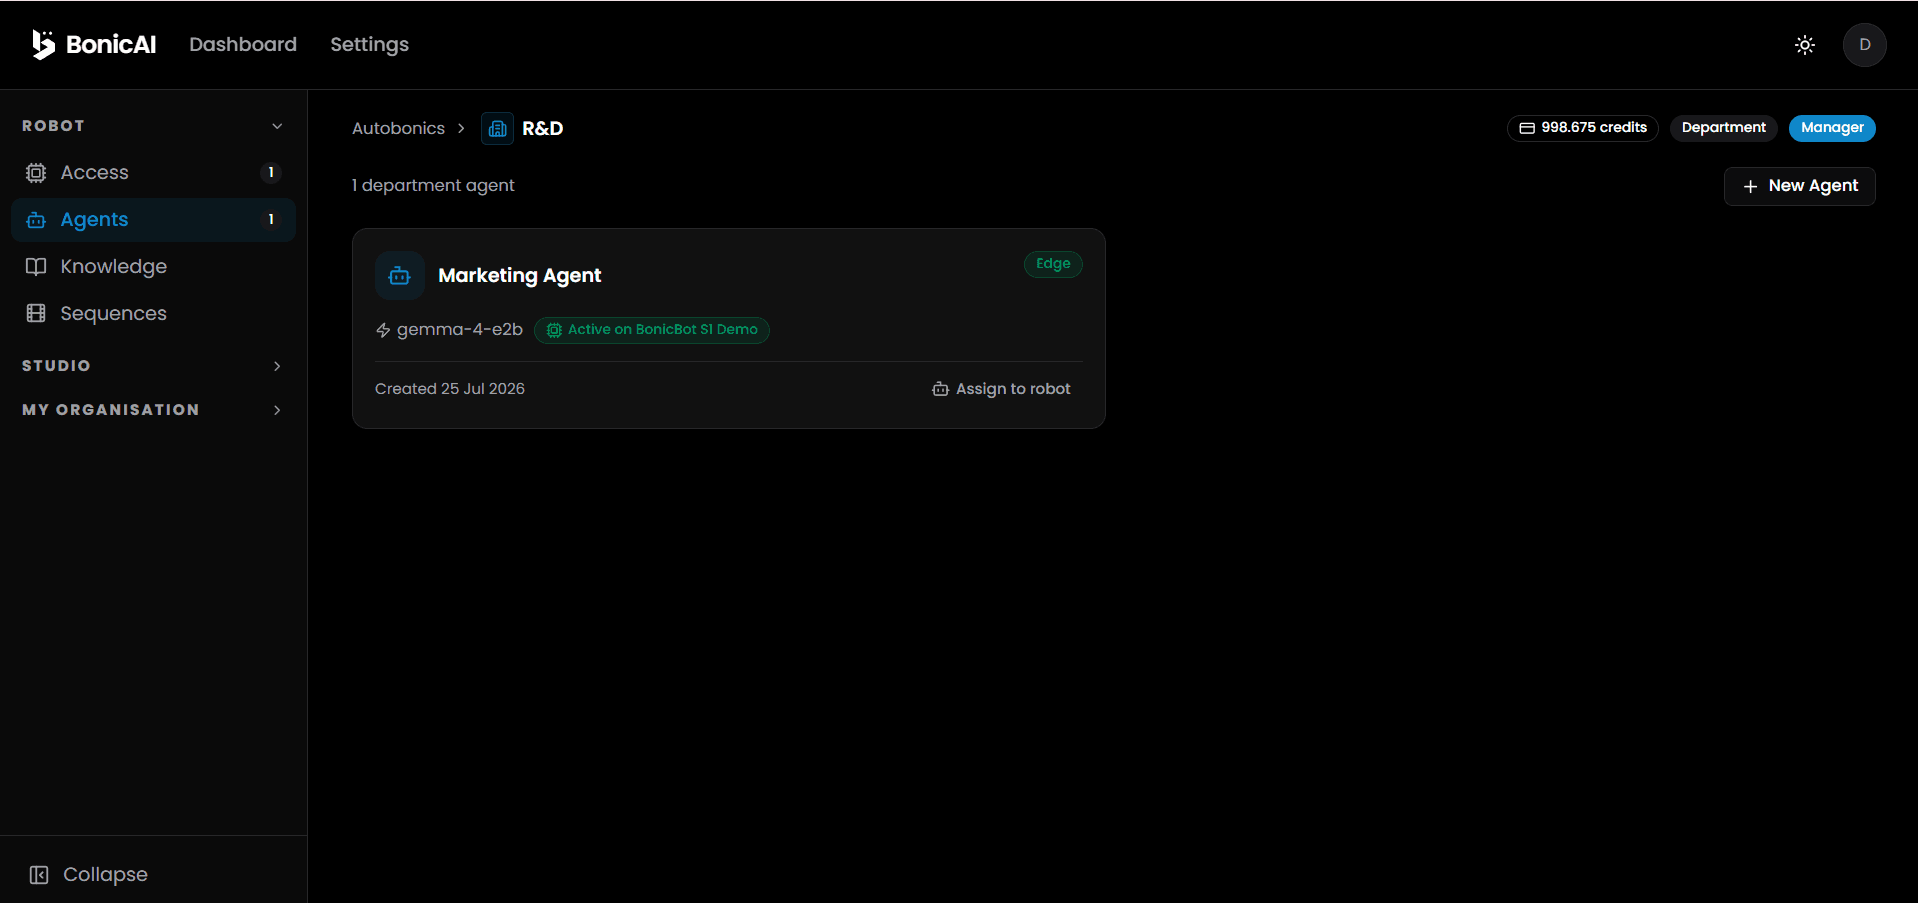
- The page header shows how many department agents exist (e.g. “1 department agent”).
- A + New Agent button in the top right lets you create a new one.
- Each agent is displayed as a card with:
- Name (e.g. “Marketing Agent”)
- Runtime tier badge — Edge (100% on-device), Standard, or Premium
- Model used (e.g.
gemma-4-e2borgemini-2.0-flash) - Active on [robot name] badge, shown in green when currently running on a robot
- Created date
- Assign to robot link/button, to deploy this agent to an accessible robot
Creating a New Department Agent
Clicking + New Agent opens the New Department Agent dialog: “Create an AI agent scoped to this department with optional knowledge base access.”
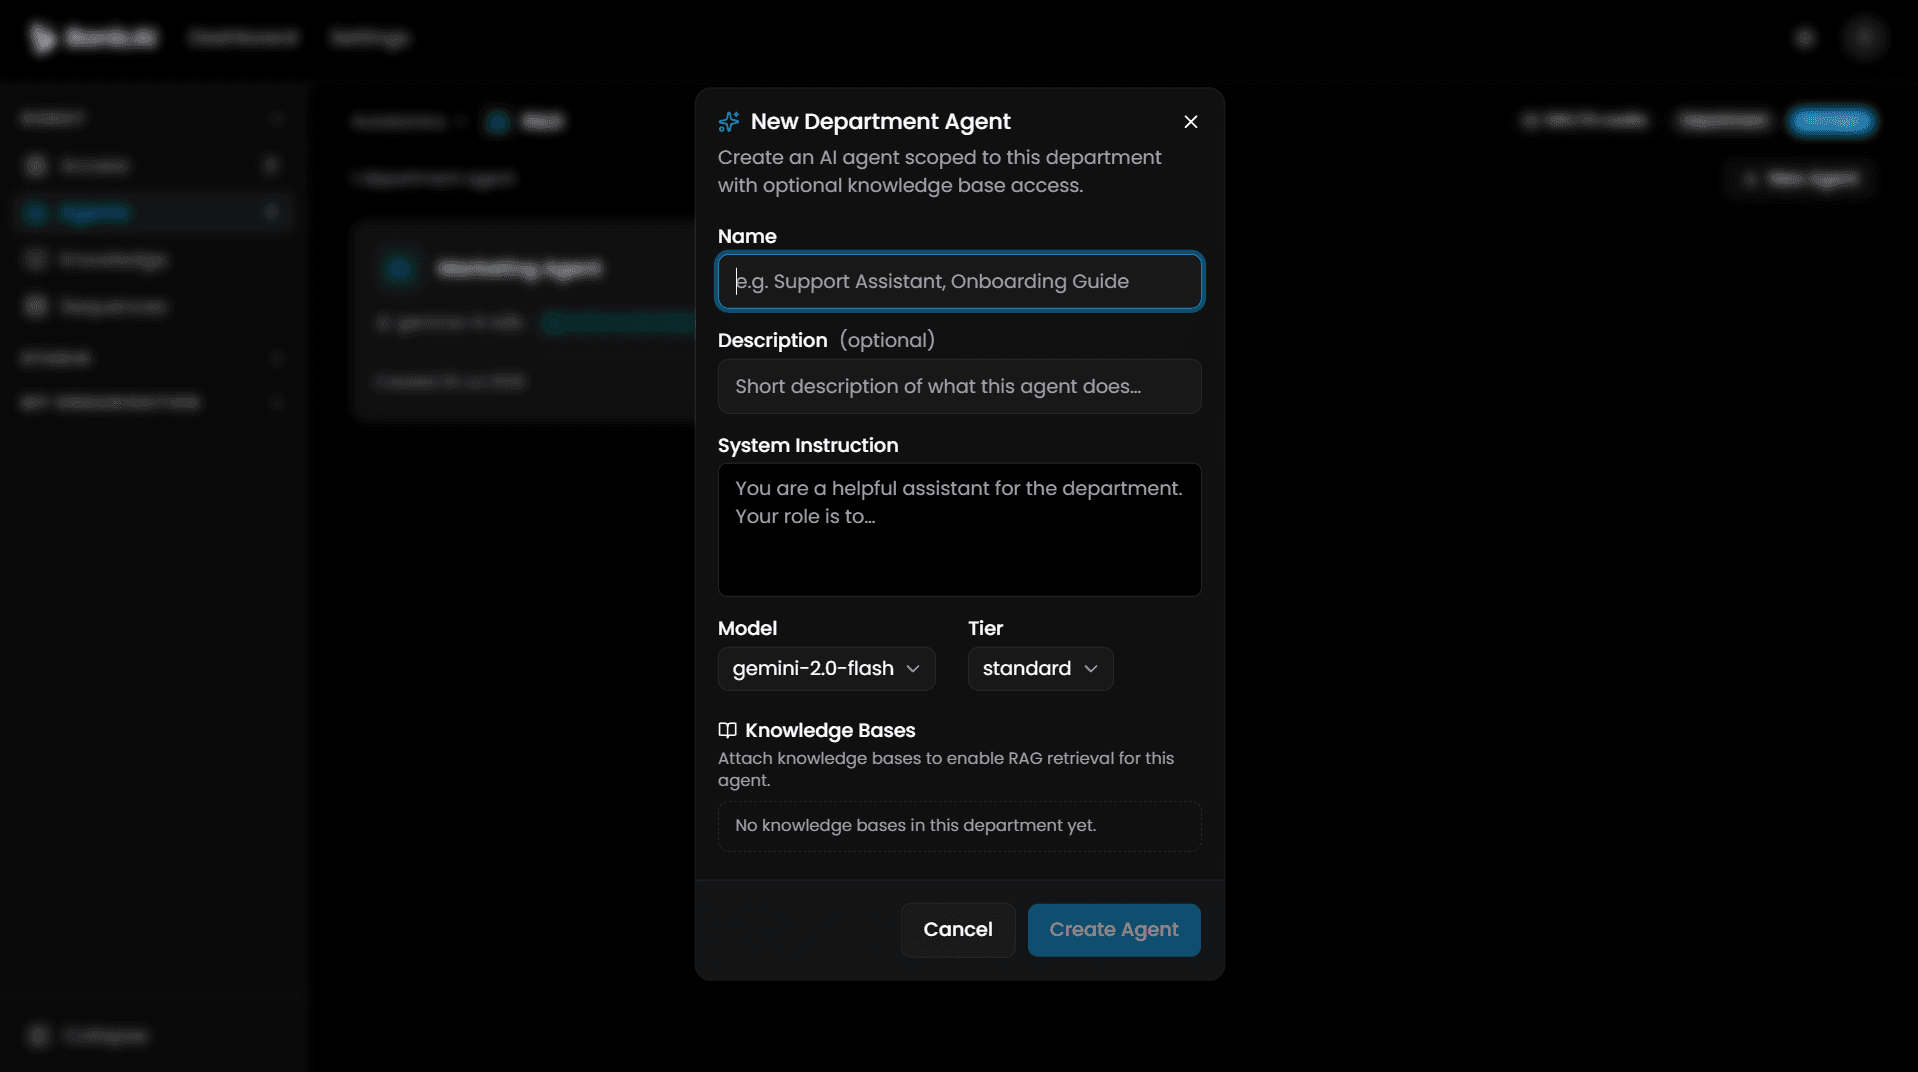
Fields to fill in:
- Name — a short, descriptive name (e.g. “Support Assistant”, “Onboarding Guide”)
- Description (optional) — a short summary of what the agent does
- System Instruction — the core prompt defining the agent’s role and behavior (e.g. “You are a helpful assistant for the department. Your role is to…”)
- Model — the underlying AI model to use (e.g.
gemini-2.0-flash) - Tier — the runtime tier (e.g.
standardoredge) - Knowledge Bases — attach one or more knowledge bases to enable RAG (retrieval-augmented generation) for the agent. If none exist yet for the department, you’ll see “No knowledge bases in this department yet.”
Once configured, click Create Agent to save it. The new agent will appear as a card on the Department Agents page.
Assigning an Agent to a Robot
Clicking Assign to robot on an agent card opens the Assign to Robot dialog: “Set [Agent Name] as the active agent on an accessible robot.”
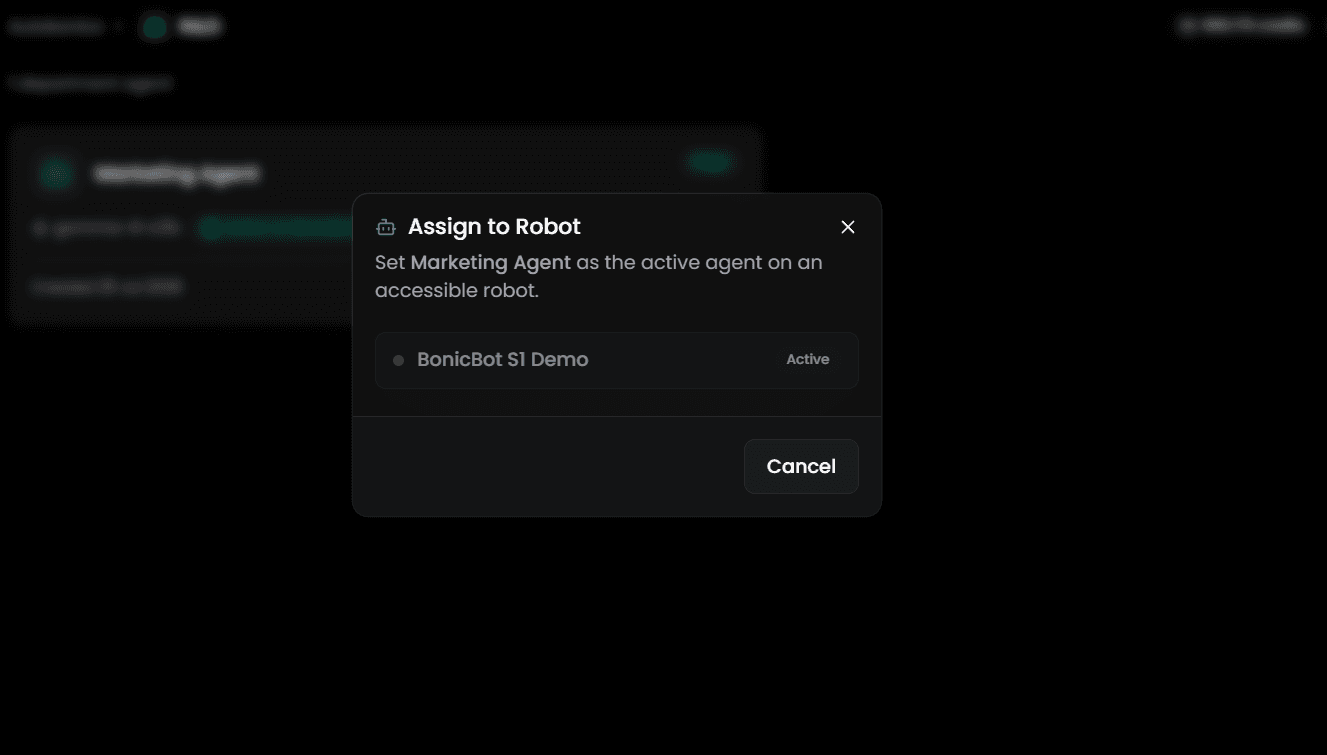
- Displays each robot accessible to the department (e.g. “BonicBot S1 Demo”), with a status dot and label showing whether it’s currently Active or available to assign.
- Click a robot in the list to set this agent as its active agent.
- Click Cancel or the X to close without changing anything.
Once assigned, the agent becomes the active AI personality running live on that robot.
Agent Detail & Configuration Page
Clicking any agent card on the Department Agents page opens that agent’s dedicated detail and configuration workspace.
A left sidebar switches between six tabs: Overview, Configuration, Knowledge, System Prompt, Security, and Deployment.
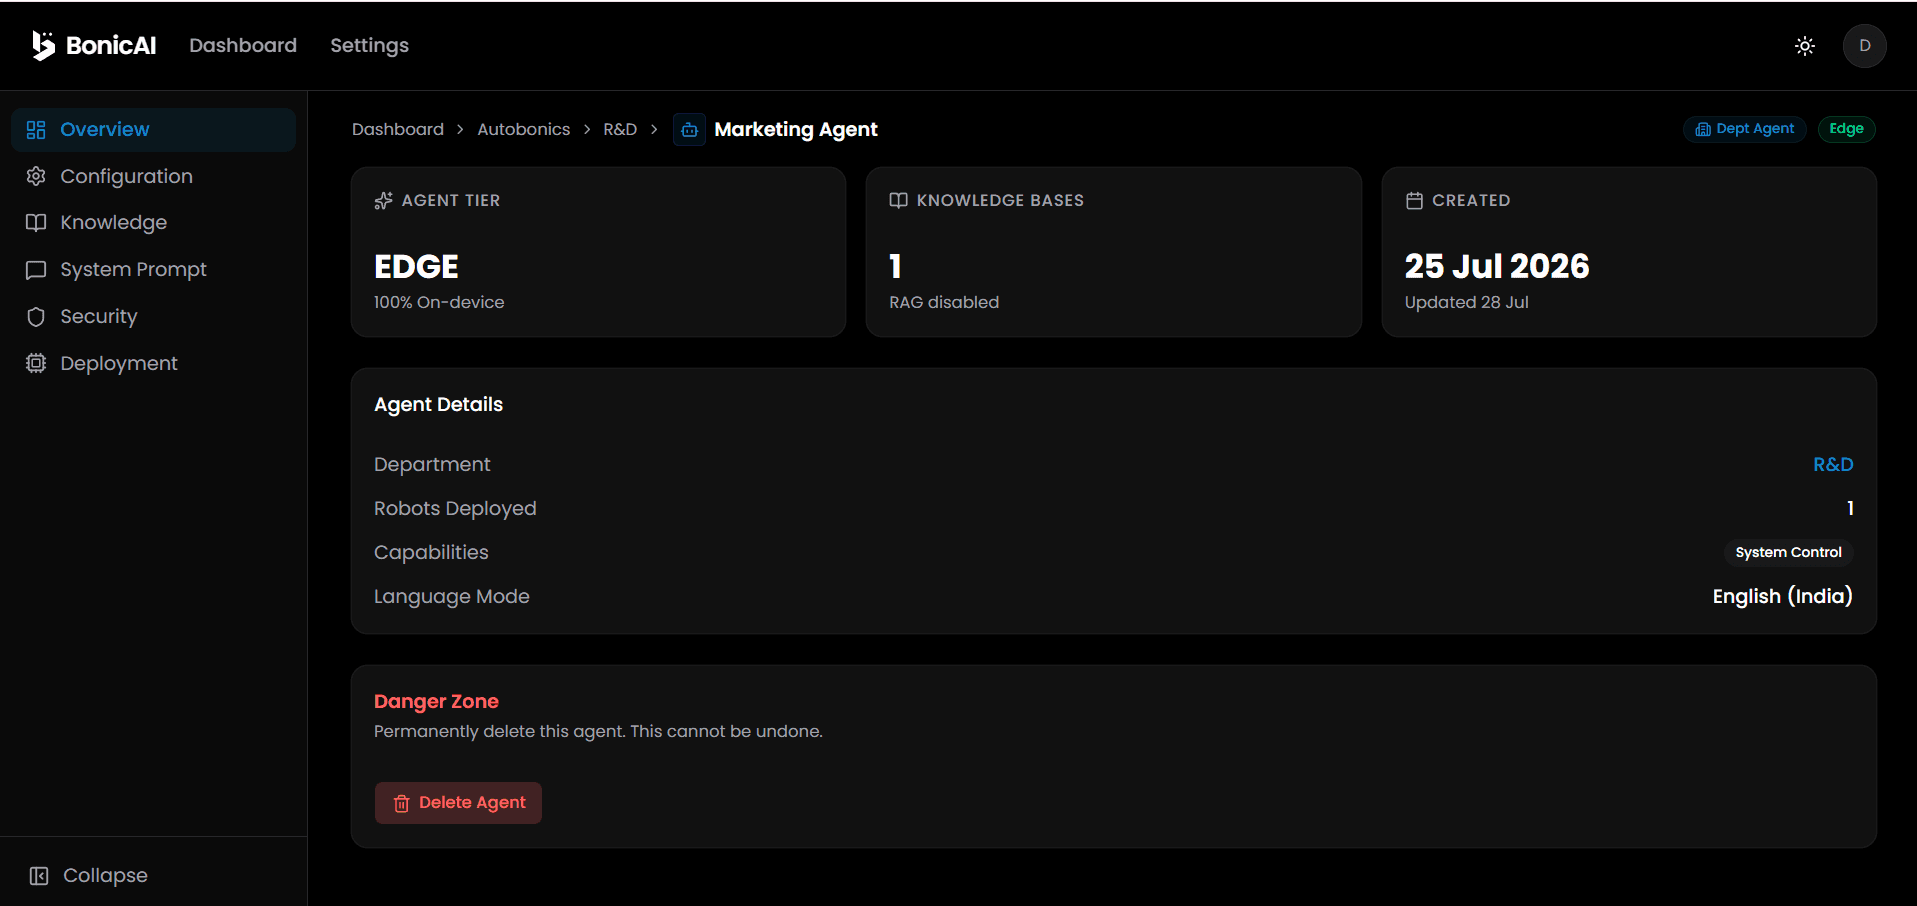
1. Overview Tab
Three summary cards:
- Agent Tier — e.g. “EDGE — 100% On-device”
- Knowledge Bases — count of attached KBs, and whether RAG is enabled/disabled
- Created — creation date and last-updated timestamp
Below that, Agent Details lists:
- Department — which department owns the agent
- Robots Deployed — how many robots are currently running it
- Capabilities — badges for enabled capabilities (e.g. System Control)
- Language Mode — the agent’s configured language (e.g. “English (India)”)
At the bottom, a Danger Zone lets you permanently Delete Agent.
2. Configuration Tab
Header: “Agent Personality & Tier — Abstract configurations into BonicOS Tiers. Model details are auto-managed.”
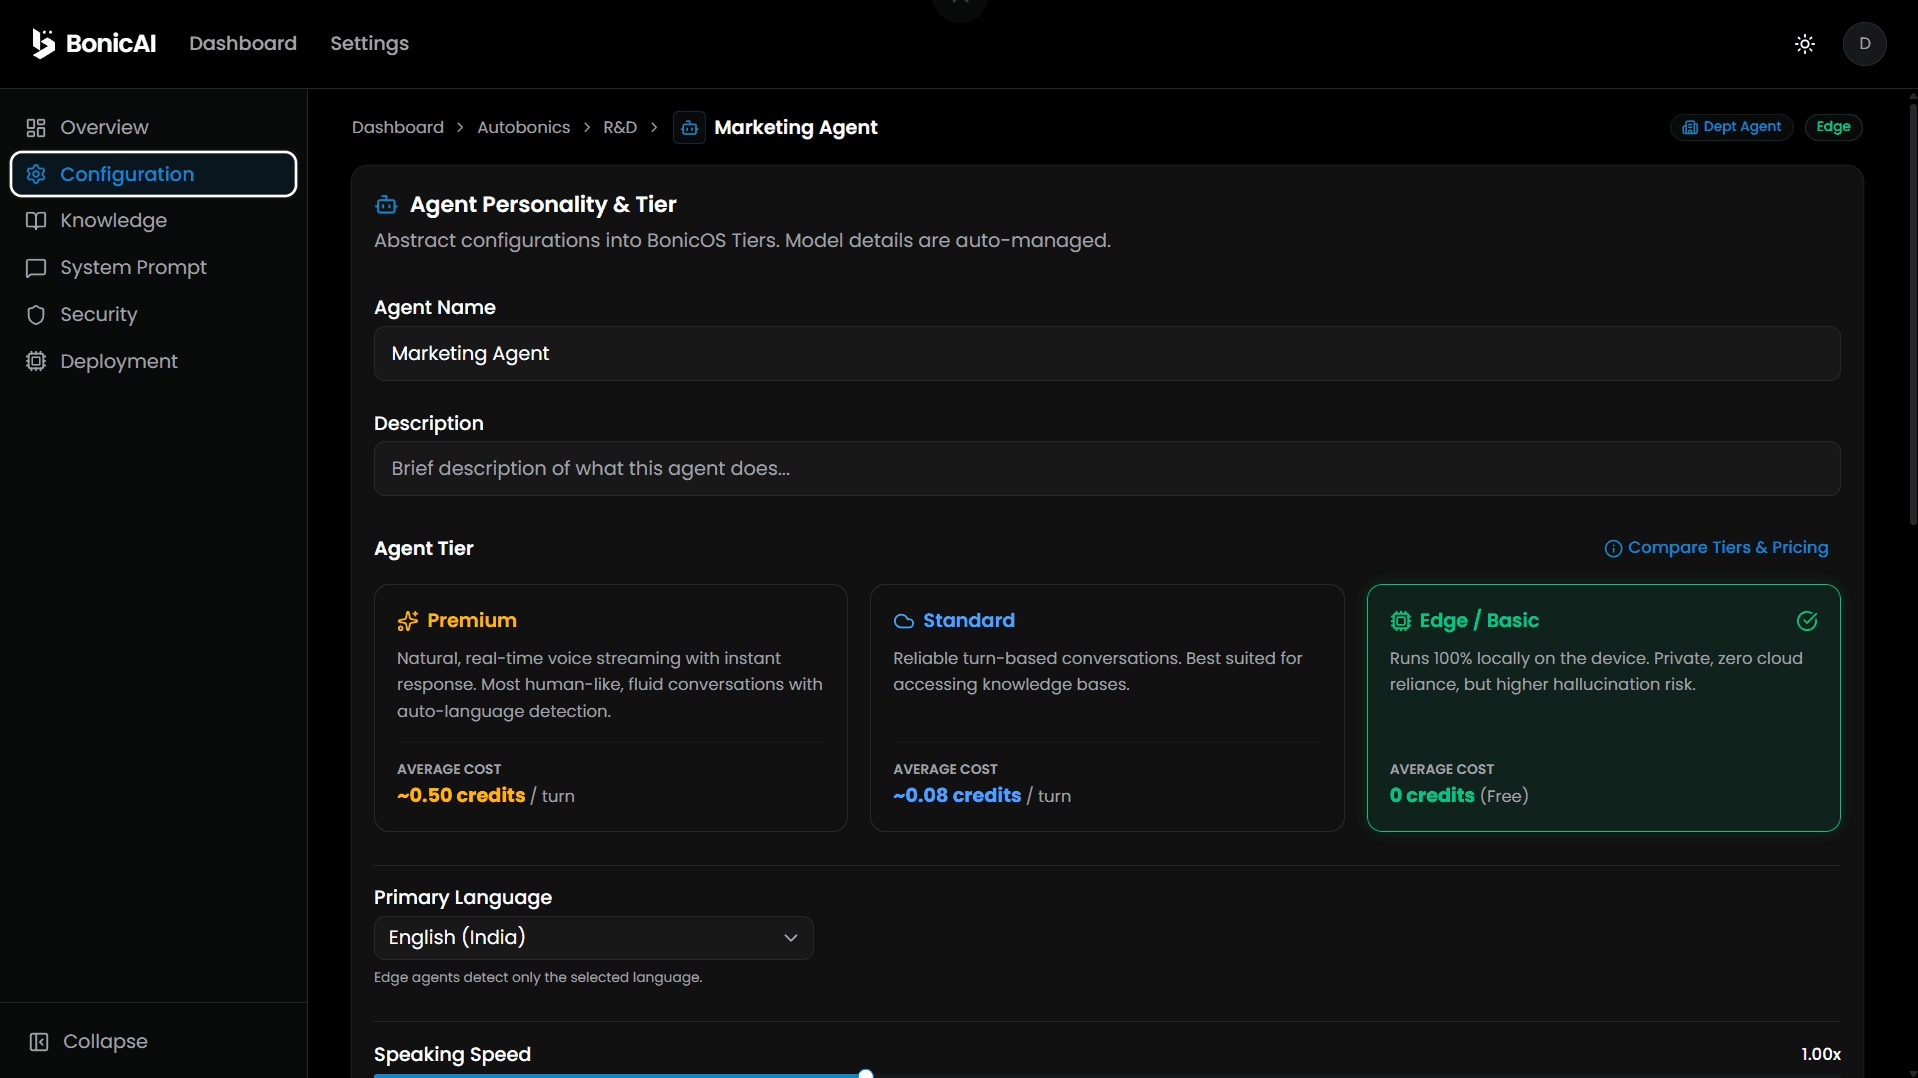
- Agent Name — editable name field
- Description — short description of what the agent does
- Agent Tier — choose between three runtime tiers:
- Premium — natural, real-time voice streaming with instant response, most human-like conversations, auto-language detection (~0.50 credits/turn)
- Standard — reliable turn-based conversations, best for accessing knowledge bases (~0.08 credits/turn)
- Edge / Basic — runs 100% locally on the device, private with zero cloud reliance (0 credits — free)
- Primary Language — dropdown (e.g. “English (India)”)
- Speaking Speed — slider controlling speaking rate (e.g. 1.00x)
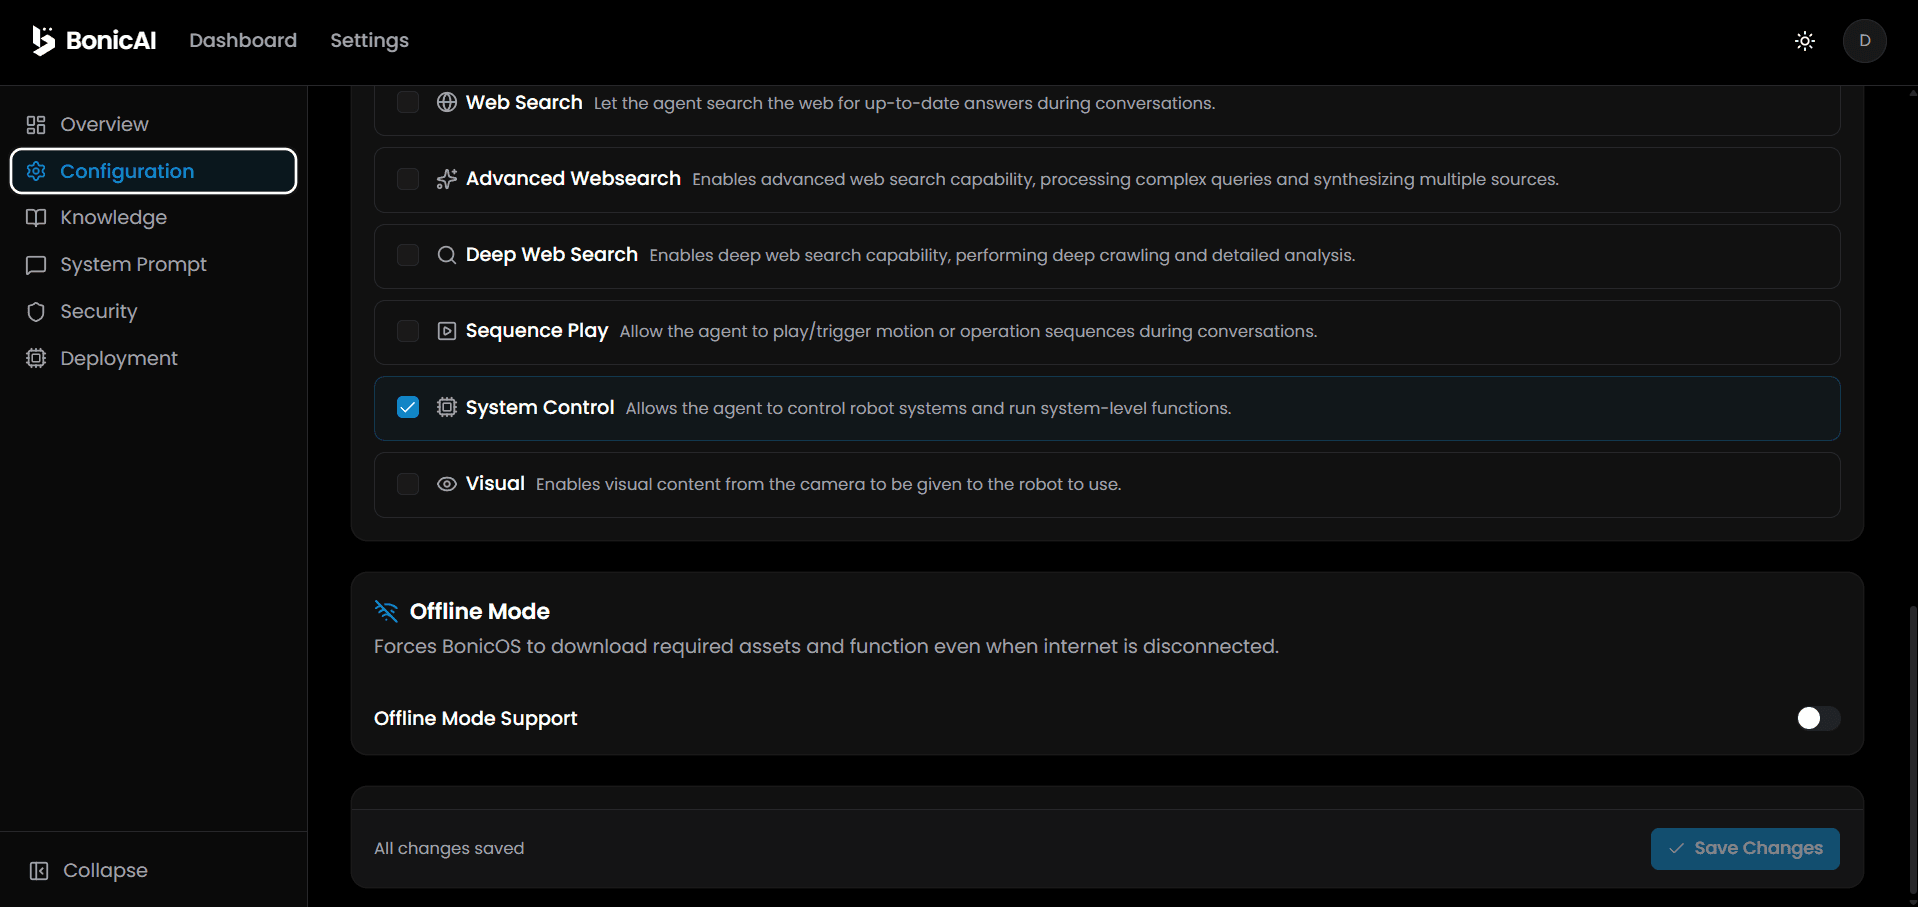
- Capabilities — select permitted features during conversations:
- Web Search — search the web for live answers
- Advanced Websearch — process complex multi-source queries
- Deep Web Search — deep crawling and detailed analysis
- Sequence Play — play/trigger motion or operation sequences
- System Control — control robot systems and run system-level functions
- Visual — process visual content from the camera
- Offline Mode — “Forces BonicOS to download required assets and function even when internet is disconnected.” Toggle Offline Mode Support on/off.
- Save Changes button at the bottom.
3. Knowledge Tab
Three summary cards: RAG Status, Attached KBs, and Total Files.
Below, Knowledge Bases — “Select which knowledge bases this agent can search for context during conversations.”
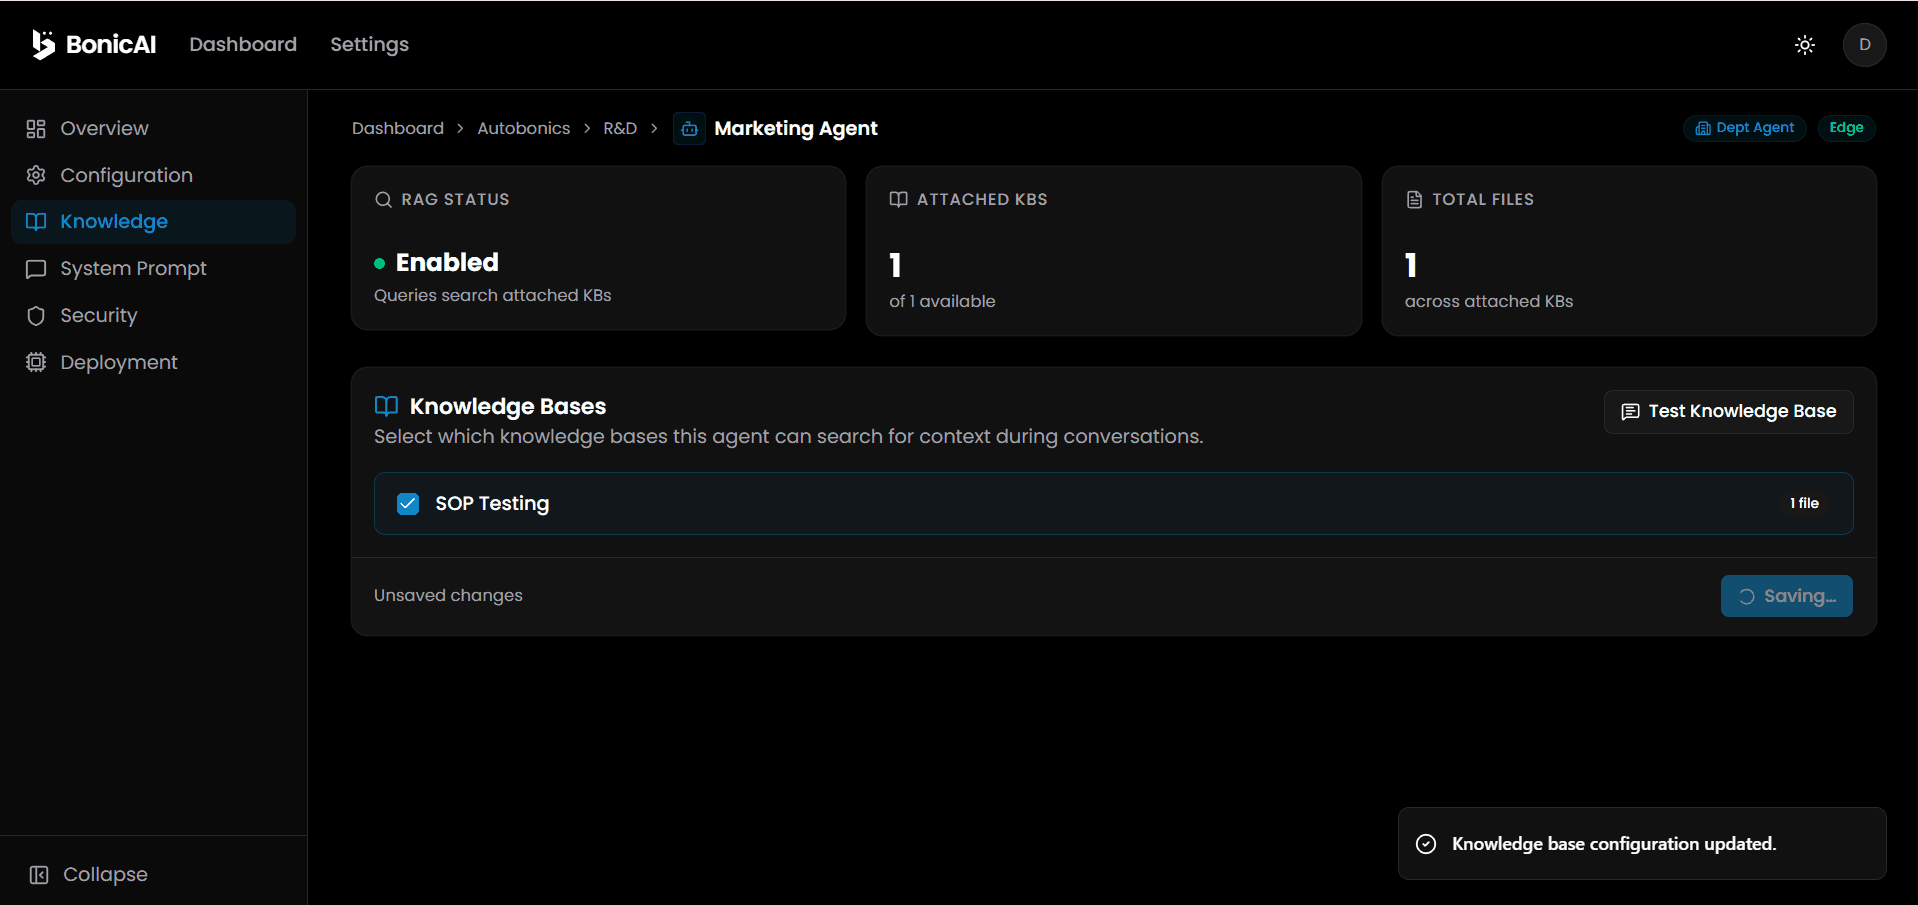
- Check the box next to any available knowledge group (e.g. “SOP Testing”) to attach it to this agent.
- Click Test Knowledge Base to test RAG retrieval queries.
- Click Save Changes to apply your attachments.
💡 Note: To create new knowledge groups or upload documents (PDF, TXT, DOCX, MD) for RAG embedding, see the Knowledge Base Creation Guide below.
4. System Prompt Tab
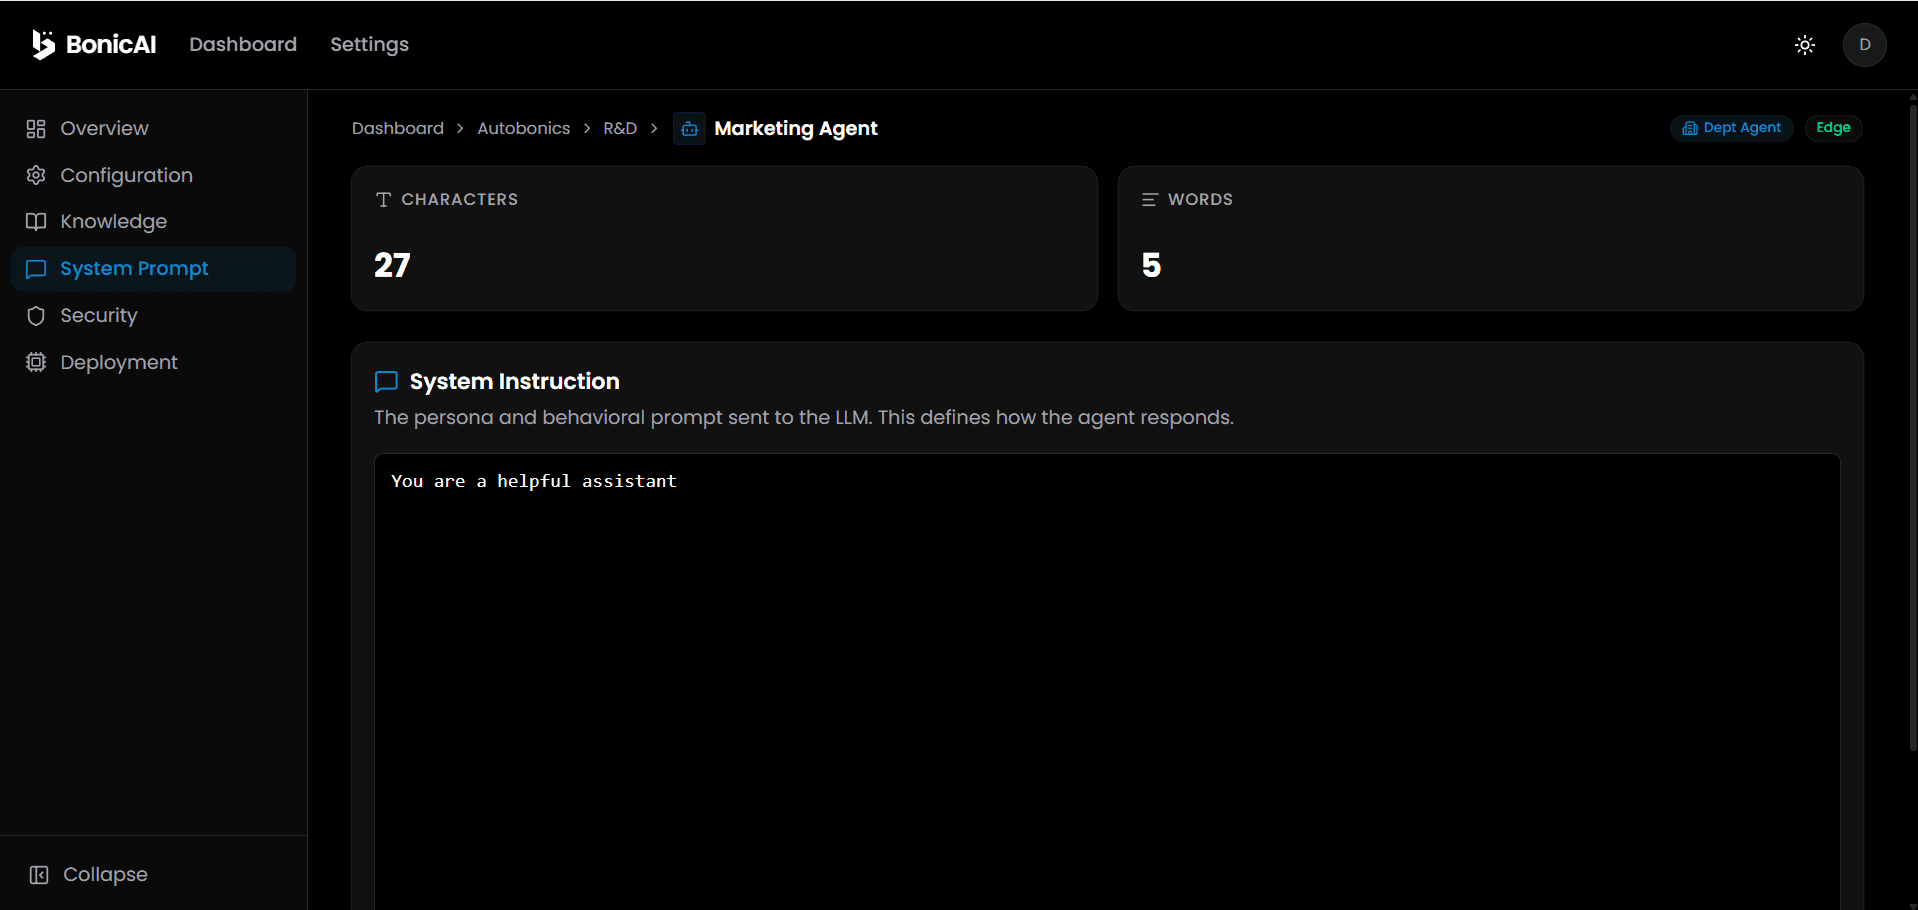
Live character and word counts display at the top.
Below, the System Instruction text editor — “The persona and behavioral prompt sent to the LLM. This defines how the agent responds.”
5. Security Tab
Two summary cards: Auth Status and Auth Methods.
Below, Authentication — “When enabled, users must authenticate before they can interact with a robot running this agent.”
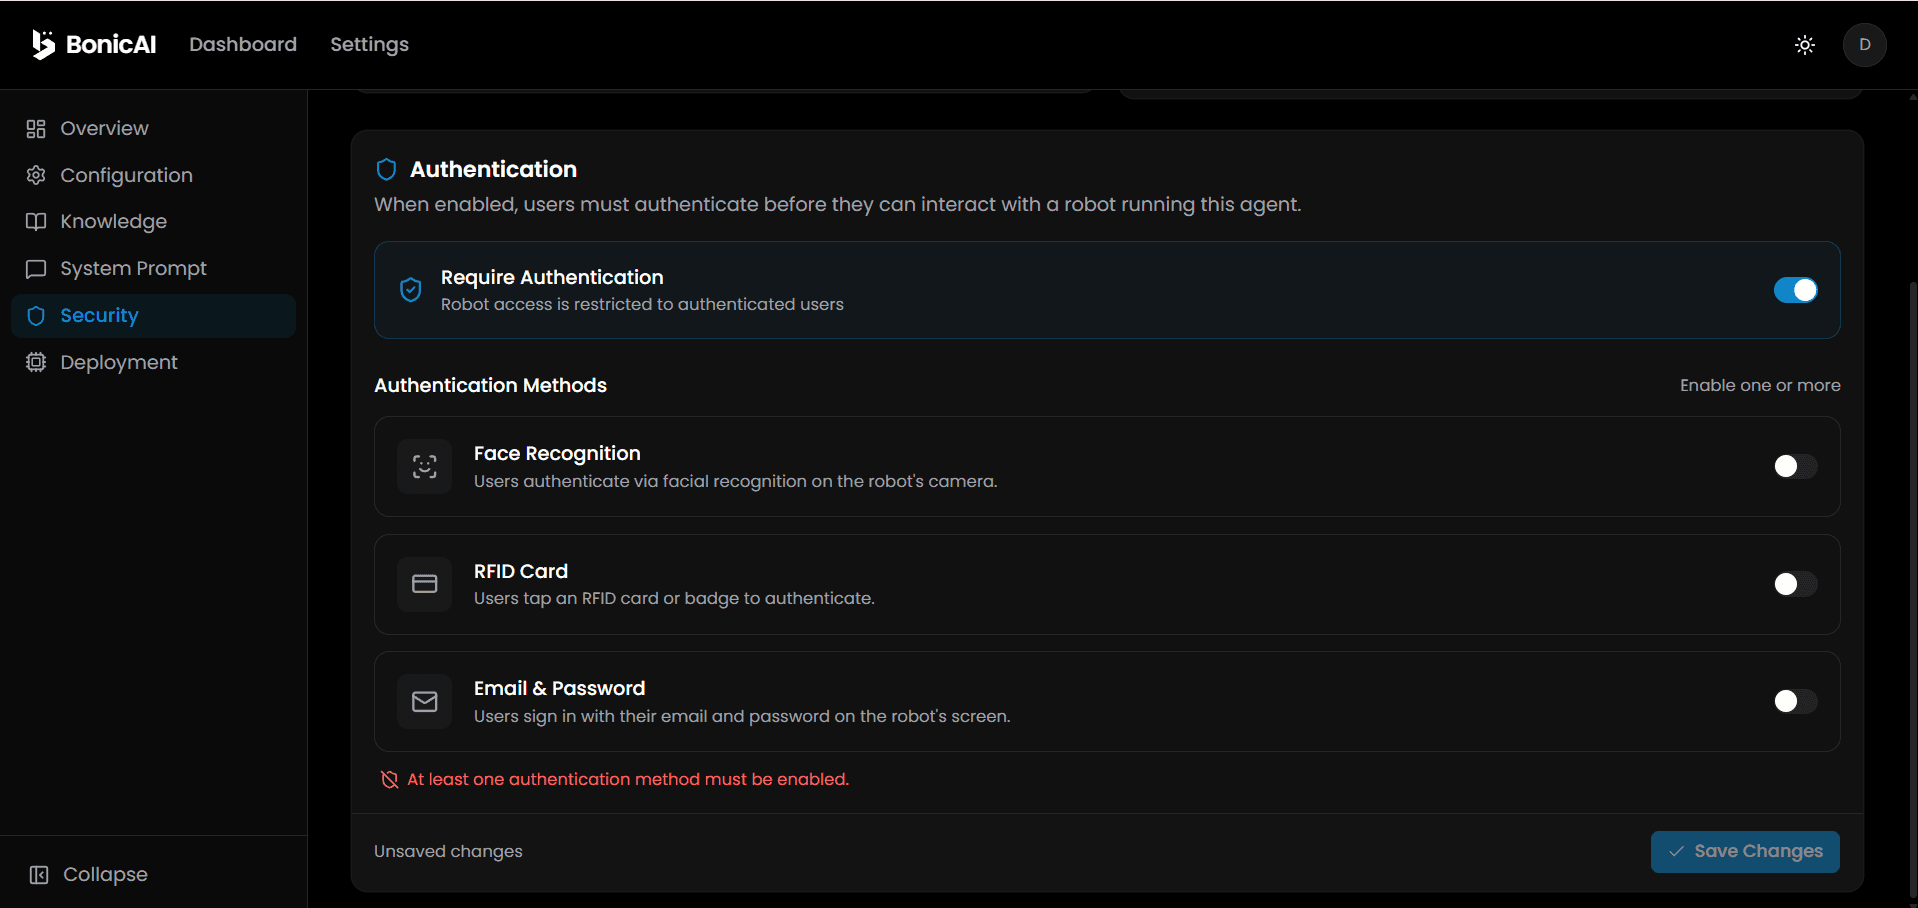
- Require Authentication Toggle — when off, the robot is open to anyone; when on, interaction is restricted to authenticated users.
- Authentication Methods (enable one or more):
- Face Recognition — authenticate via facial recognition on the robot camera
- RFID Card — tap an RFID card or badge
- Email & Password — sign in with email and password on the robot tablet screen
- Click Save Changes to lock security settings.
6. Deployment Tab
Summary cards: Active On, Available Robots, and Total Robots.
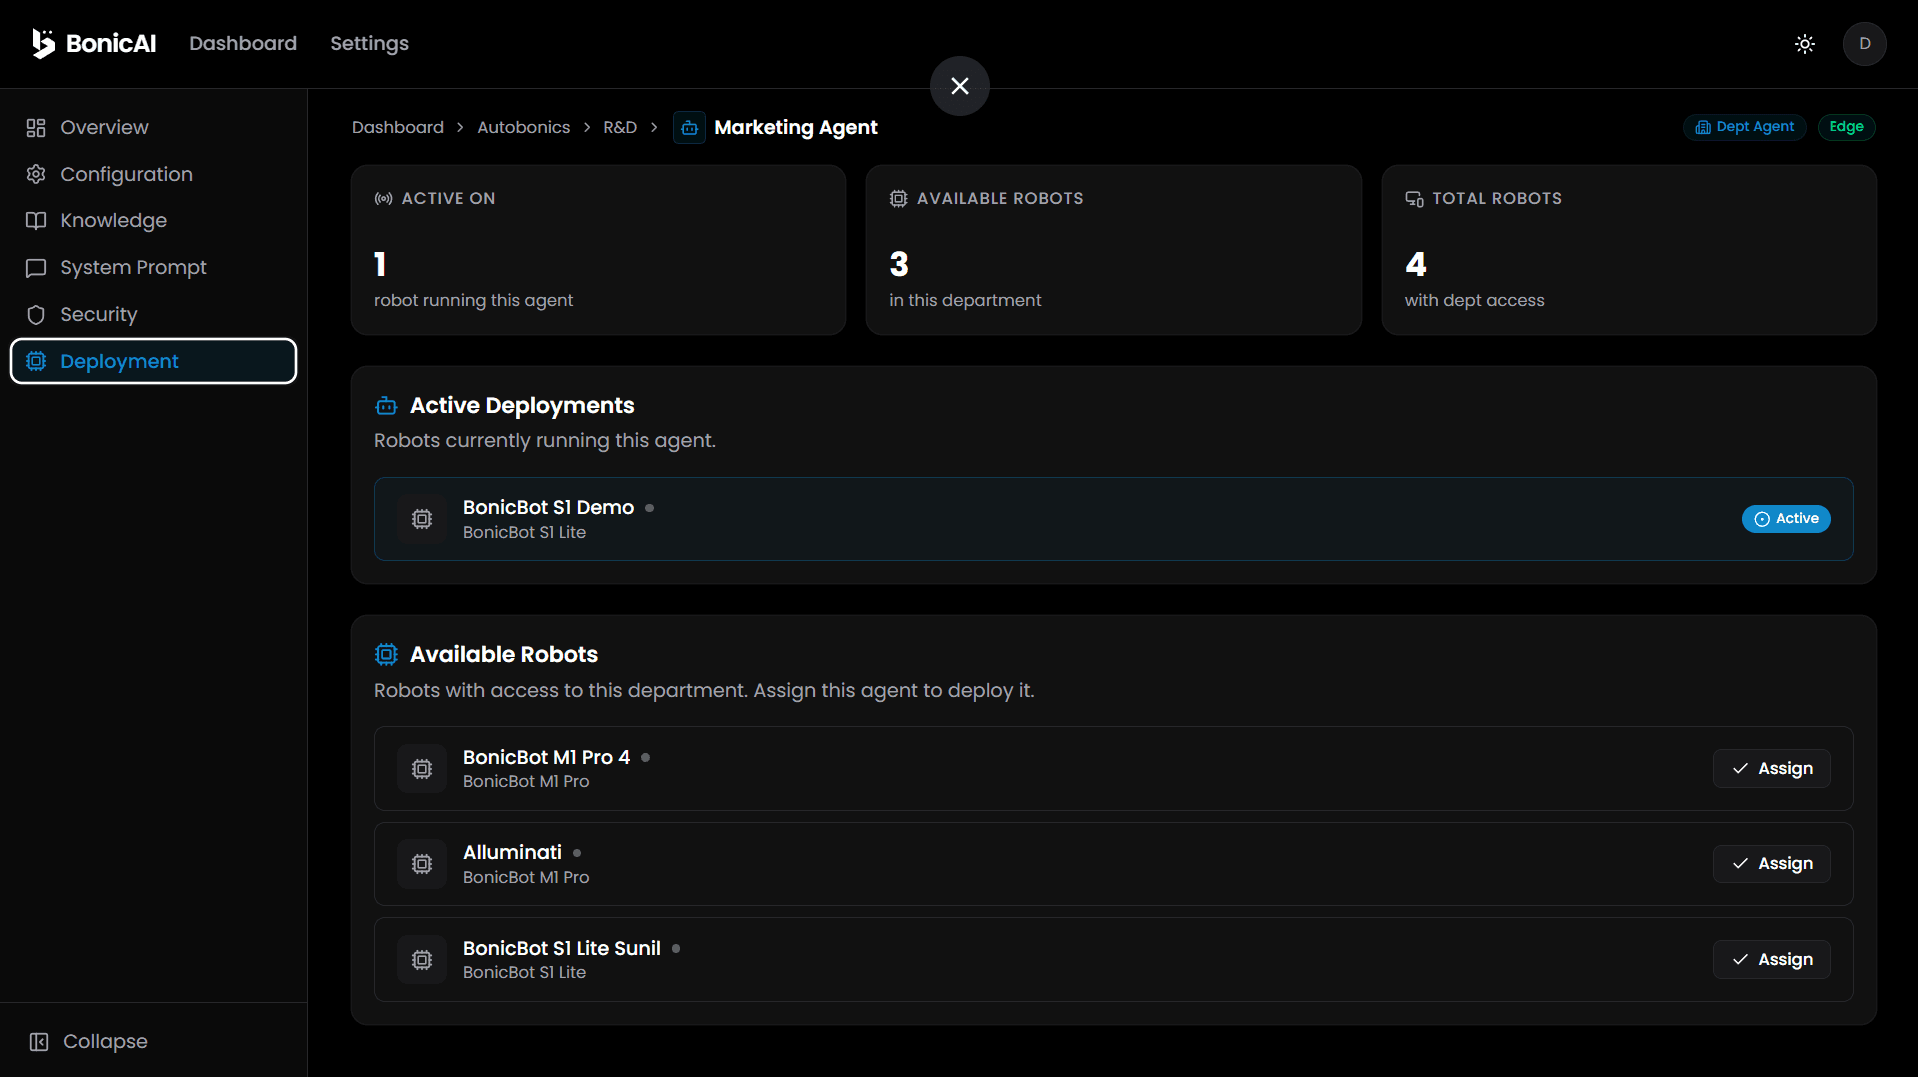
- Active Deployments — lists robots currently running this agent.
- Available Robots — lists accessible department robots not yet running this agent; click Assign next to any robot to deploy this agent to it instantly.
Knowledge Base
The Knowledge tab (under the ROBOT sidebar section) is where you build the knowledge bases that Department Agents attach to for RAG (retrieval-augmented generation).
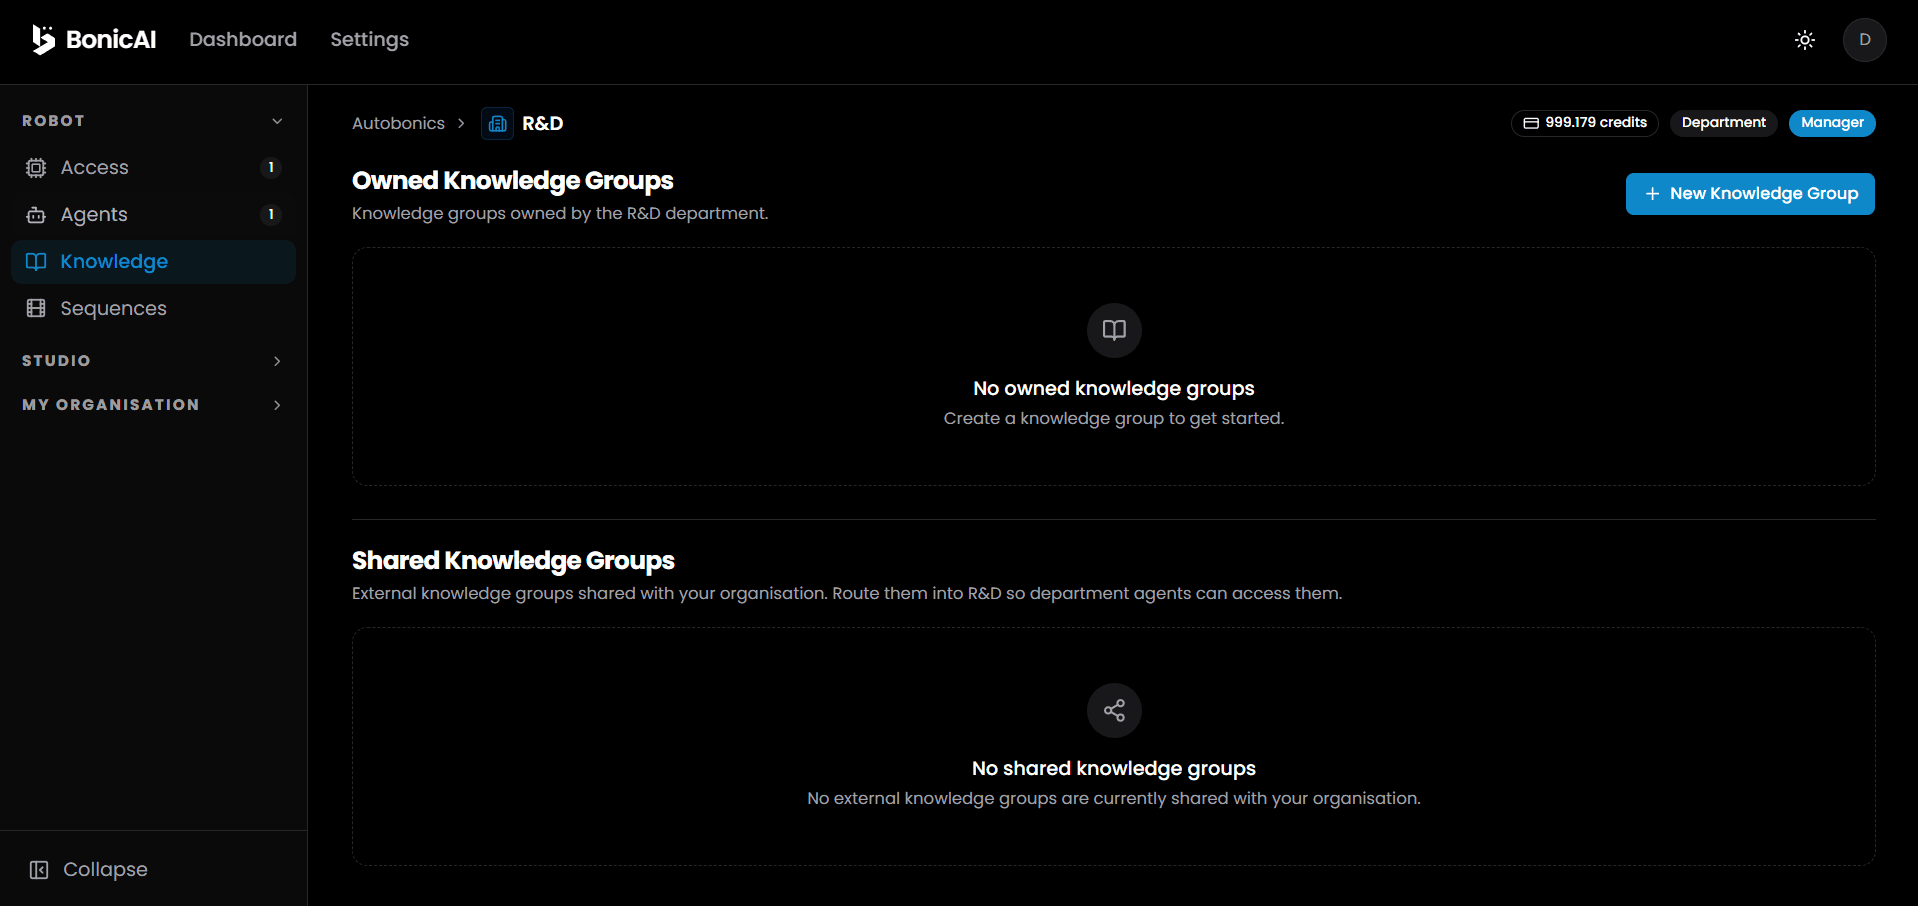
Owned Knowledge Groups
- Lists knowledge groups owned by this department (“Knowledge groups owned by the R&D department”).
- If none exist yet: “No owned knowledge groups — Create a knowledge group to get started.”
- Click + New Knowledge Group in the top right to create one.
Shared Knowledge Groups
- Lists external knowledge groups shared with your organisation.
- If none are shared yet: “No shared knowledge groups — No external knowledge groups are currently shared with your organisation.”
Creating a New Knowledge Group
Clicking + New Knowledge Group opens a dialog: “Create a new knowledge group under the [department] department.”
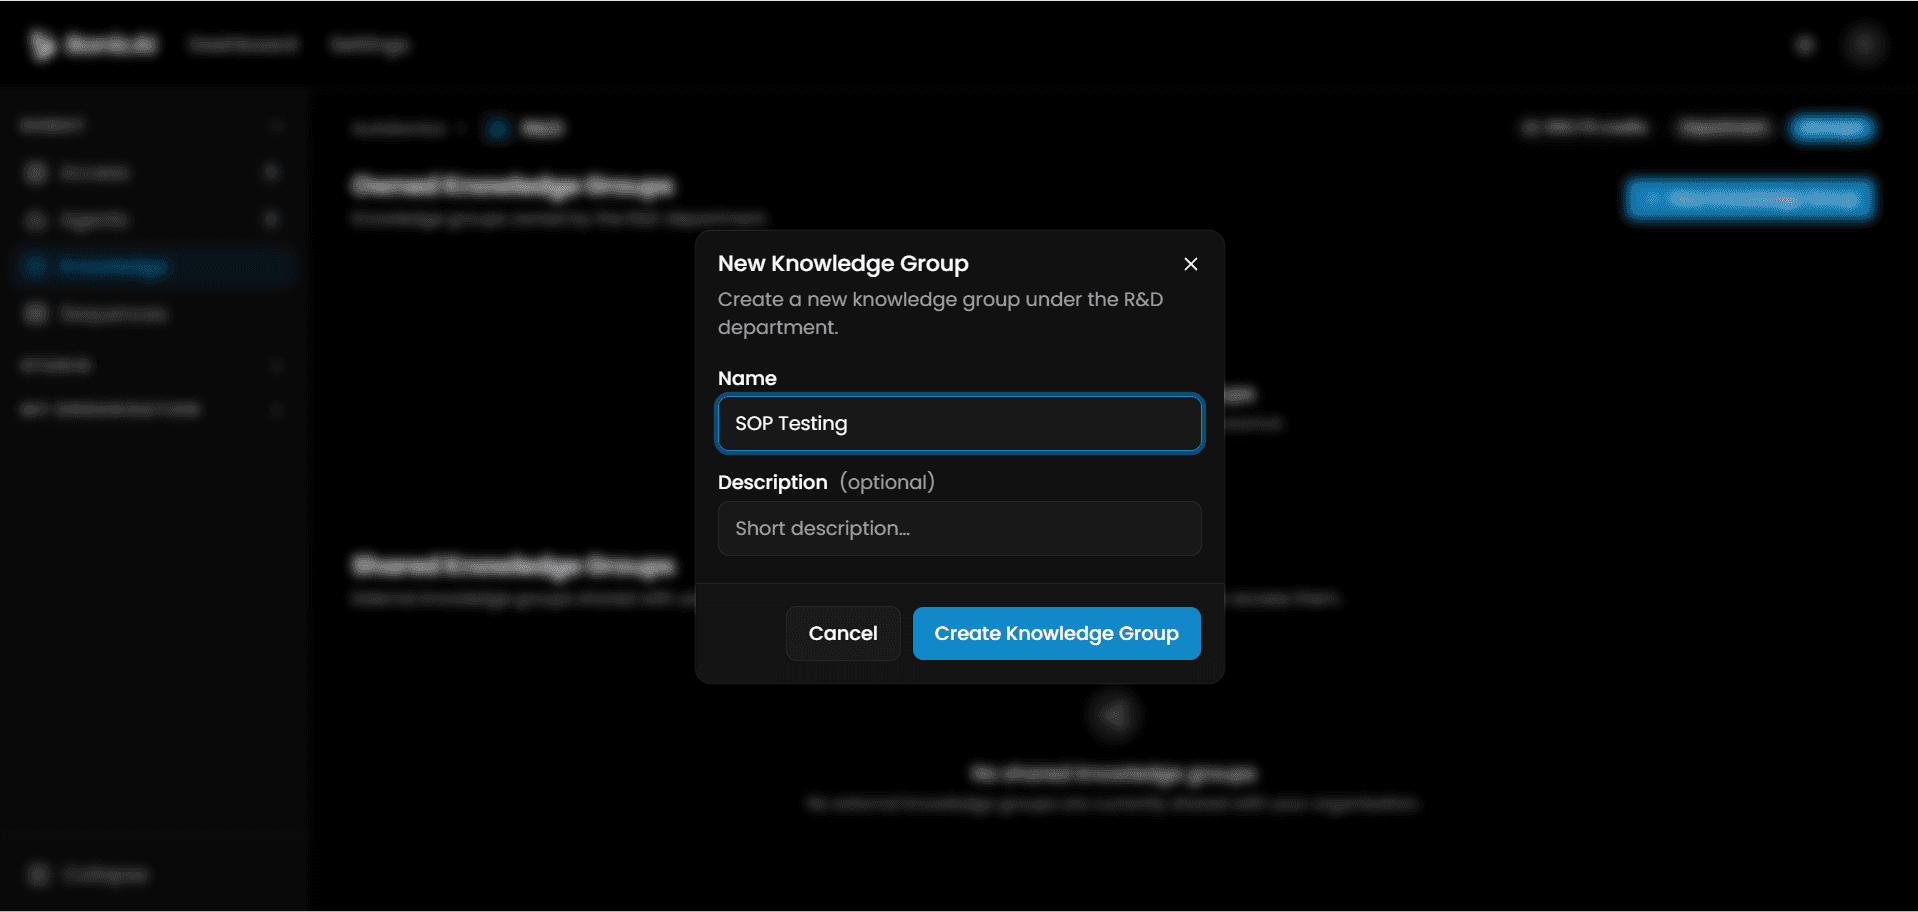
- Name (e.g. “SOP Testing”) and optional Description.
- Click Create Knowledge Group to save.
Managing Files in a Knowledge Group
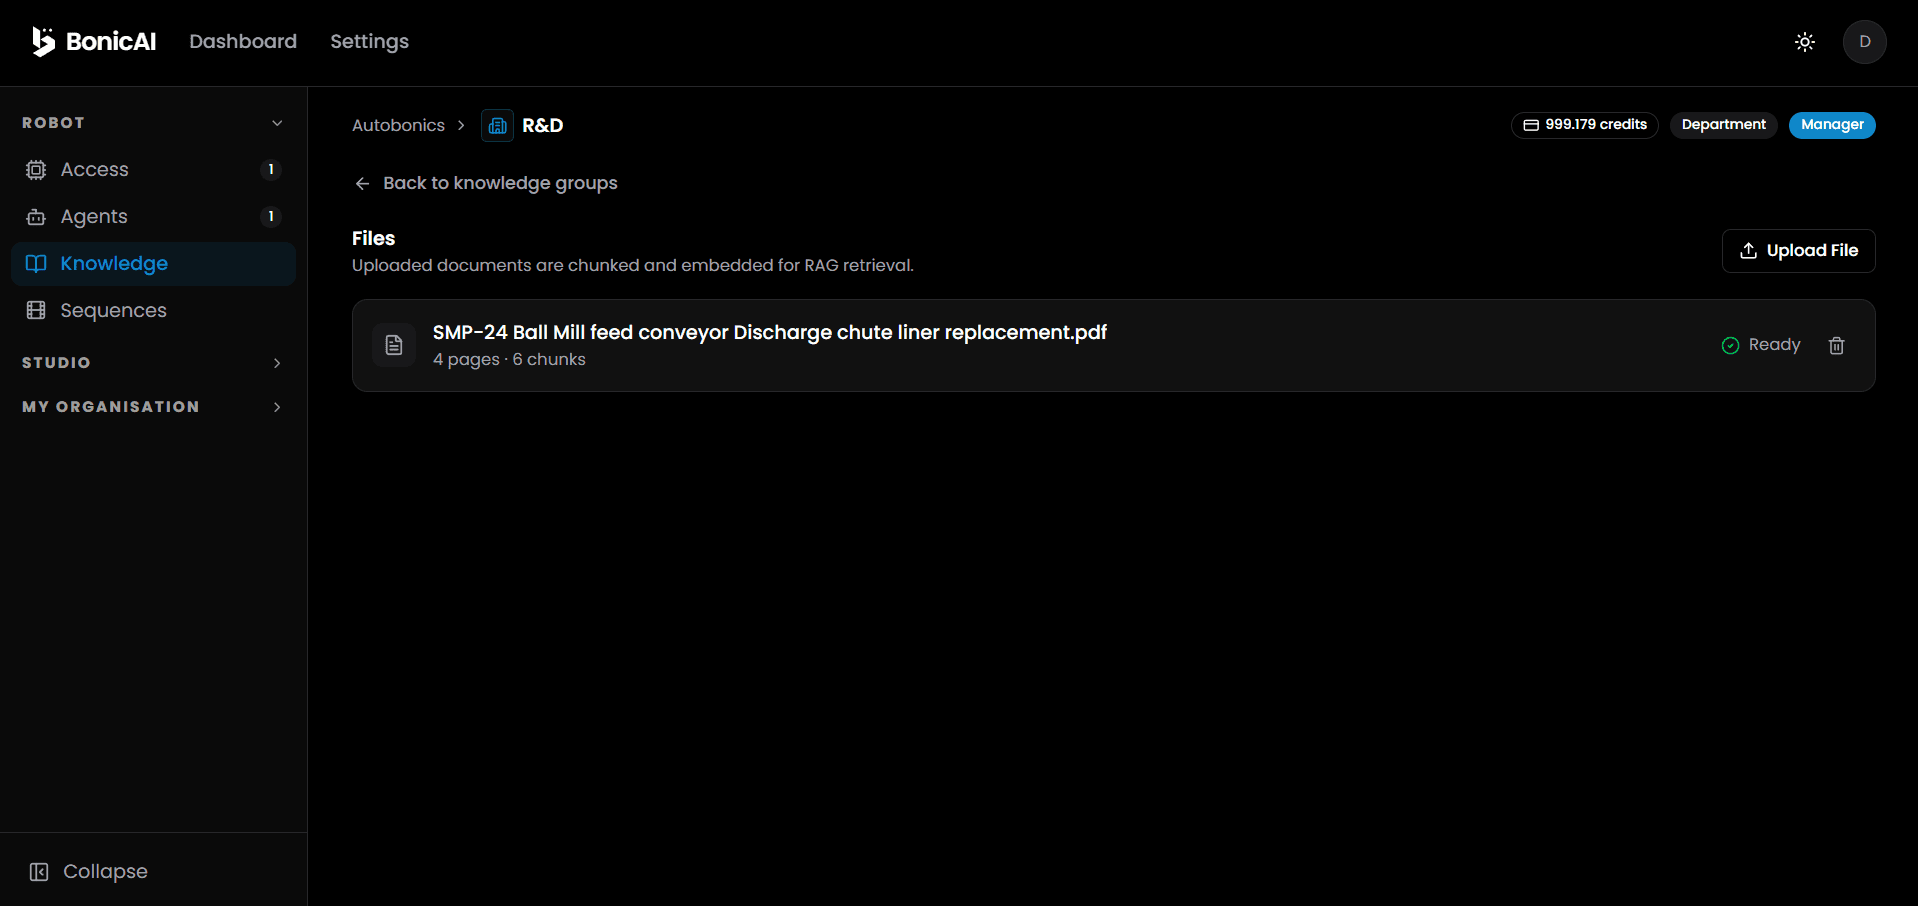
Clicking Manage on a knowledge group opens its Files view: “Uploaded documents are chunked and embedded for RAG retrieval.”
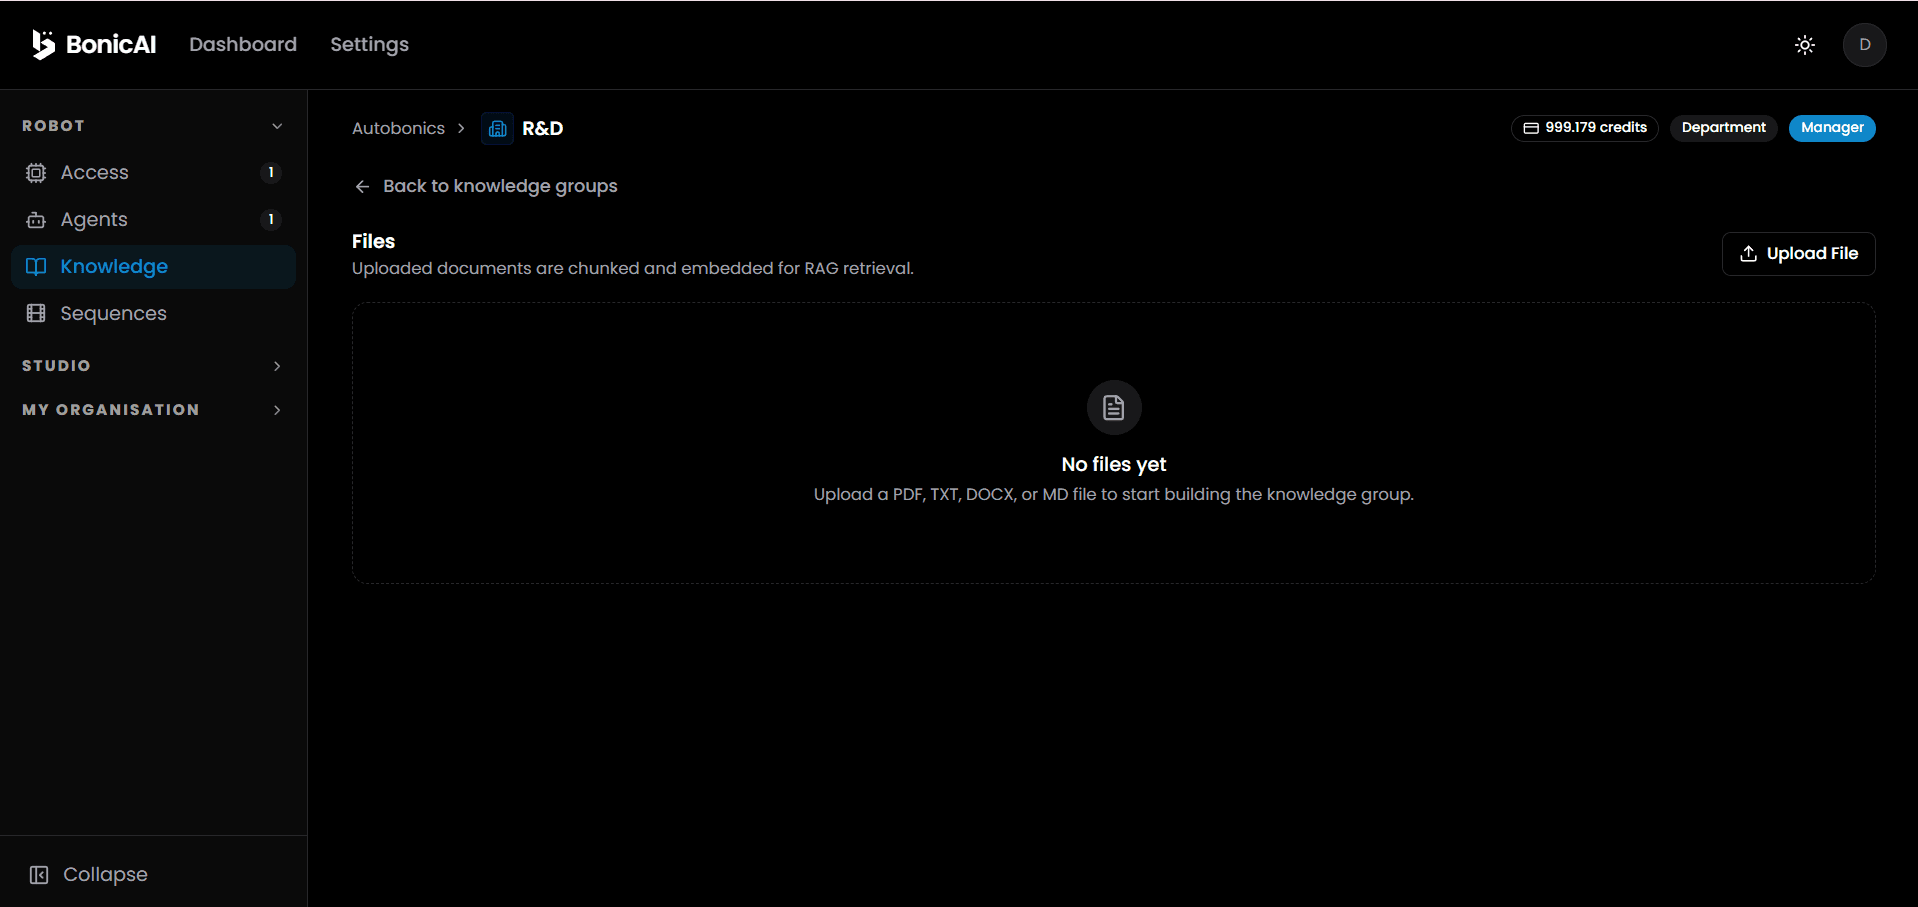
- Initial Upload View: Displays an upload prompt: “No files yet — Upload a PDF, TXT, DOCX, or MD file to start building the knowledge group.”
- Uploading Documents: Click ↑ Upload File to select your document (PDF, TXT, DOCX, MD).
- Processing & Ready Status: Once uploaded, BonicAI automatically chunks and embeds the document for RAG retrieval. The file card displays its name, page count, chunk count (e.g. “4 pages · 6 chunks”), a green ✔ Ready status badge, and a delete icon.
- Use ← Back to knowledge groups to return to the group list.
Once a knowledge group has files in the Ready status, it can be attached to any Department Agent under its Knowledge tab.