BonicAI Marketing Studio — User Guide
This guide covers using the Marketing Studio on the BonicAI platform — creating looping promotional Showreels, collecting visitor information via Lead Forms, managing Product Catalogues, and deploying active Marketing Sessions to your BonicBot fleet.
Overview of Marketing Mode
Marketing Mode transforms your BonicBot into an interactive brand ambassador for retail, events, showrooms, and exhibitions. While in Marketing Mode, the robot automatically:
- Plays a looping visual Showreel on its chest screen to attract passing foot traffic.
- Prompts interested visitors to browse your Product & Service Catalogue.
- Captures customer contact details through customized Lead Forms (email, phone, organization).
- Integrates with department AI agents to answer visitor inquiries in real time.
All marketing assets are created in the BonicAI Web Studio and deployed directly to one or more robots connected to your department.
Navigating to Marketing Studio
- Log in to the BonicAI Web Platform .
- Select your organisation and navigate to your target Department (e.g. Autobonics → R&D or Marketing).
- In the left sidebar, find the STUDIO section and expand Marketing.
- You will see four core sub-sections:
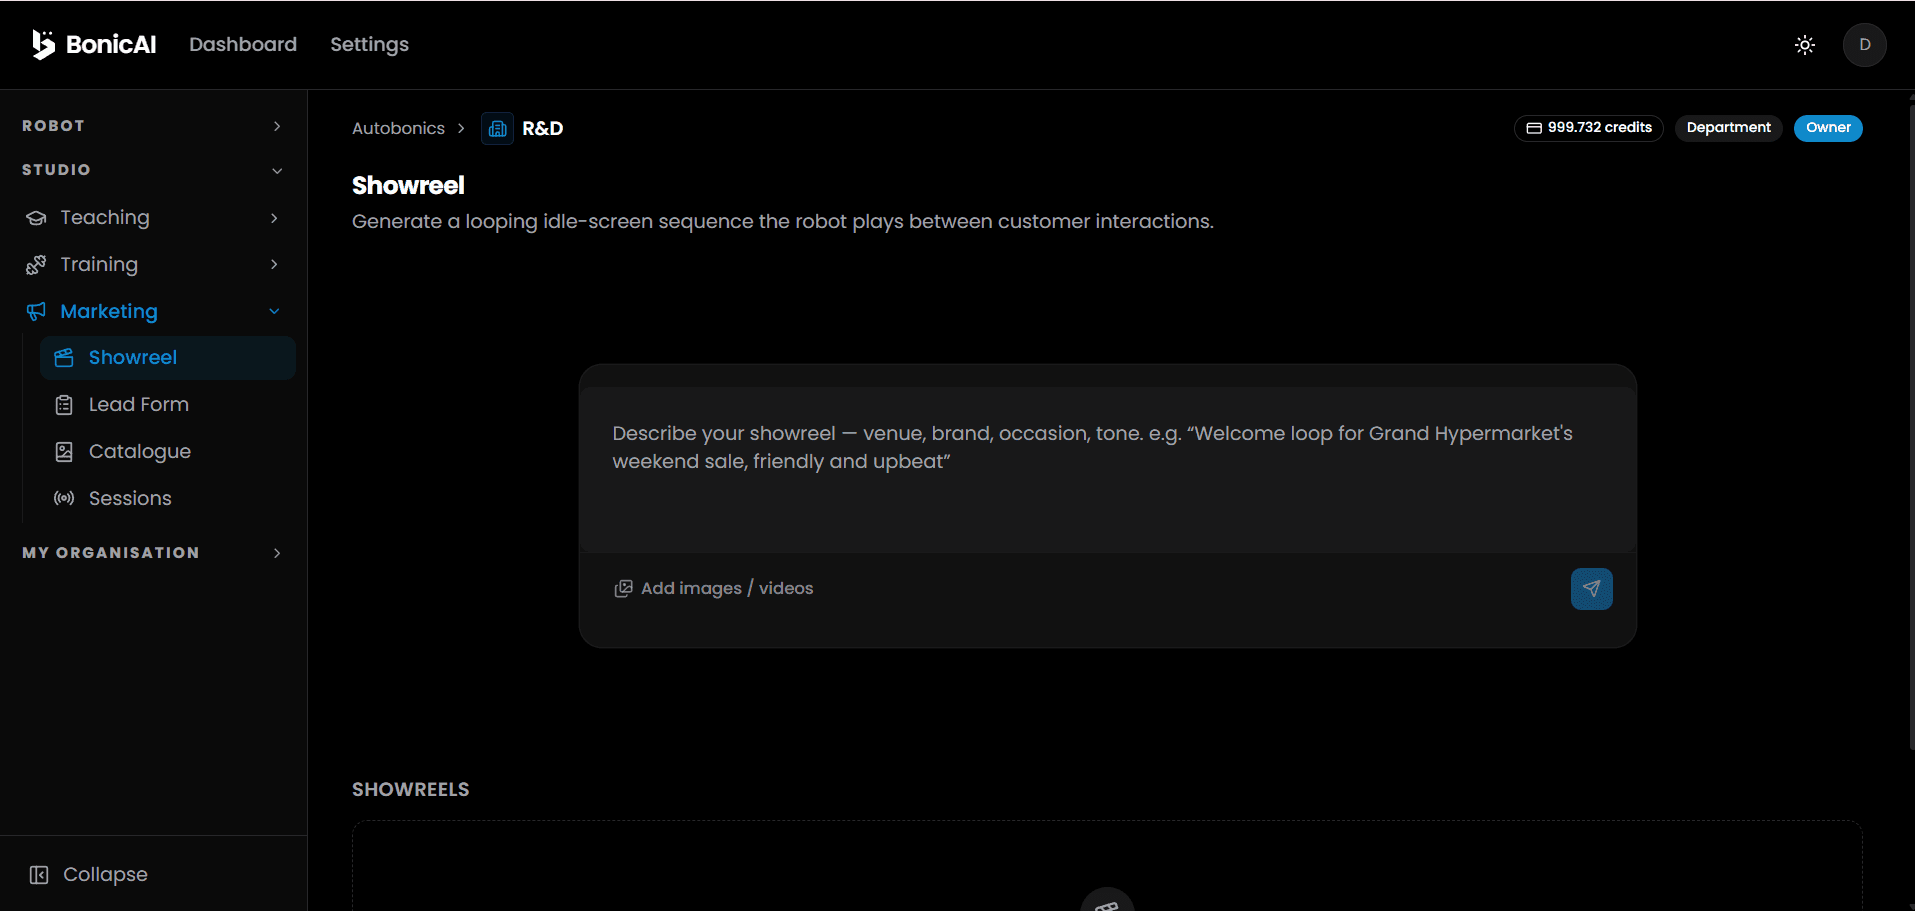
- Showreel — generate & manage looping idle-screen media
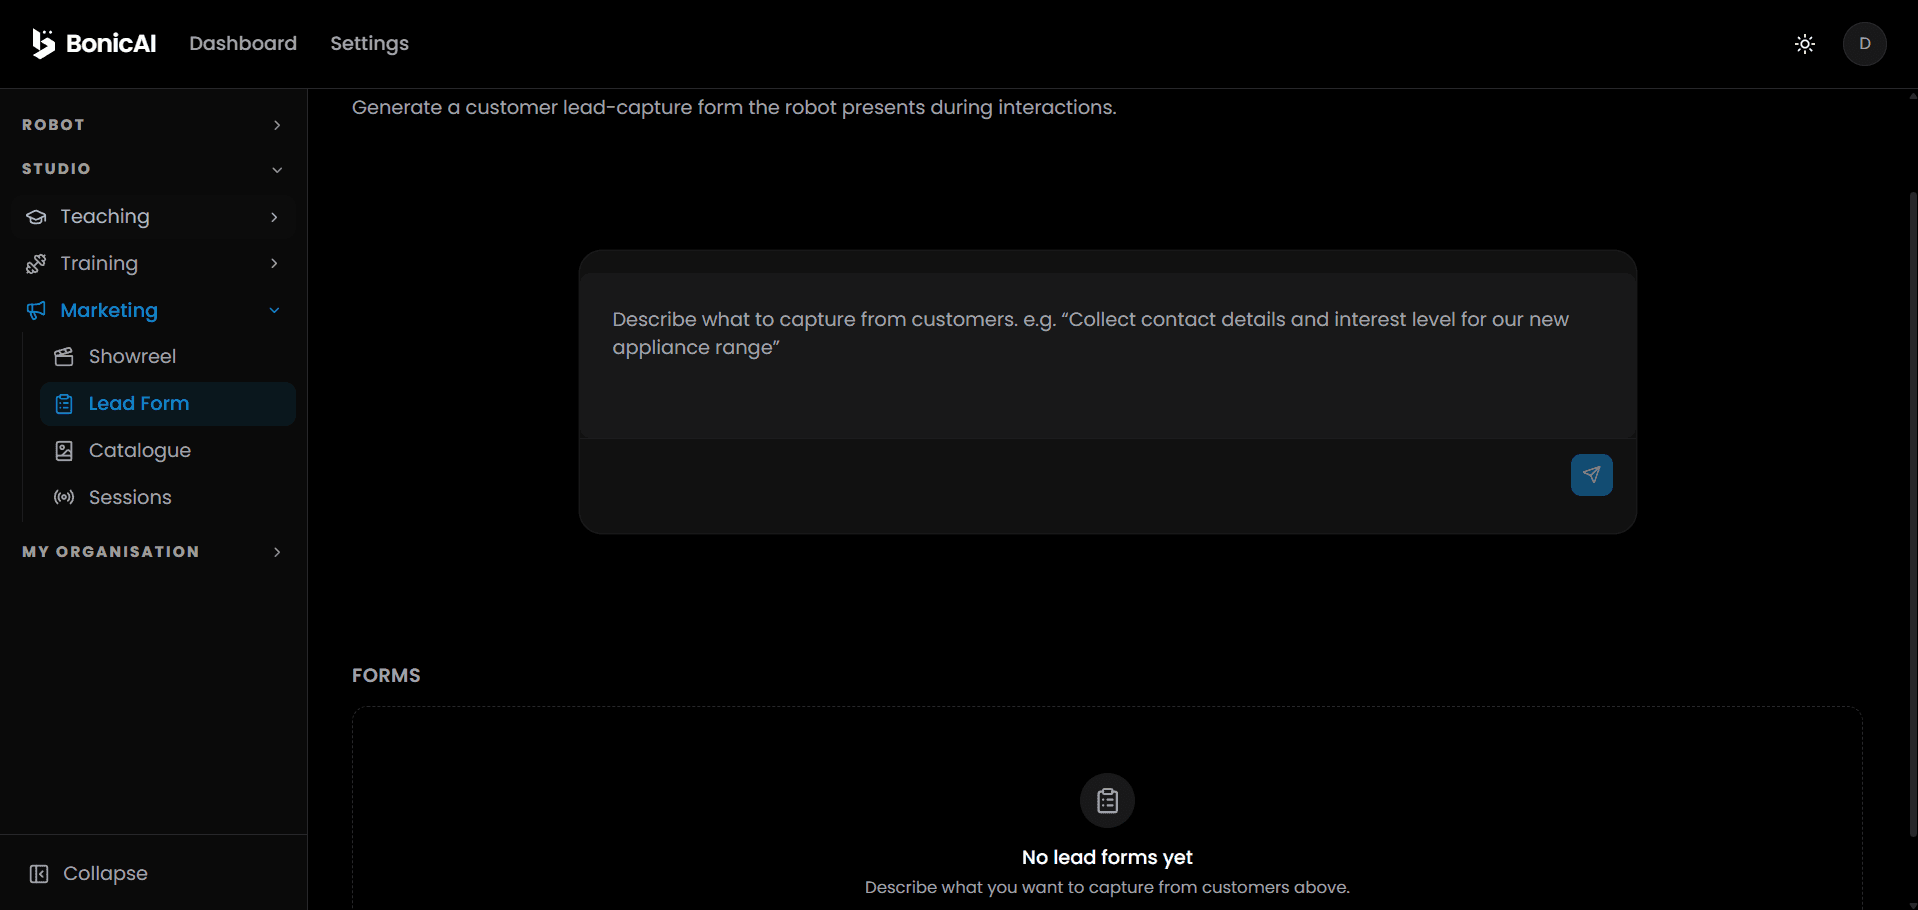
- Lead Form — configure visitor lead capture dialogs
- Catalogue — add and organize product/service items
- Sessions — bundle assets into active robot marketing deployments
Showreel — AI Idle-Screen Generator
A Showreel is a looping visual sequence displayed on the robot’s chest screen whenever it is idle between customer interactions.
Creating a New Showreel
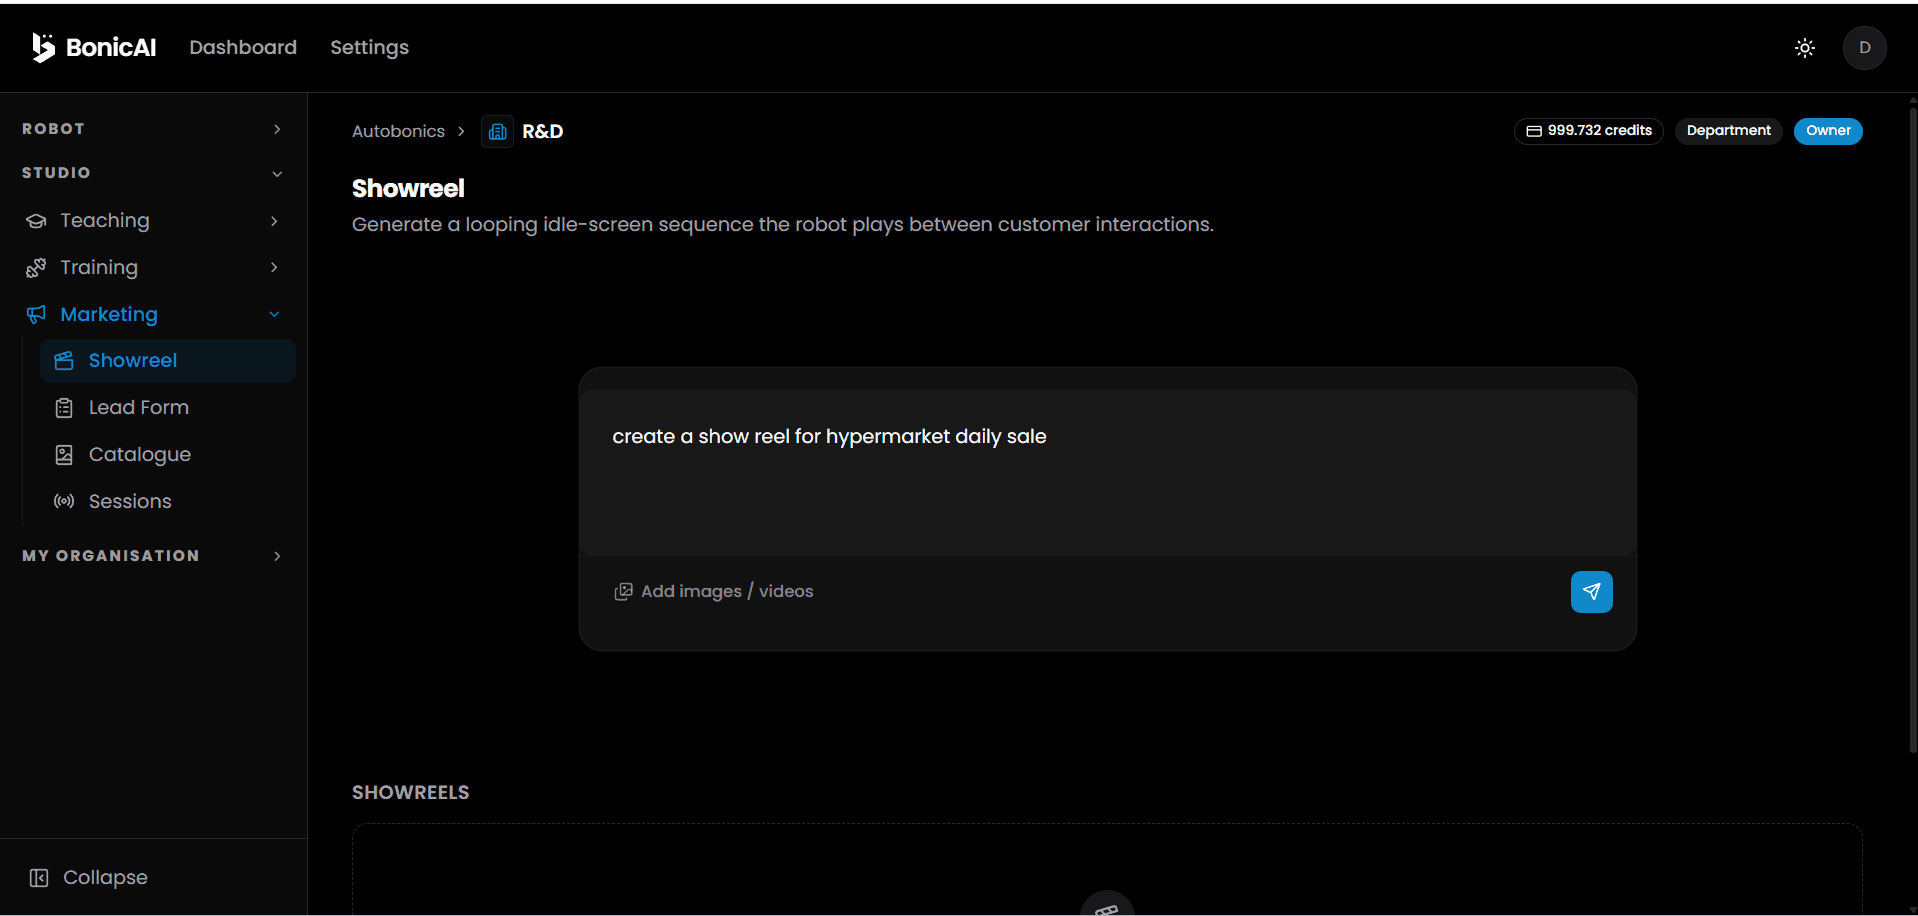
- Click Showreel under the Marketing sidebar menu.
- In the prompt box (“create a show reel for hypermarket daily sale” or “generate an idle reel for tech summit booth”), enter a descriptive topic or instructions for the AI.
- (Optional) Click Add images / videos to upload custom brand logos, product banners, or media clips.
- Click the Send / Generate button (blue arrow icon).
- The AI processes your prompt and opens the Visual Showreel Editor.
Visual Showreel Editor & AI Assistant
Once you give the command to the AI, you reach the Visual Showreel Editor screen to customize media segments, voice narration, and slide order.
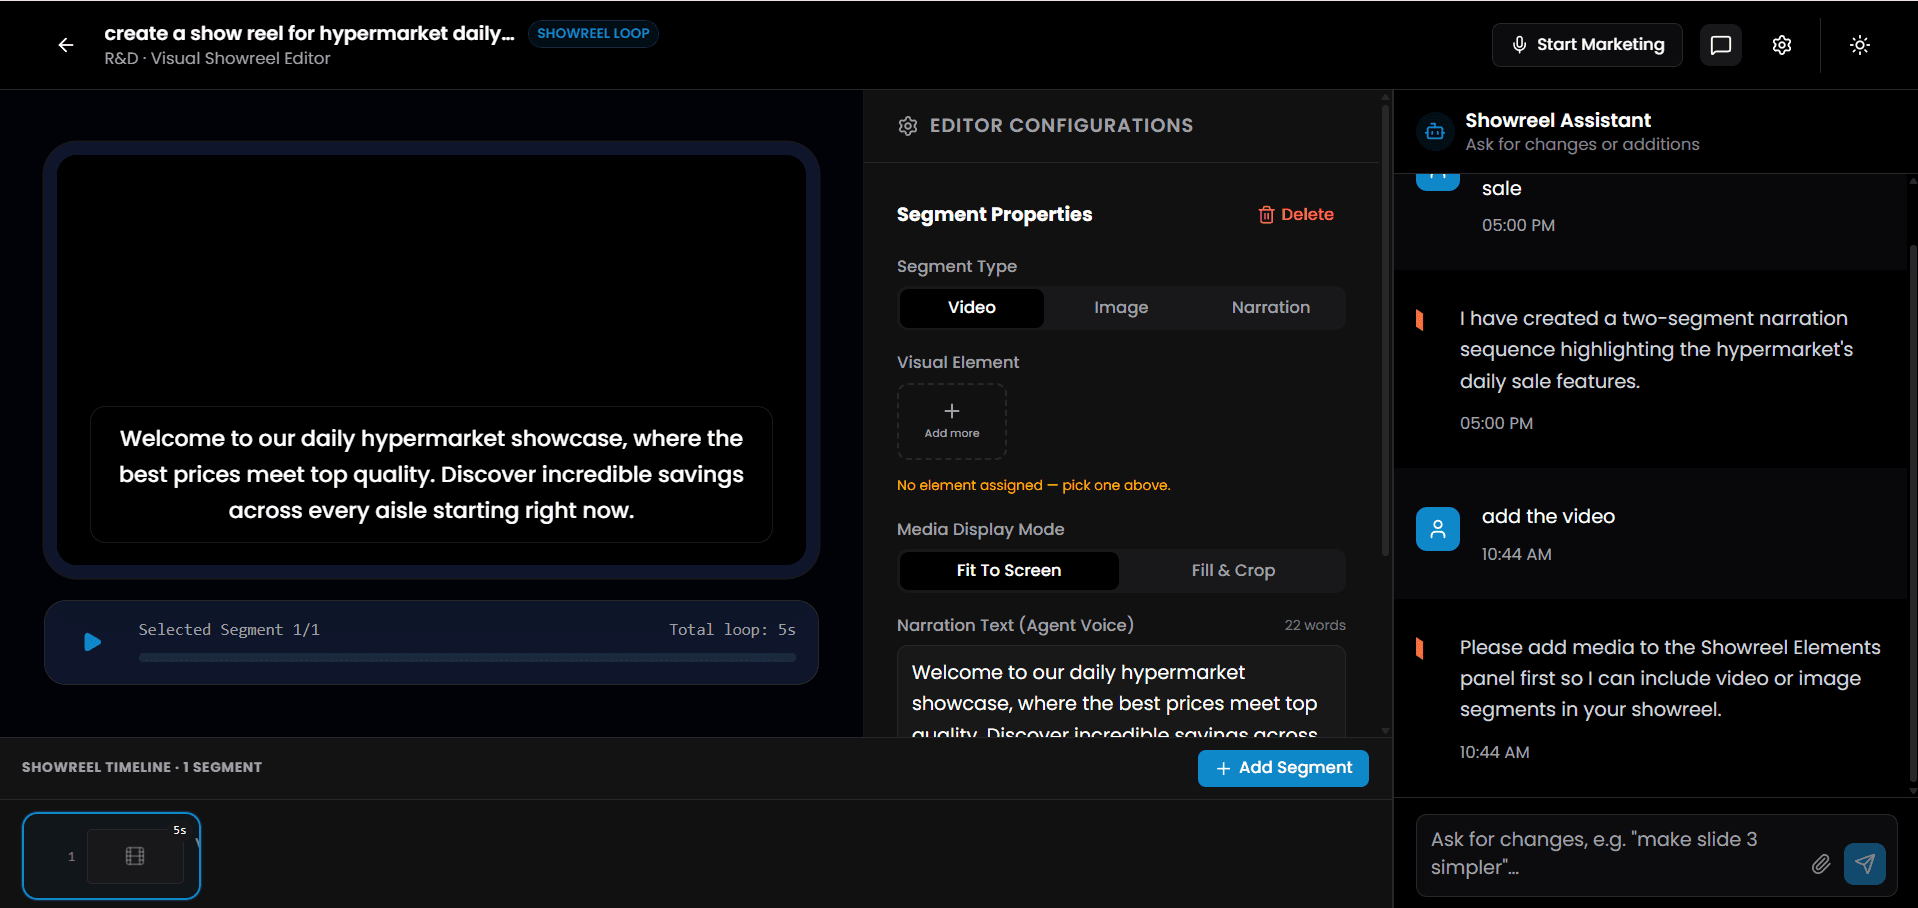
1. Live Tablet Preview
- Shows a live preview of how the showreel slide will render on the BonicBot chest screen.
- Displays text overlays, video playback controls, selected segment index (e.g.
Selected Segment 1/1), and total loop time (e.g.Total loop: 5s).
2. Editor Configurations Panel
- Segment Properties:
- Segment Type: Choose between Video, Image, or Narration segment types.
- Visual Element Upload: Click + Add more to upload custom video files or image banners to the Showreel Elements panel.
- Media Display Mode: Toggle between Fit To Screen and Fill & Crop.
- Narration Text (Agent Voice): Edit the spoken voiceover script (e.g. “Welcome to our daily hypermarket showcase, where the best prices meet top quality…”) that BonicBot speaks during this segment.
- + Add Segment: Add additional slides to expand your showreel loop.
3. Showreel Timeline Track
- Shows thumbnail cards for all segments in the showreel sequence.
- Drag slides to reorder, or set custom display durations (e.g.
5s).
4. Showreel Assistant Chat
- After uploading video or image files into the Editor Configurations panel, simply ask the Showreel Assistant in the chat window to add the items (e.g. “add the video” or “include the uploaded image in slide 2”).
- The AI Assistant automatically integrates your uploaded media elements directly into the target showreel segment and updates the slide transitions seamlessly!
5. Managing & Deploying Showreels
- Click ⚡ Start Marketing in the top-right corner to deploy this showreel live to accessible department robots.
- Saved showreels appear in your SHOWREELS library to edit, duplicate, or delete anytime.
Lead Form — Visitor Lead Capture
Lead Forms allow the robot to capture visitor interest, contact details, and inquiry notes directly during conversations with the AI.
Setting Up a Lead Form
Click Lead Form under the Marketing sidebar menu, then click + Create Lead Form or type an AI generation prompt (e.g. “create a visitor identification form”).
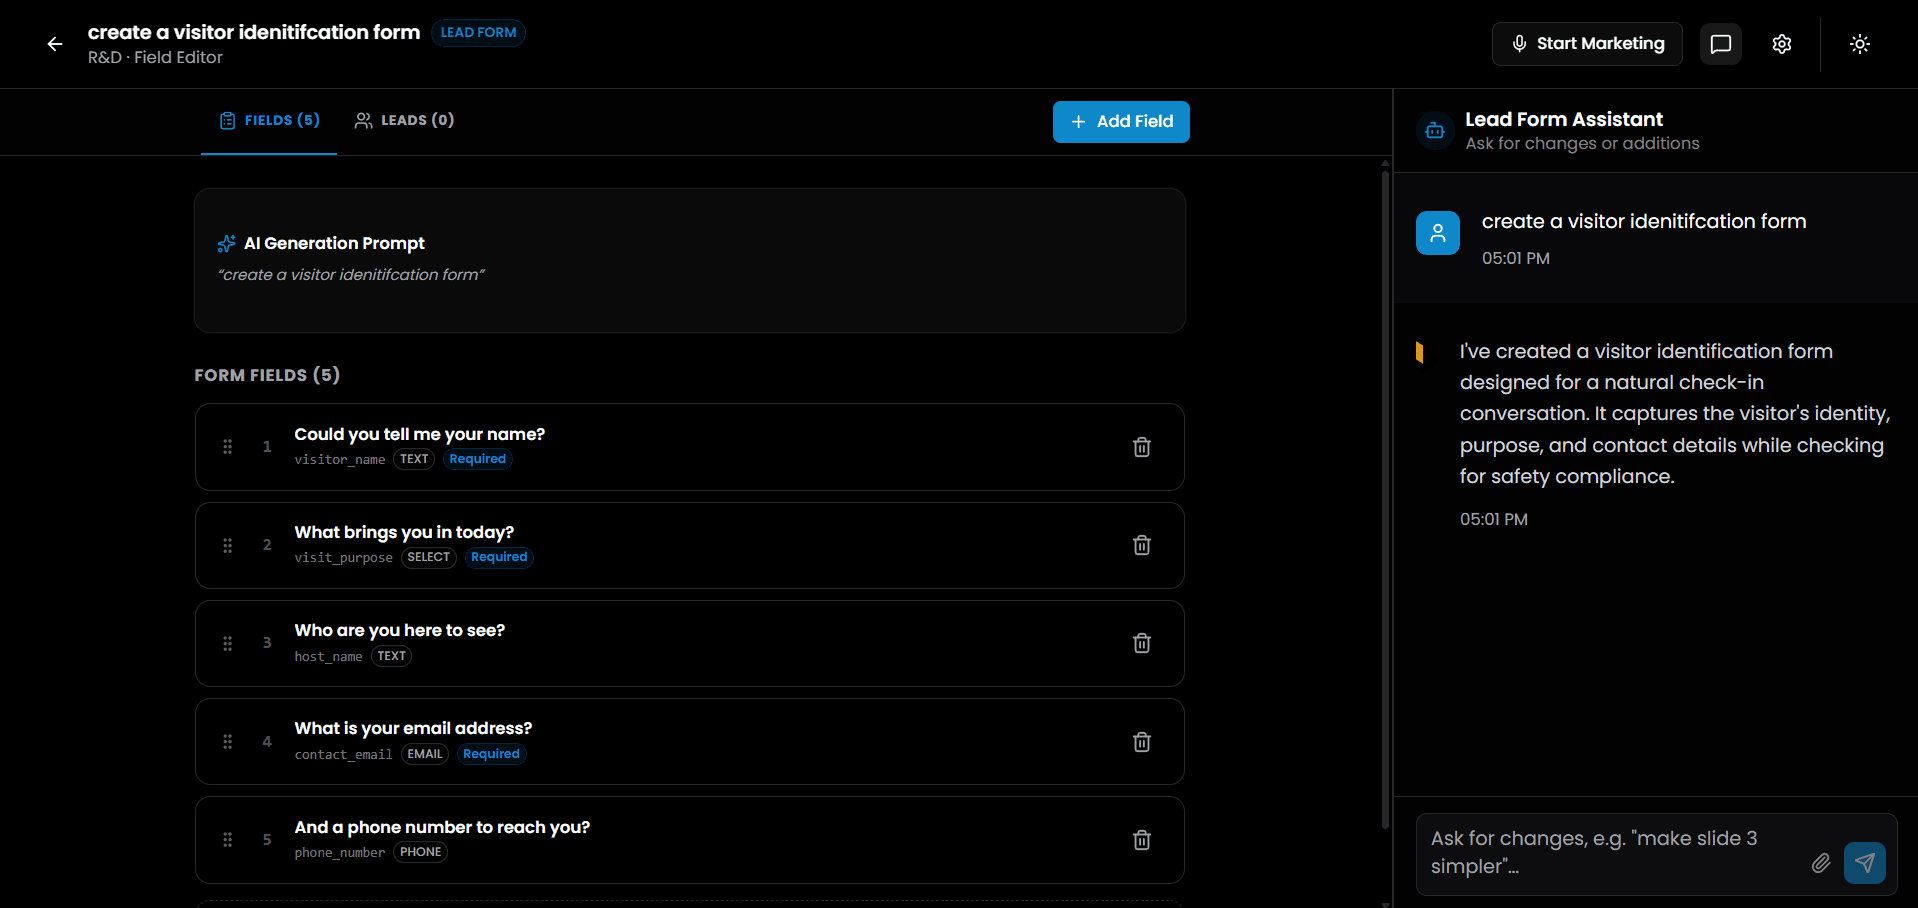
1. AI Form Field Generator & Lead Form Assistant
- Type a natural conversation prompt into the chat window (e.g. “create a visitor identification form”).
- The Lead Form Assistant automatically constructs a tailored field structure designed for smooth robot-to-human check-in interactions.
2. Form Field Configuration & Input Types
You can customize each generated field or click + Add Field to add new questions:
- Field Question: The spoken/displayed prompt on the robot screen (e.g. “Could you tell me your name?”, “What brings you in today?”, “What is your email address?”).
- Variable Key: Unique data field key for CRM sync (e.g.
visitor_name,visit_purpose,host_name,contact_email,phone_number). - Input Type Badges:
TEXT— free-form text inputSELECT— dropdown / multiple choice optionsEMAIL— email address validationPHONE— phone number keypad input
- Required Toggle: Mark essential fields as
Requiredto ensure visitors complete them before finishing the form.
3. Deploying & Viewing Leads
- Deploying to Fleet (
⚡ Start Marketing): Click ⚡ Start Marketing in the top right header to attach this lead form to an active Marketing Session. During live visitor interactions, BonicBot’s AI agent uses these configured form fields to ask questions and gather customer responses smoothly during conversation. - Viewing Submissions (
LEADSTab): Click the LEADS tab next to FIELDS in the top navigation bar to view all captured visitor responses, contact details, and timestamped submission logs collected by your robots.
Reviewing Captured Leads
All lead responses collected by robots running this form are synced instantly back to the cloud:
- View live submissions under the LEADS tab.
- Filter leads by robot, date range, or department.
- Export lead data as CSV / Excel for CRM integration (Salesforce, HubSpot, etc.).
Catalogue — Product & Service Management
The Catalogue section enables you to showcase interactive product cards, service tiers, or promotional deals directly on the robot screen.
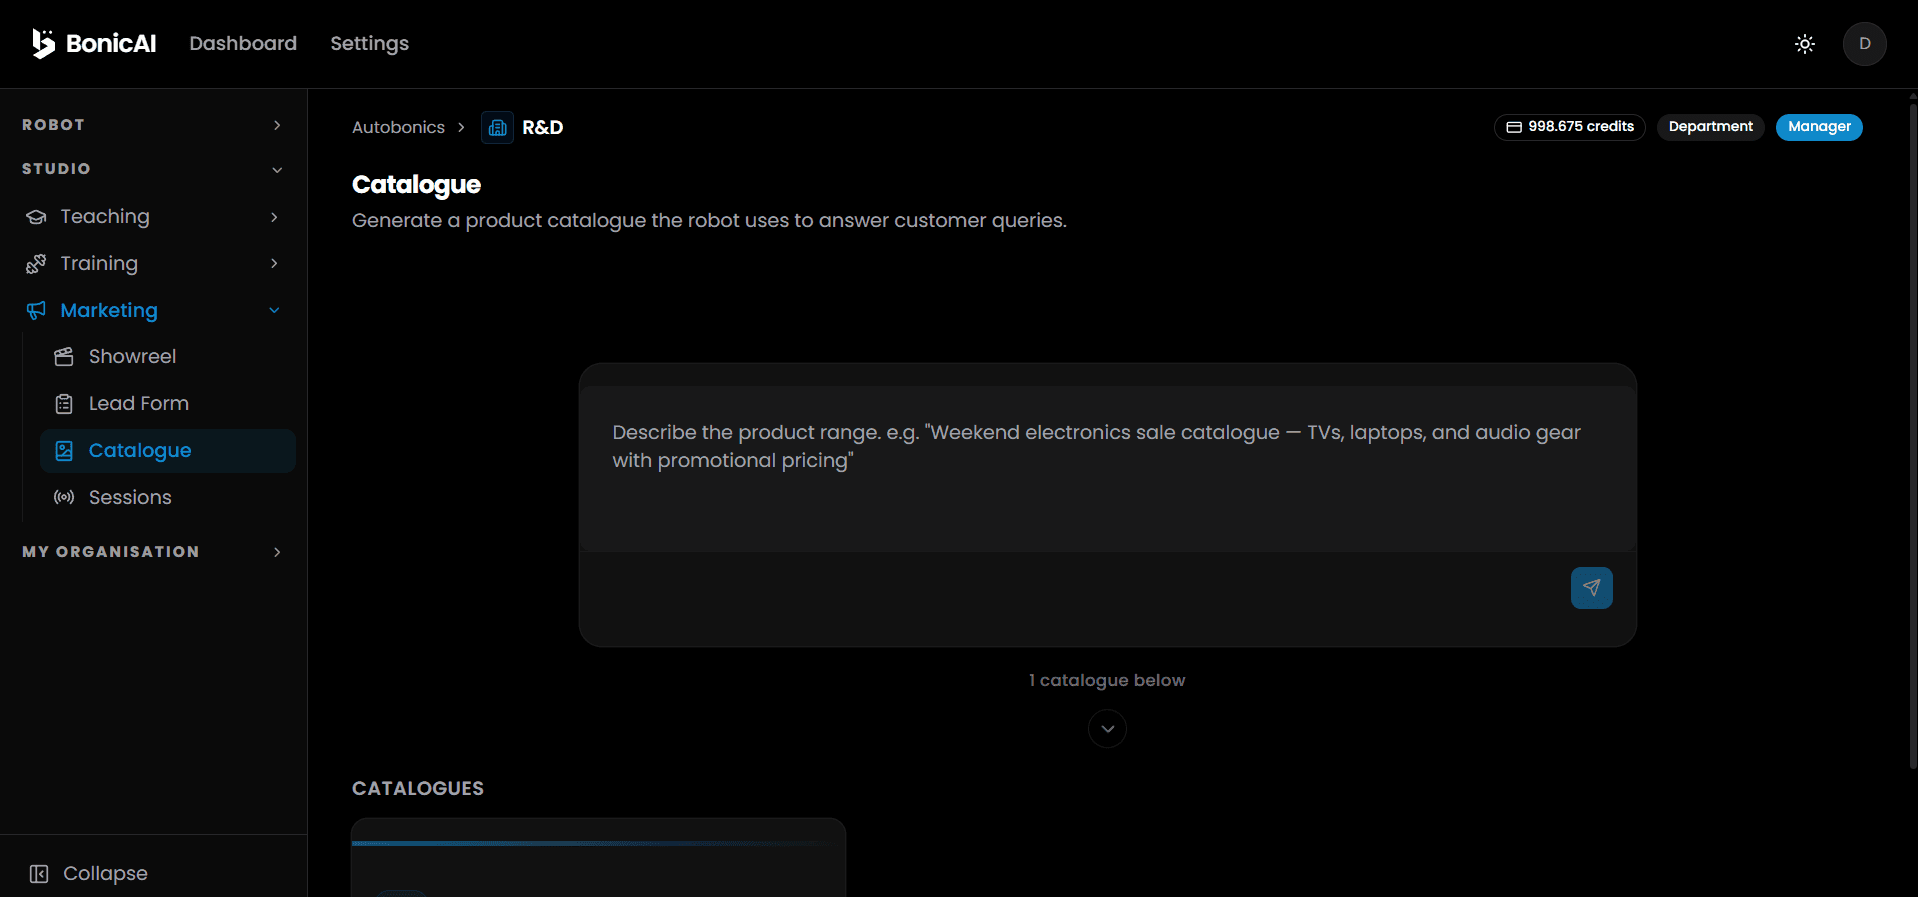
Generating & Building a Product Catalogue
- Click Catalogue under the Marketing sidebar menu.
- In the AI prompt box, describe your product line (e.g. “create a hypermarket daily sale catalogue” or “Weekend electronics sale catalogue — TVs, laptops, and audio gear with promotional pricing”).
- Click the Send / Generate button (blue arrow icon).
- The AI automatically generates product cards, images, category tags, and item descriptions.
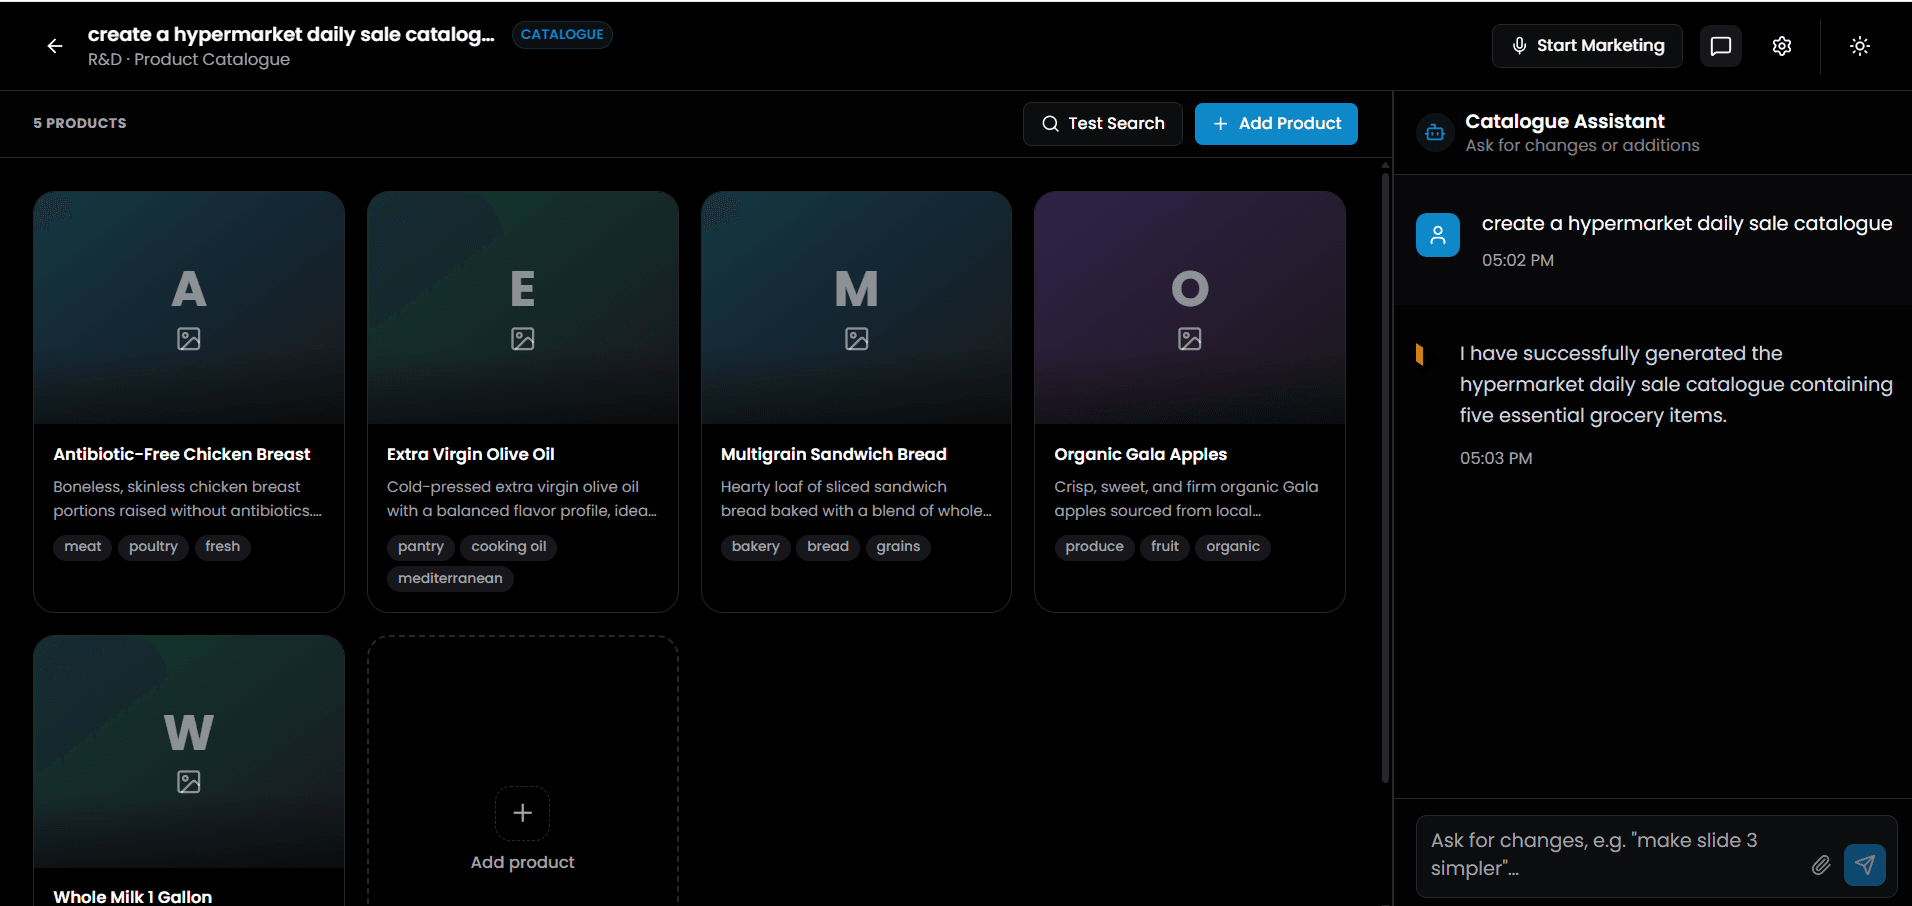
Managing Catalogue Items & Categories
- Interactive Product Cards: Displays generated products (e.g. Antibiotic-Free Chicken Breast, Extra Virgin Olive Oil, Multigrain Bread, Organic Gala Apples, Whole Milk) complete with descriptions and category badges (
meat,poultry,fresh,pantry,cooking oil,bakery,bread,produce,fruit,organic). - + Add Product: Click + Add Product (or the + Add product grid card) to manually insert new items, prices, and high-resolution images.
- 🔍 Test Search: Click Test Search to test how visitors or AI agents query items from this catalogue.
- Catalogue Assistant Chat: Use the right-hand chat panel to refine items (e.g. “add 20% discount tag to olive oil” or “add vegan category to bread”).
- Click ⚡ Start Marketing to attach this catalogue to an active robot deployment.
Sessions — Deploying Marketing Sessions
A Marketing Session bundles a Showreel, a Lead Form, and a Catalogue into a single active deployment profile running live on target BonicBot hardware.
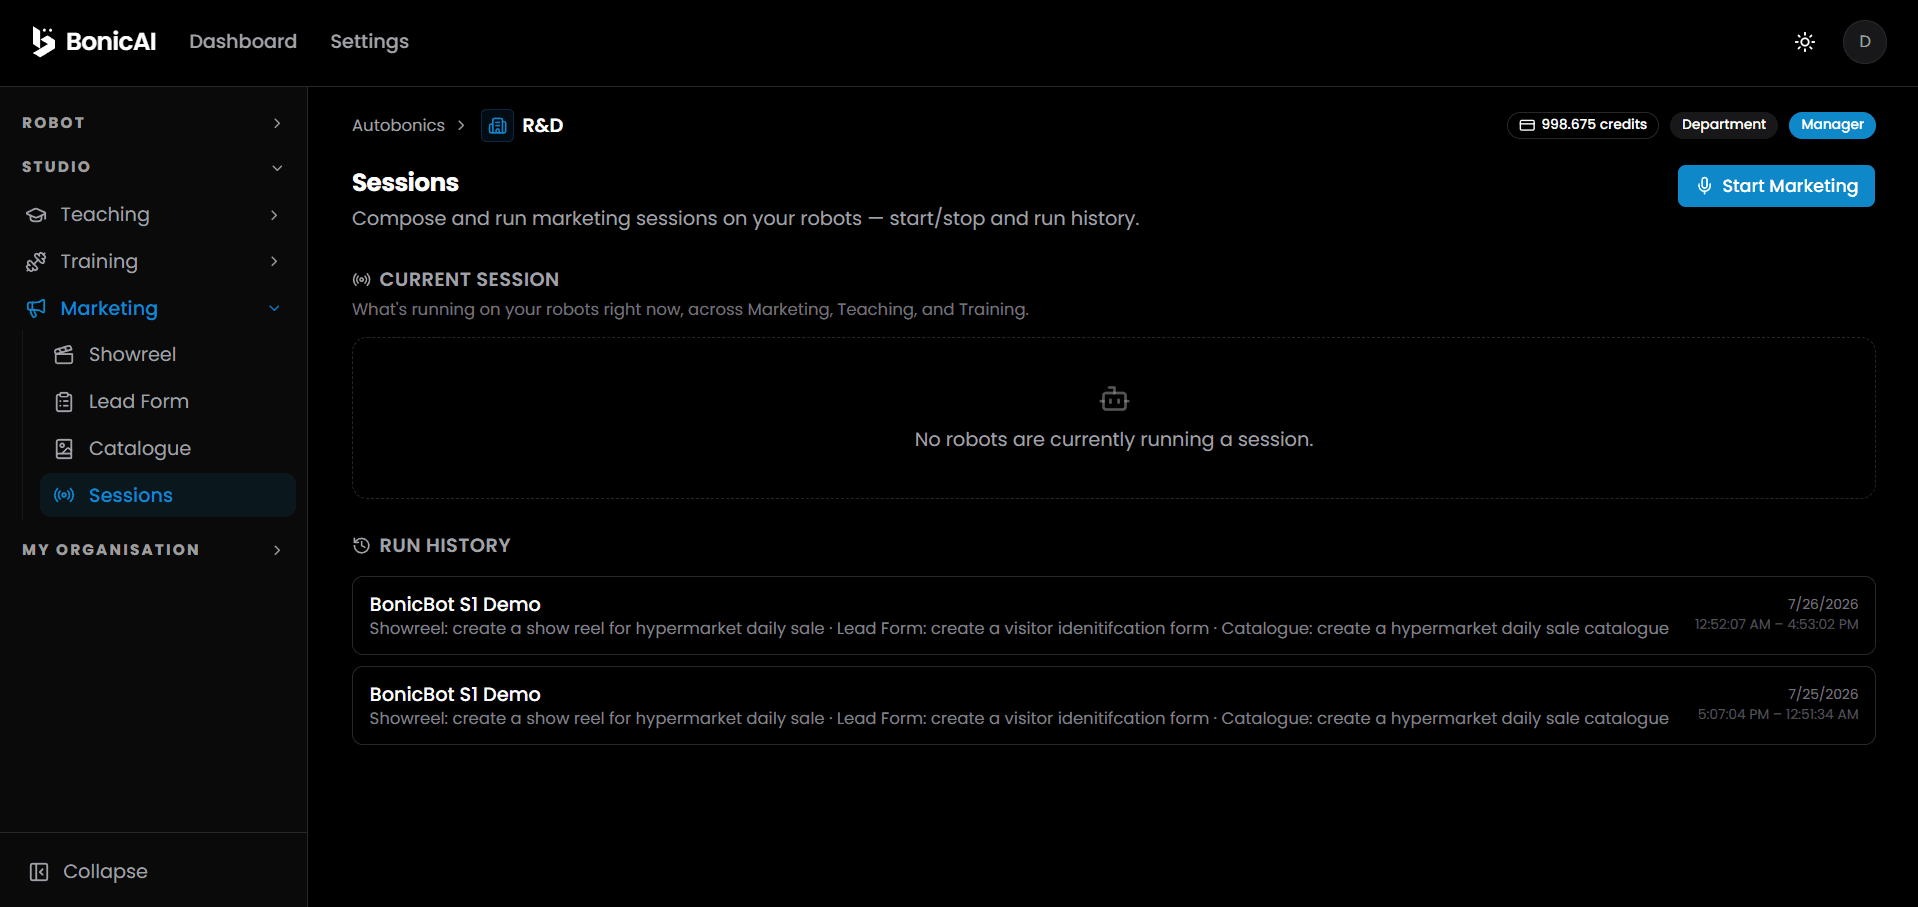
1. Sessions Dashboard & Run History
- CURRENT SESSION: Displays all robots currently running live marketing sessions across Marketing, Teaching, and Training. Shows “No robots are currently running a session” when idle.
- RUN HISTORY: Logs all past completed sessions per robot (e.g. BonicBot S1 Demo), displaying attached Showreels, Lead Forms, Catalogues, and start/end timestamps (e.g.
7/26/2026 12:52 AM - 4:53 PM).
2. Creating & Deploying a Marketing Session
- Click Sessions under the Marketing sidebar menu (or click ⚡ Start Marketing anywhere in the Marketing Studio).
- The Start Marketing on Robot dialog appears: “Pick any combination of showreel, lead form, and catalogue (at least one), then pick a robot.”
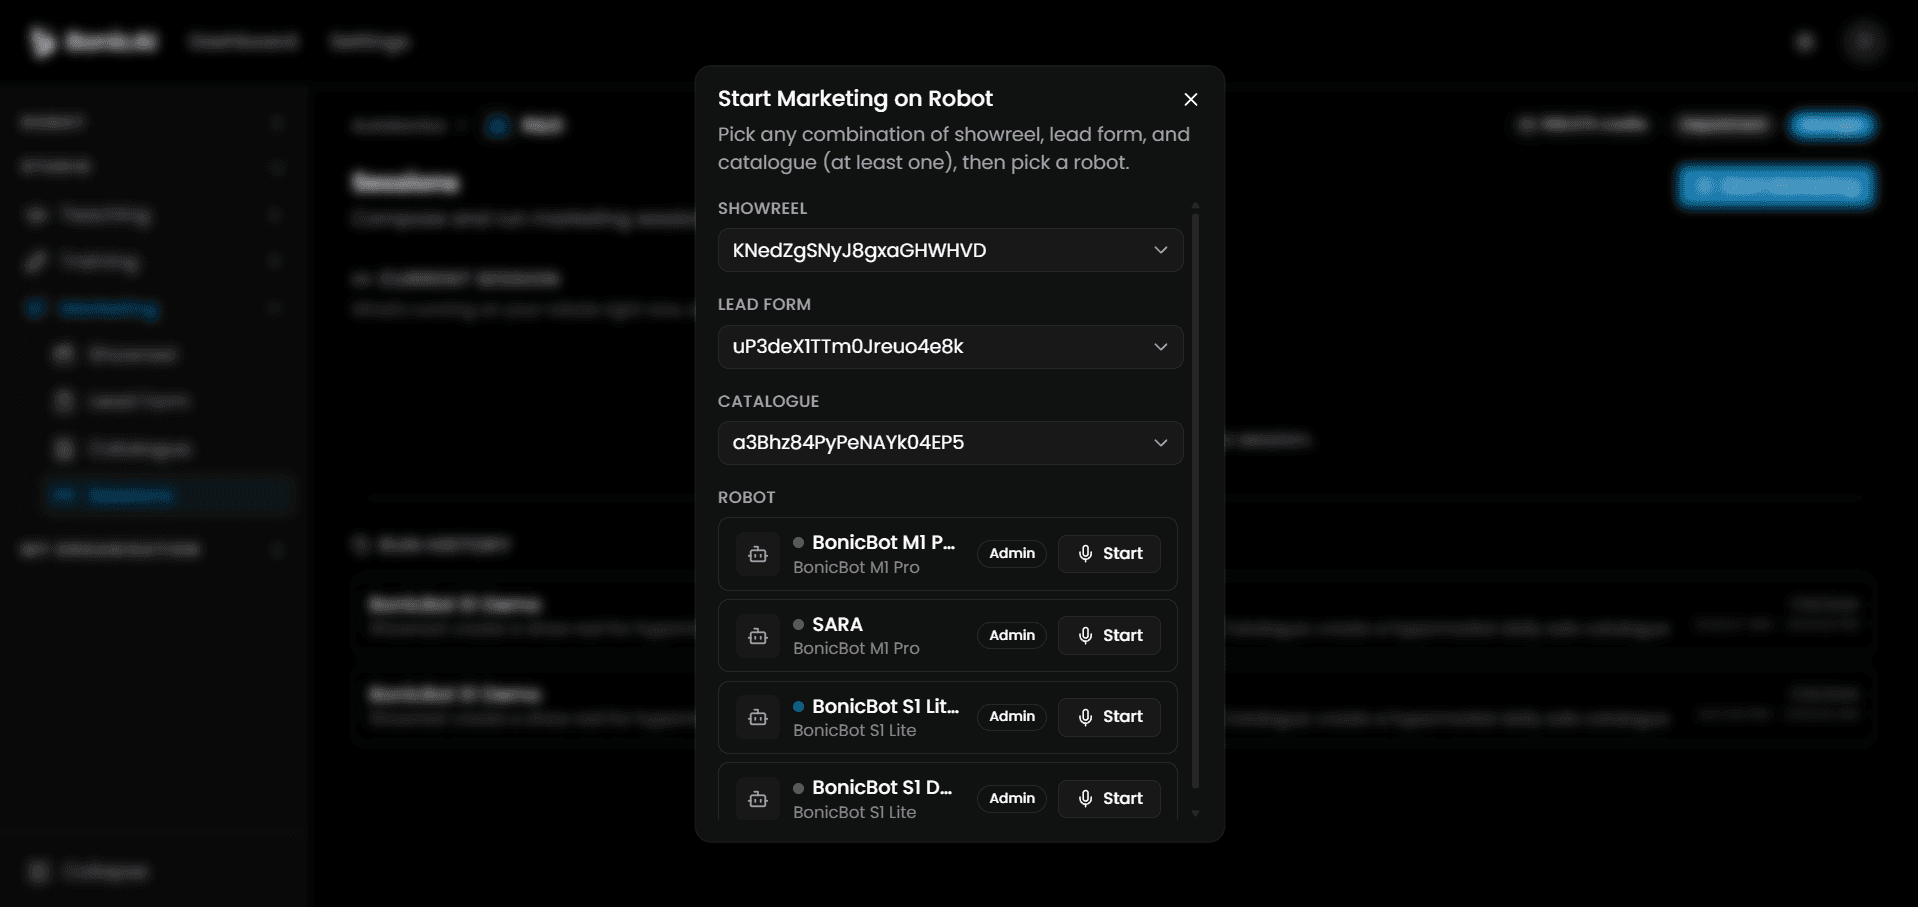
- Select your assets from the dropdown menus:
- SHOWREEL: Choose your generated showreel loop (e.g. “create a show reel for hypermarket daily sale”).
- LEAD FORM: Select your visitor lead capture form (e.g. “create a visitor identification form”).
- CATALOGUE: Select your product catalogue (e.g. “create a hypermarket daily sale catalogue”).
- Target Robot Selection: Choose a target robot from the accessible fleet (e.g. BonicBot S1 Lite) and click 🎙️ Start.
- Confirm Marketing Session (Agent & Sequence Selection):
- After selecting your target robot, the Confirm Marketing Session dialog pops up: “Pick the agent and taught sequence BonicOS should use for this session.”

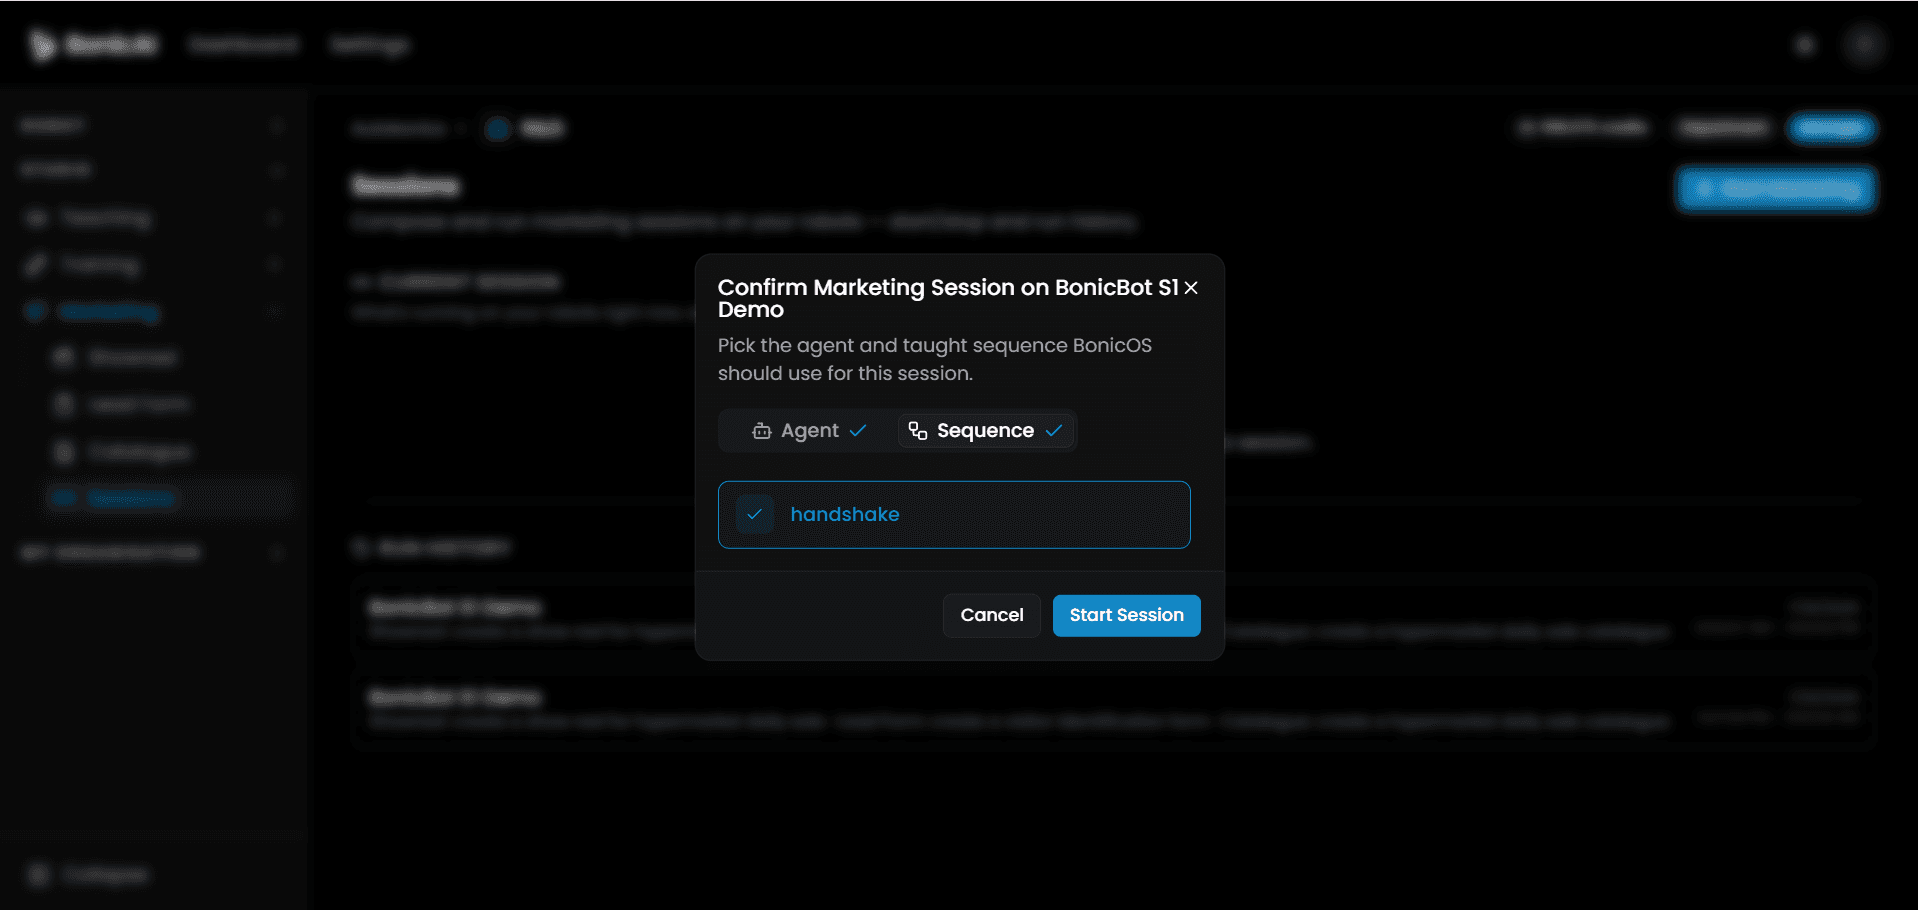
- Agent Selection: Select the Department Agent (e.g. Marketing Agent) to handle spoken visitor Q&A during the session.
- Sequence Selection: Select a taught motion sequence (e.g. handshake, wave, greet) for the robot to execute during visitor interactions.
- Click Start Session to launch the marketing deployment live on the physical robot!
3. Monitoring & Stopping Live Sessions
Once started, the session appears under CURRENT SESSION with a green Marketing status badge.
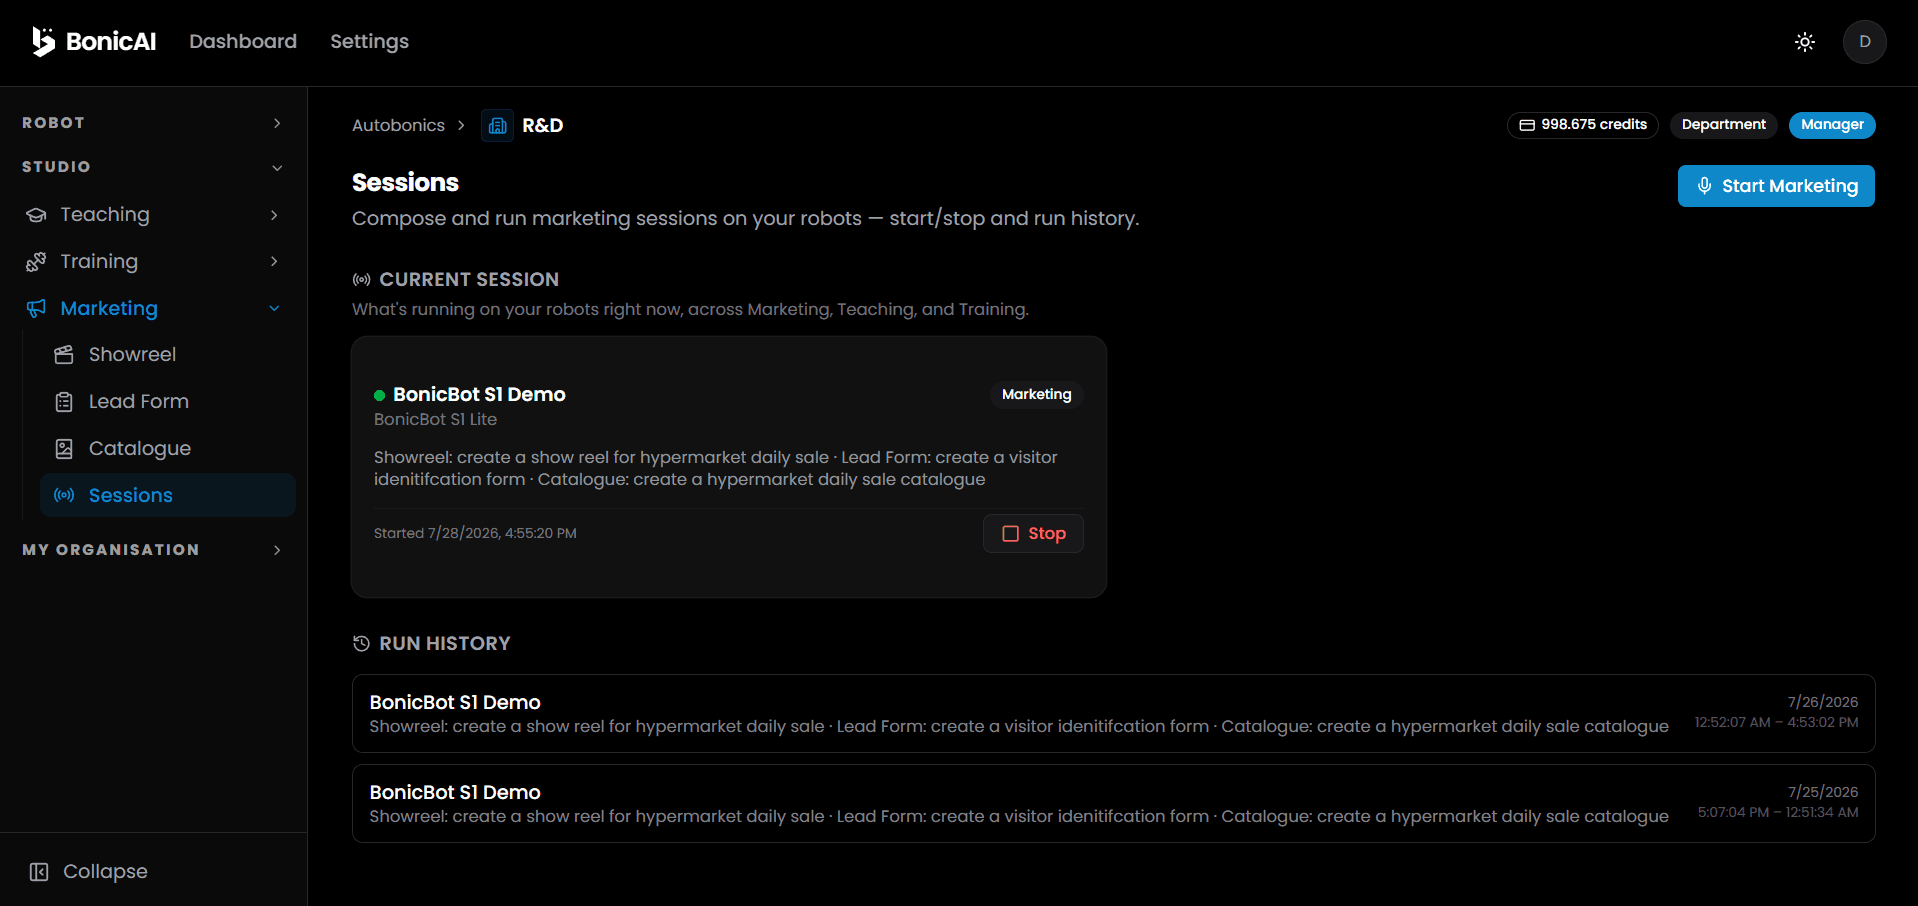
- Live Telemetry: Shows the robot’s live session status, active showreel, attached lead form, and catalogue.
- 🛑 Stop Button: Click 🛑 Stop anytime to immediately end the live session on the physical robot.
Best Practices for Marketing Deployments
- Use Vibrant Media: Ensure showreel images and videos use bright colors and bold text readable from 5–10 feet away.
- Keep Lead Forms Short: Ask only for Name and Email/Phone to minimize friction during physical robot interactions.
- Link a Dedicated Agent: Pair your marketing session with a specialized Department Agent loaded with product Knowledge Bases for accurate RAG answers.
- Monitor Battery & Connectivity: Check robot battery levels and Wi-Fi sync status from the Robot Dashboard before starting high-traffic event sessions.