BonicAI Robot Dashboard — User Guide
This guide covers the BonicAI web platform dashboard : viewing your fleet, checking robot details, managing hardware access, personal account settings, creating robot-level agents, motion sequence recording, managing members, billing, settings, and controlling a robot directly via real-time joint teleoperation.
Signing In
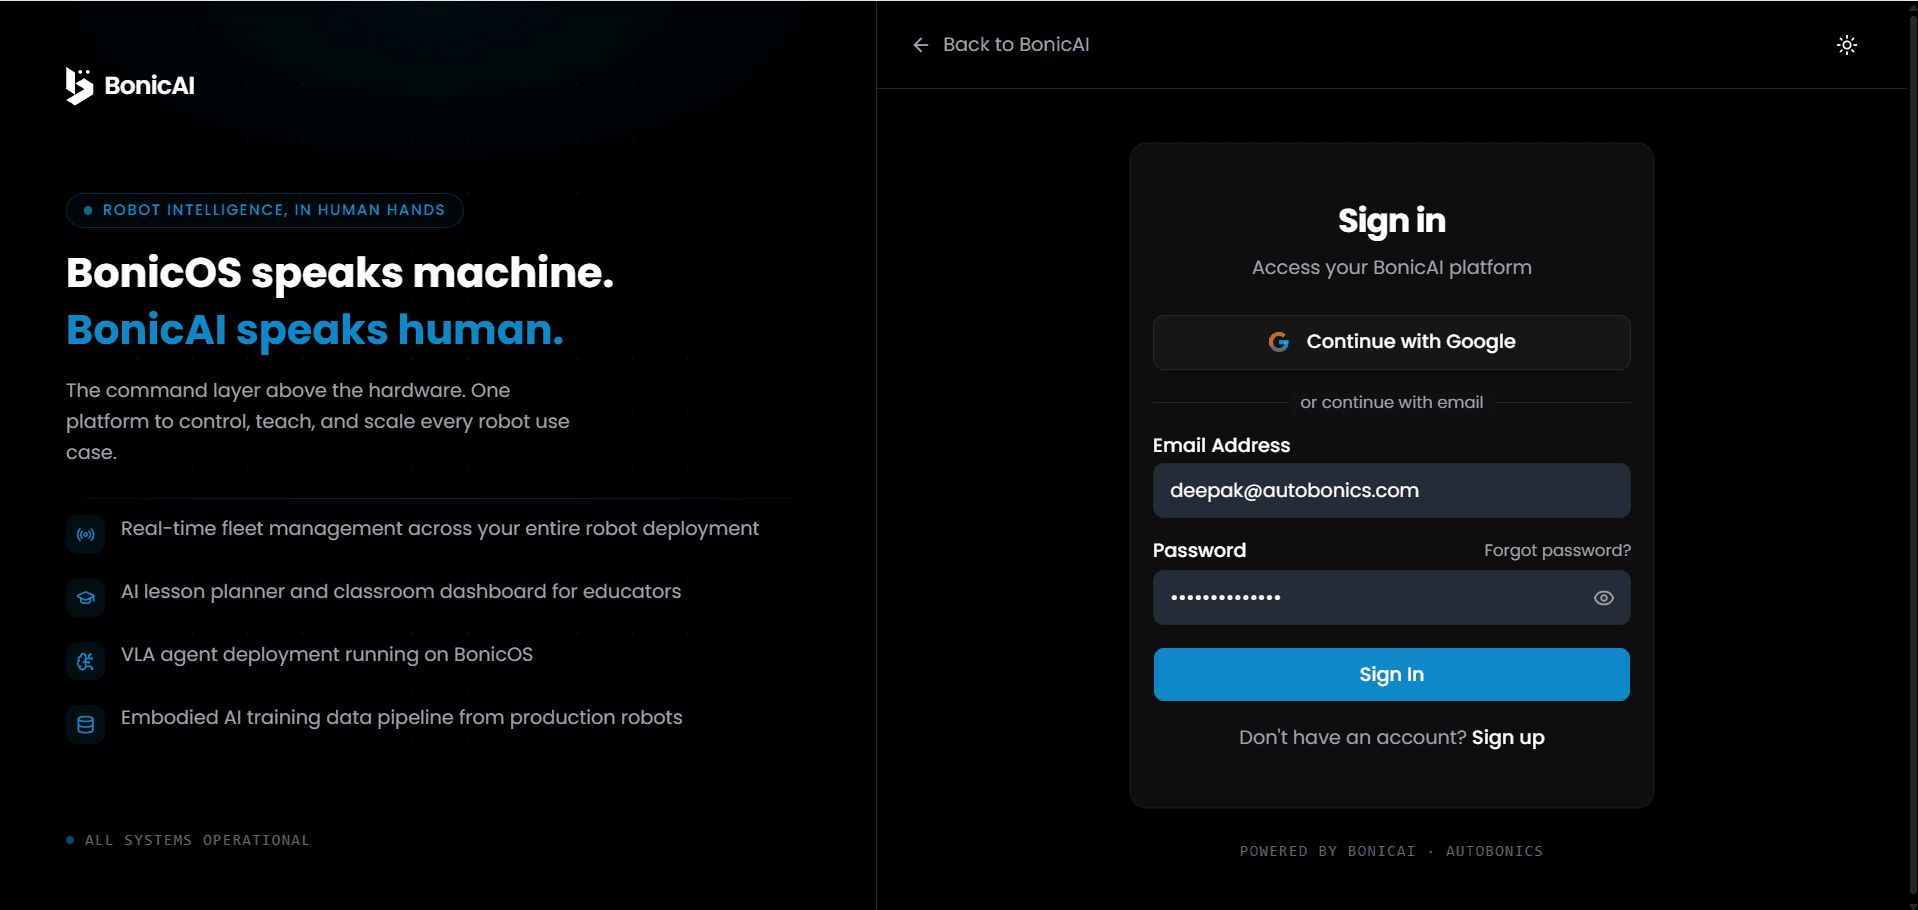
- Go to the BonicAI platform sign-in page (bonic.ai ).
- Sign in with Google, or use your email and password.
- If you do not have an account yet, click Sign up to create one.
- Forgot your password? Use the Forgot password? link on the sign-in screen.
Main Dashboard
After signing in, you land on the main Dashboard — an overview of your robot fleet and organisation access.
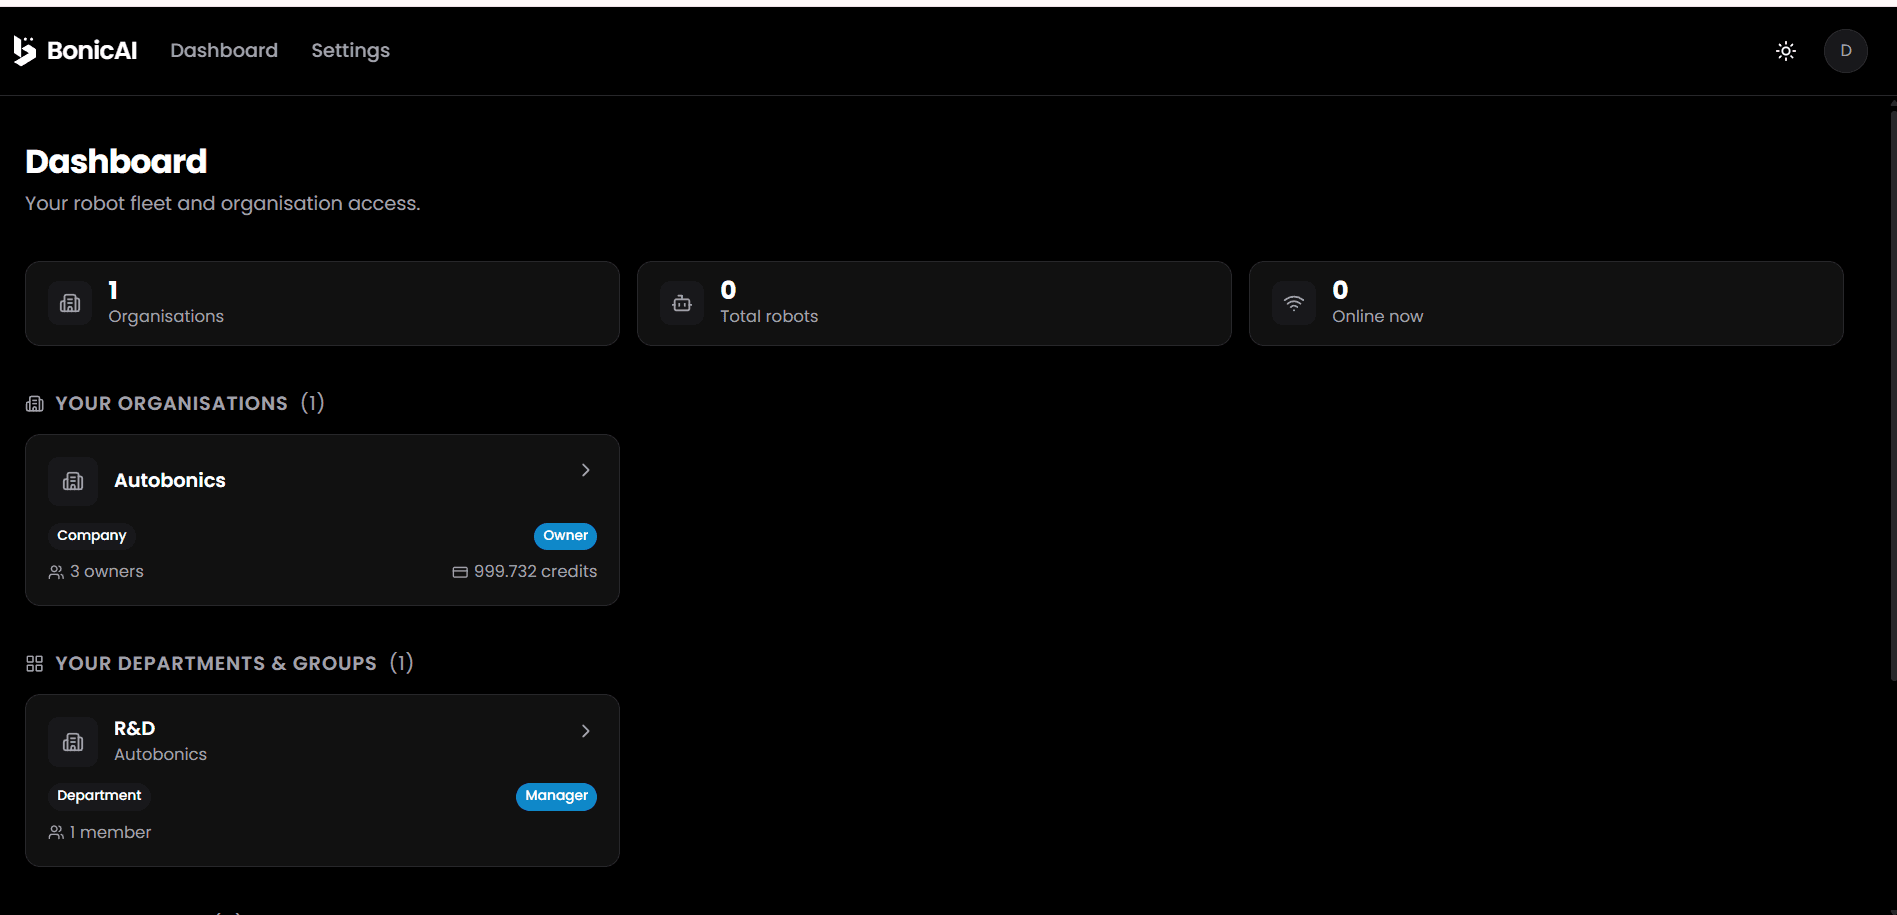
At the top, three summary cards show:
- Organisations — number of organisations you belong to
- Total robots — total robots across your account
- Online now — how many of those robots are currently online
Below that:
- YOUR ORGANISATIONS — lists the organisations you own or belong to.
- YOUR DEPARTMENTS & GROUPS — lists the departments/groups you belong to (e.g. R&D under Autobonics), along with your role badge (e.g. Manager) and member count.
- YOUR ROBOTS — lists the individual robots directly assigned to you.
Personal Account Settings
In the top navigation header bar (next to Dashboard), click Settings to open your personal user account management workspace. This page allows you to configure profile details, WhatsApp telemetry notifications, face recognition biometrics, and security credentials across three tabs: Profile, Identity, and Security.
1. Profile Tab
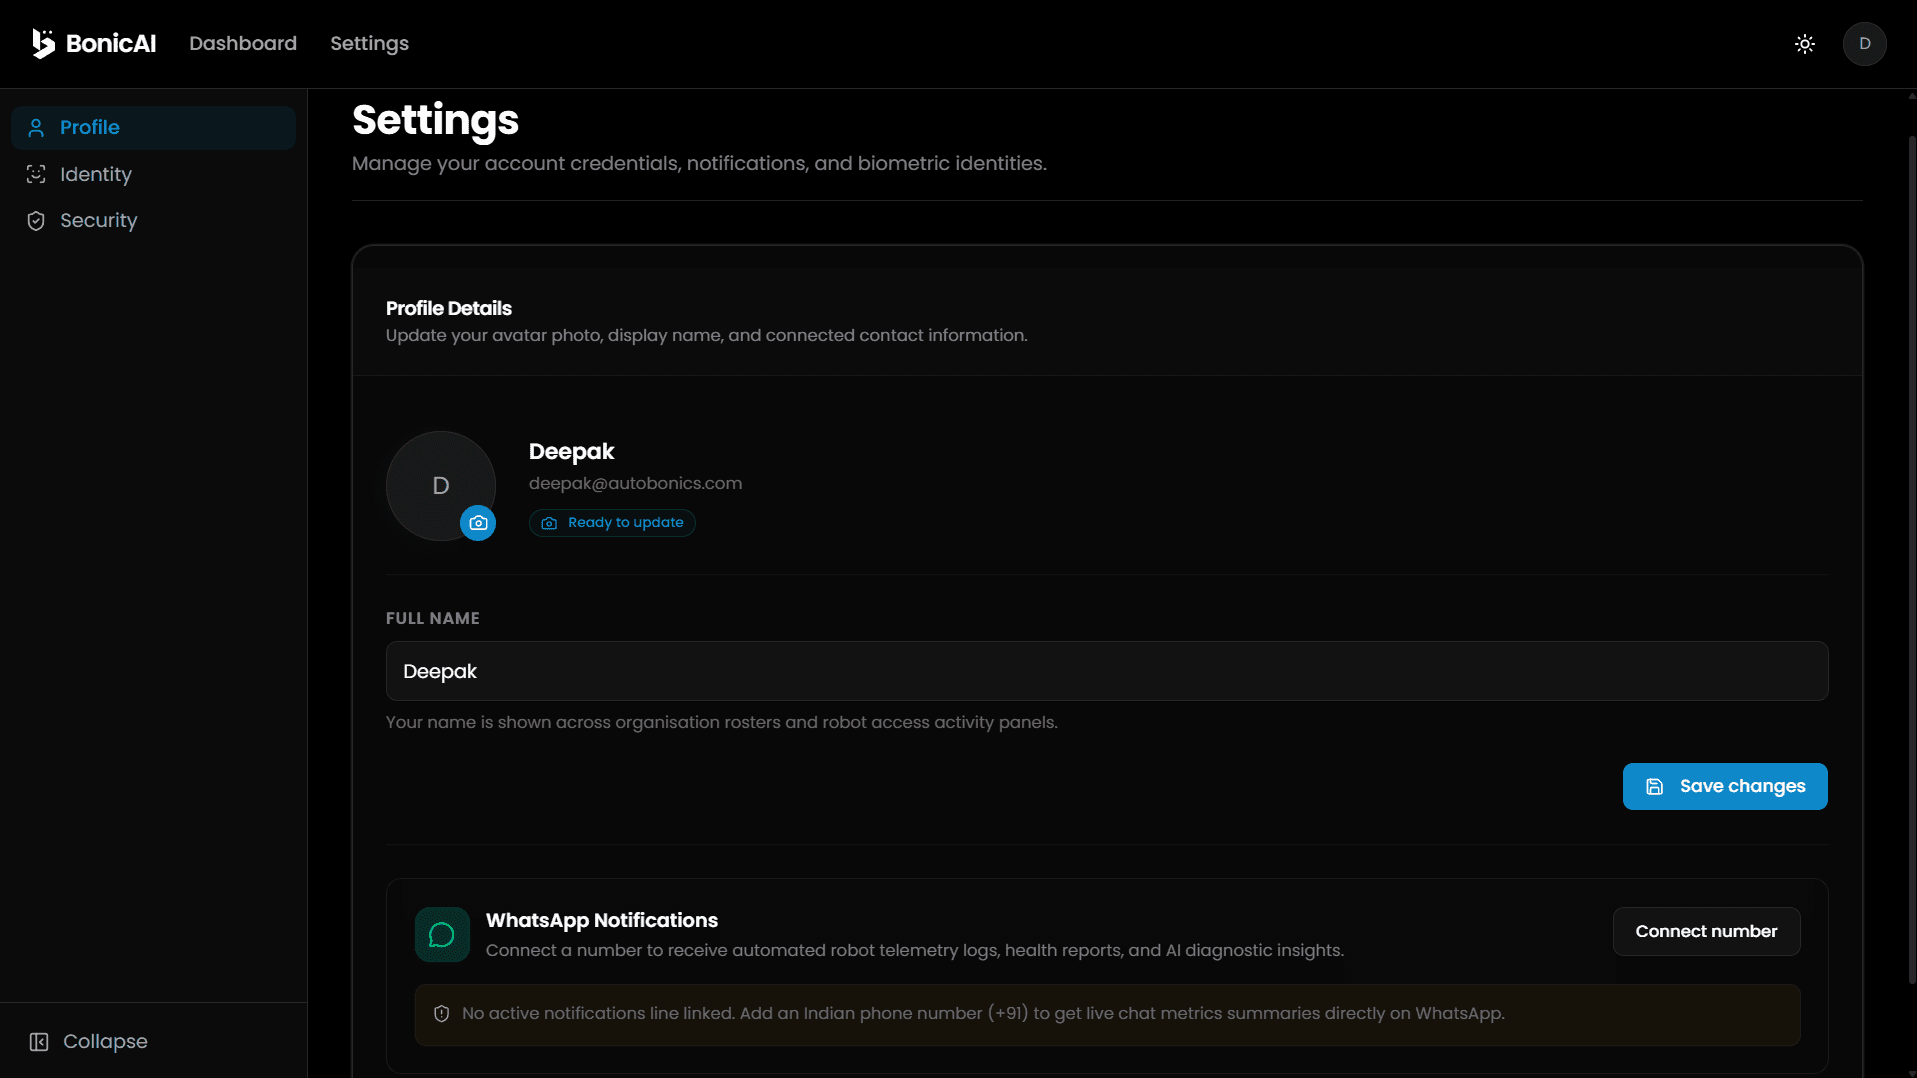
- Profile Details:
- Upload or change your personal avatar photo (
Ready to updatecamera button). - Edit your Full Name as displayed across organisation rosters, member access lists, and activity logs.
- View your primary account email address.
- Click Save changes to update profile details.
- Upload or change your personal avatar photo (
- WhatsApp Notifications:
- Link an Indian phone number (
+91) to receive automated robot telemetry alerts, health status reports, and AI diagnostic summaries directly on WhatsApp. - Click Connect number to pair your WhatsApp account.
- Link an Indian phone number (
2. Identity Tab
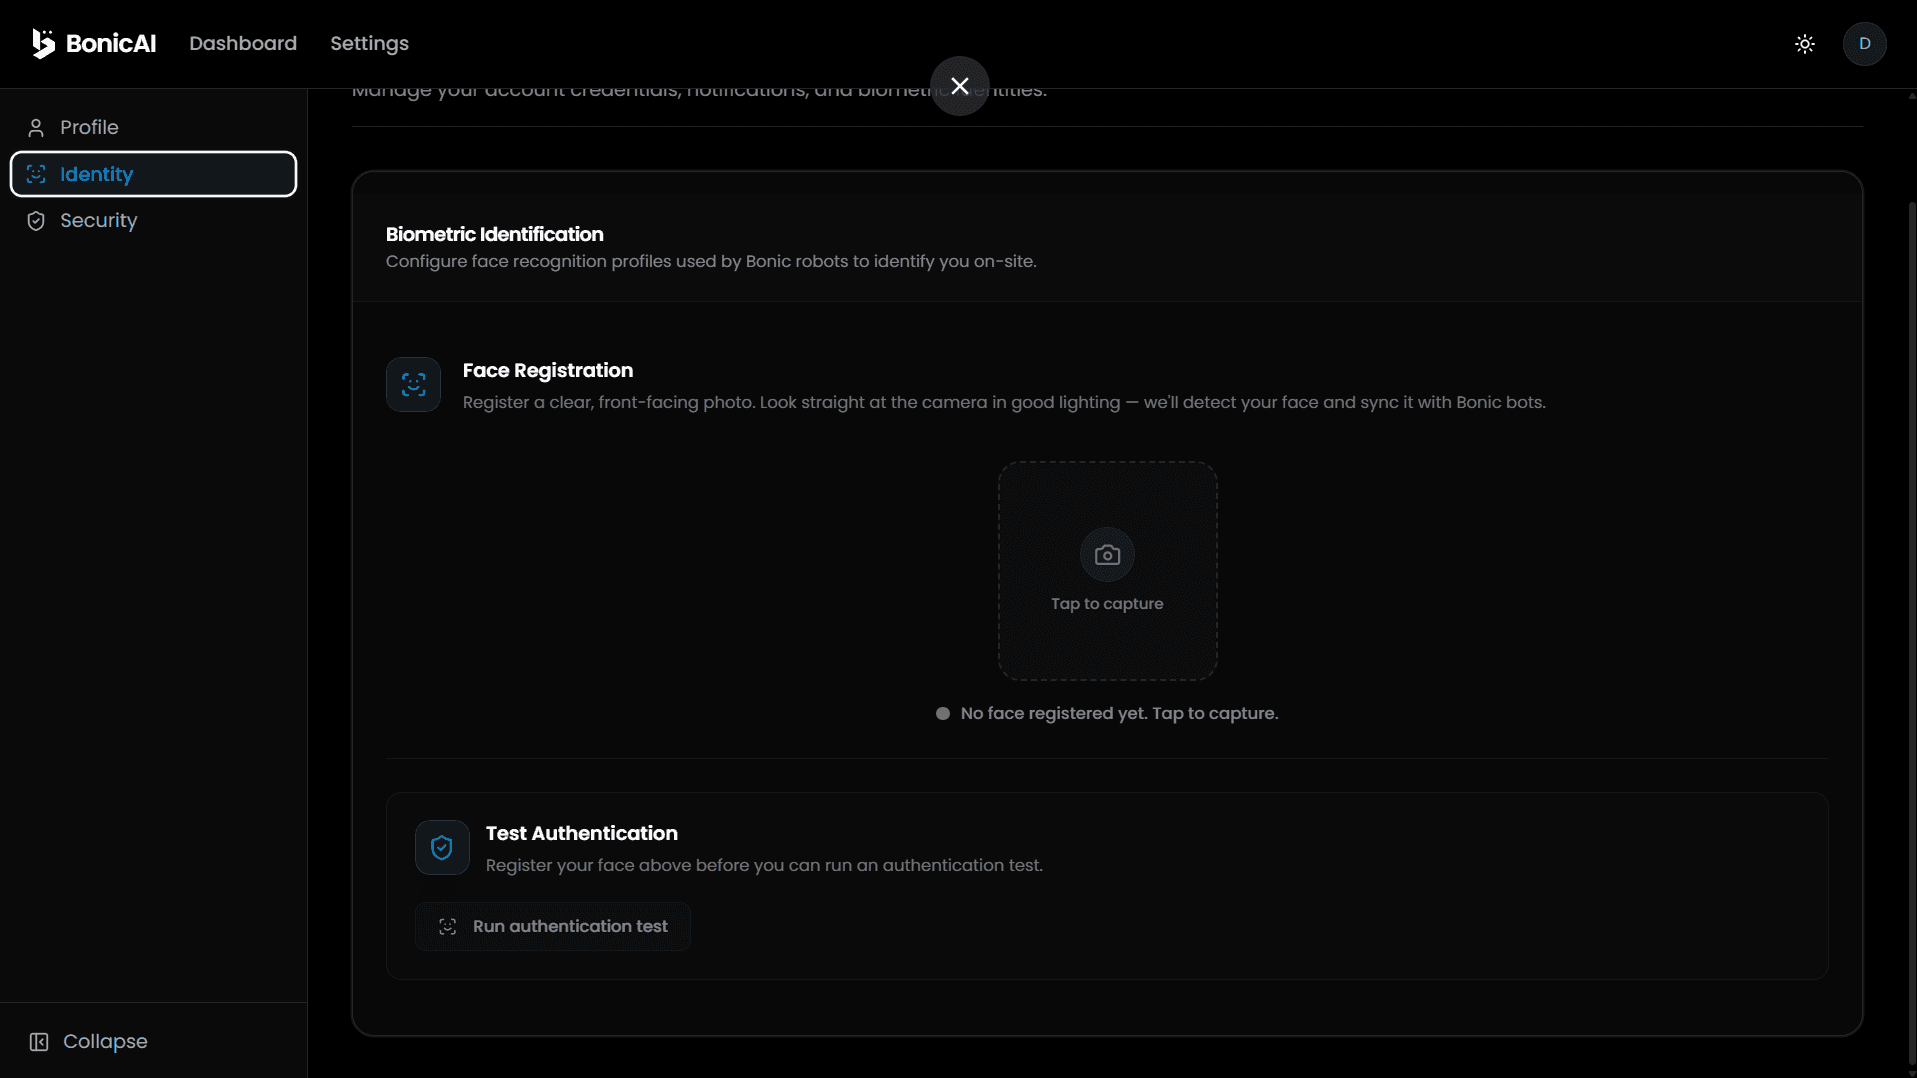
- Biometric Identification: Manage your face recognition profile used by BonicBot robots across your organization for on-site user identification.
- Face Registration: Tap Tap to capture to capture a clear, front-facing camera photo. BonicAI automatically detects your facial features and syncs your profile securely to accessible robots.
- Test Authentication: Once registered, click Run authentication test to test facial recognition matching before interacting with physical robots.
3. Security Tab
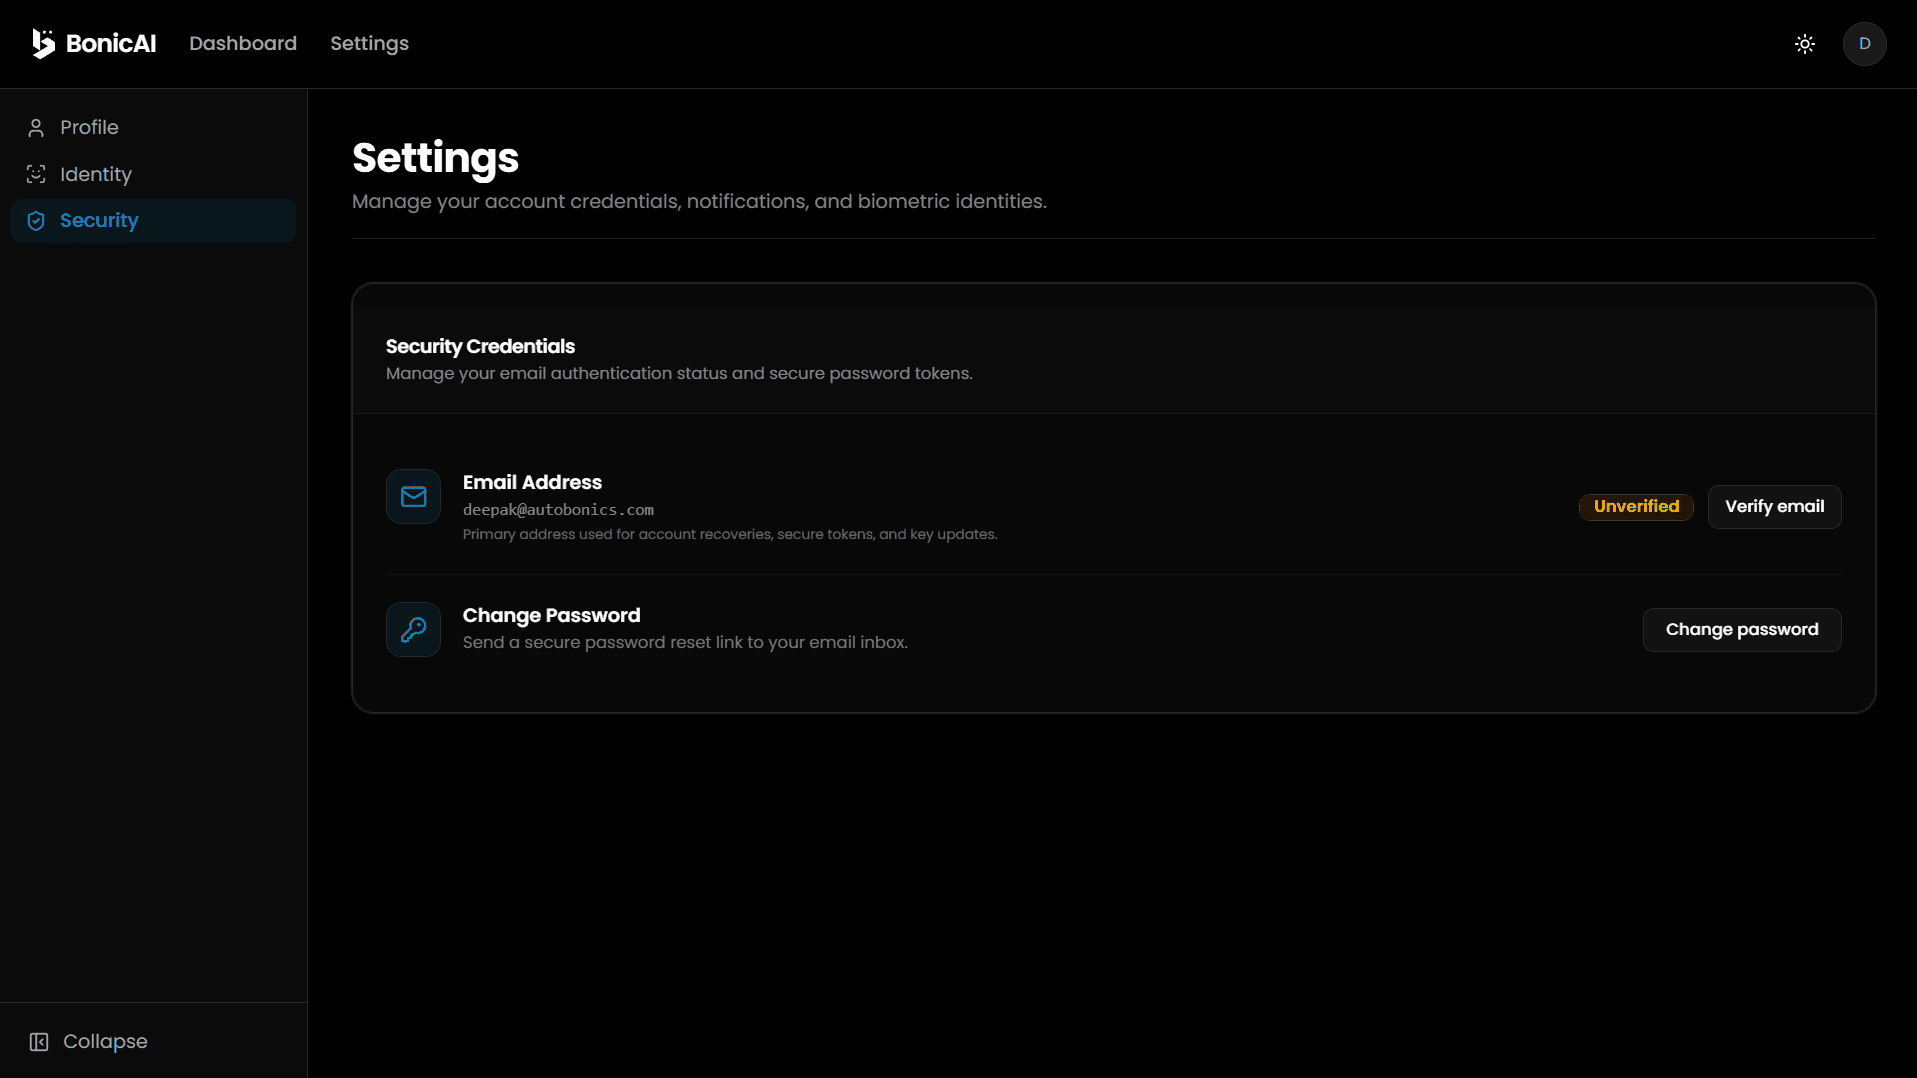
- Security Credentials: Manage your email authentication status and secure password reset tokens.
- Email Address Verification: Displays your account email address and current verification badge (
Unverified/Verified). Click Verify email to send a verification link to your inbox. - Change Password: Click Change password to send a secure password reset link to your email for updating your account password.
Navigating to Your Robots via Department
When you click on a department card from YOUR DEPARTMENTS & GROUPS (e.g. clicking R&D under Autobonics), you reach that department’s landing page showing all robots available to that department.
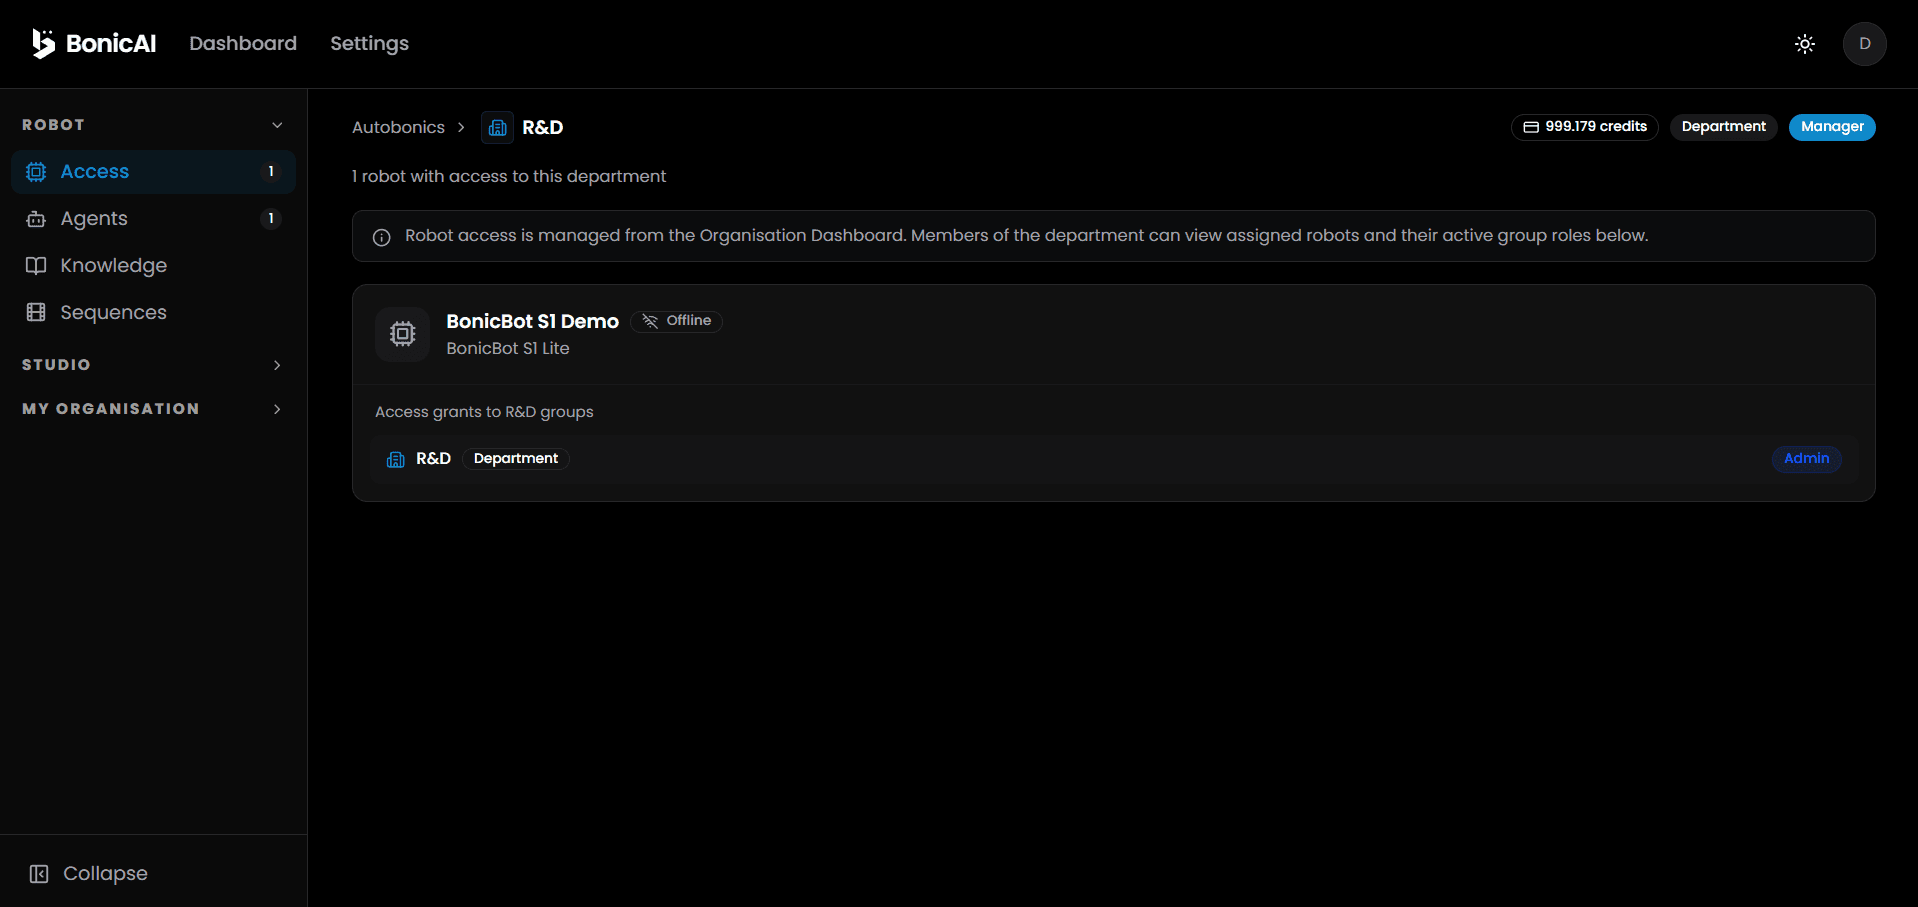
On this page:
- You’ll see the total number of robots with access (e.g. “1 robot with access to this department”).
- Each robot is displayed as an accessible card showing its name (e.g. BonicBot S1 Demo), model, online/offline status badge, and access group grants.
- Click any robot card in the list to select it and open that robot’s dedicated Overview page.
Robot Overview & Sidebar
Once you select a specific robot, you land on its Overview page. The sidebar on the left gives you access to every part of the platform for that robot:
| Section | What it’s for |
|---|---|
| Overview | Robot status, product info, active agent, and robot details |
| Control | Direct/manual joint teleoperation control of the robot |
| Sequence | Build, record, and manage motion keyframe sequences for the robot |
| Agents | View, create, and activate Robot Agents or assigned Department Agents |
| Members | Manage individual users with direct access to this robot |
| Access | View assigned organisations and department group access grants |
| Billing | Check robot credit balance and purchase additional usage credits |
| Developer | Developer API & SDK tools (Coming Soon) |
| Settings | Edit robot name, description, logo, and reset Web Bluetooth pairing |
You can collapse the sidebar using the Collapse button at the bottom left for more screen space.
Overview Tab
The Overview Tab is your robot’s home base. At the top, you’ll see the robot’s name (e.g. BonicBot S1 Demo), its category badge (e.g. S-SERIES), and its current connection state (Online / Offline) in the top-right corner.
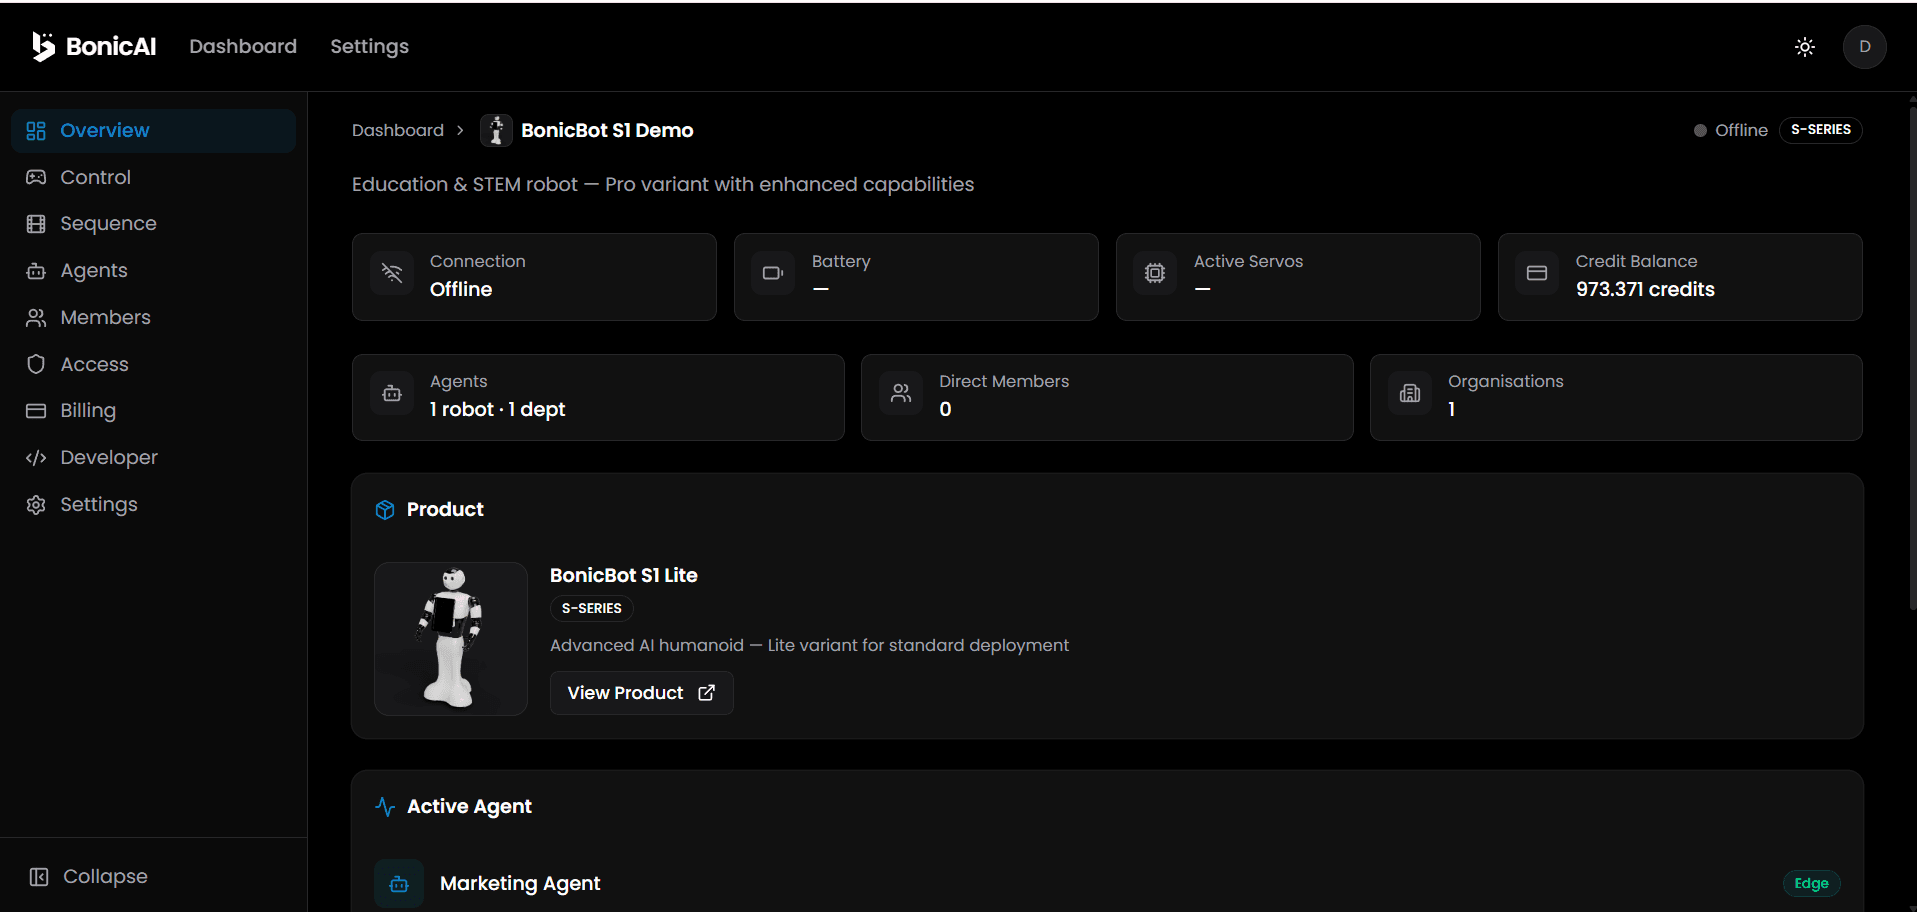
Status Cards
Four quick-glance cards summarize the robot’s live state:
- Connection — whether the robot is currently online or offline
- Battery — current battery level (shows
—when the robot is offline) - Active Servos — number of servos currently active (shows
—when offline) - Credit Balance — how many platform credits are available on the account
Agents / Members / Organisations Summary
Below the status cards, a second row shows:
- Agents — how many robots and departments are linked to this account (e.g. “1 robot · 1 dept”)
- Direct Members — number of people with direct access to this robot
- Organisations — number of organizations this robot belongs to
Product
This card shows which BonicBot product/model is deployed (e.g. BonicBot S1 Lite), its series badge, and a short description. Click View Product to open the full product page.
Active Agent
Shows the AI agent currently assigned to run on this robot. Click Change to select a different Department Agent or Robot Agent.
Robot Details
Summary metadata:
- Robot ID / Code
- MAC Address (Bluetooth address)
- Series & Model
- Serial Number
- Created Date
Control Tab — Joint Teleoperation
Clicking Control in the robot sidebar opens the joint teleoperation studio for direct, real-time manual control of the physical robot.
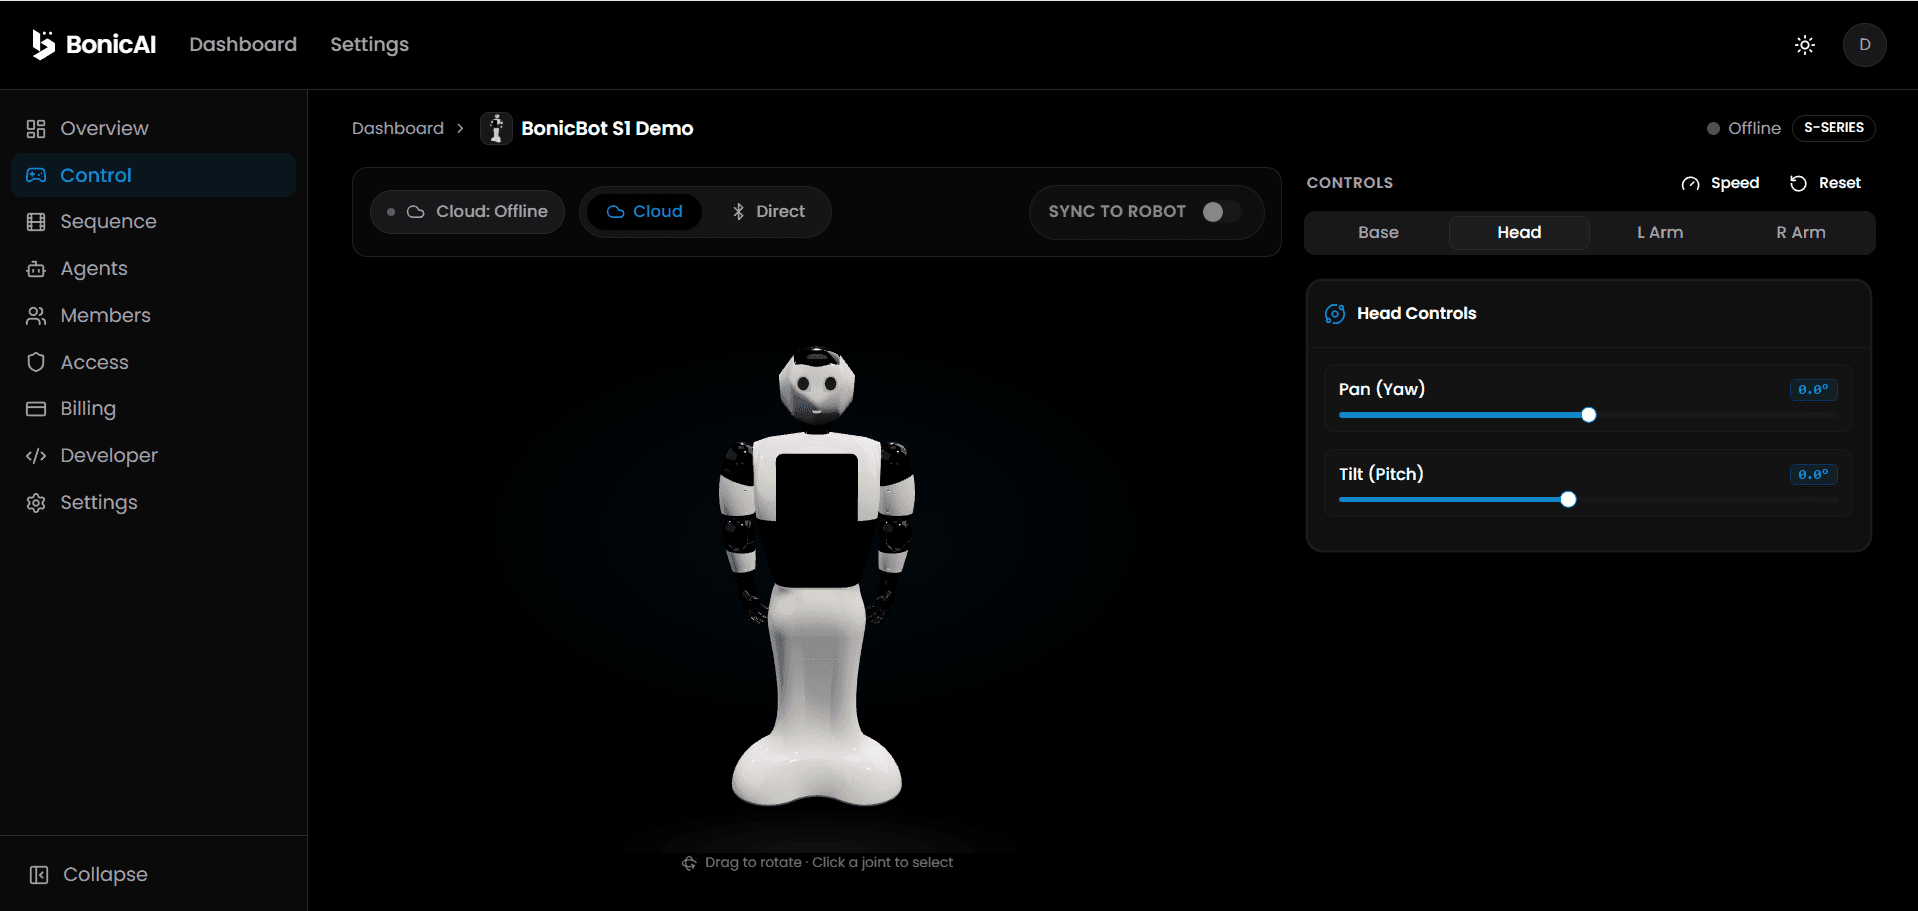
1. Connection & Sync Controls
At the top of the control view:
- Connection Mode Selector:
- Direct (Web Bluetooth) — connects your browser directly to the physical robot over BLE for zero-latency real-time control.
- Cloud — controls the robot via cloud database sync. Useful when managing a robot remotely over Wi-Fi.
- Click Connect (or Disconnect) to initiate the connection. A green dot and status label (Connected) indicates an active link.
- SYNC TO ROBOT Toggle:
- Switch SYNC TO ROBOT ON to stream joint slider adjustments live to the physical robot hardware in real time.
- When OFF, joint angle changes are previewed on the 3D model without commanding physical servo motors.
- Speed & Reset Controls:
- Speed: Adjust motor movement speed scale.
- Reset: Click Reset to return all joint servos back to neutral home position (
0.0°).
2. Live 3D Joint Pose Model
- Interactive 3D model of BonicBot rendering joint positions in real time.
- Click and drag to rotate the 3D camera angle to inspect joint poses from any direction, or click any joint directly to select it.
3. Servo Joint Sliders Panel
Control individual robot joint servos using category tabs (Base, Head, L Arm, R Arm):
- HEAD: Head Pan (Yaw) slider (
-90°to+90°), Head Tilt (Pitch) slider (-45°to+45°). - LEFT ARM: Shoulder Pitch, Shoulder Roll, Elbow Roll, Wrist Pitch, Gripper Open/Close.
- RIGHT ARM: Shoulder Pitch, Shoulder Roll, Elbow Roll, Wrist Pitch, Gripper Open/Close.
- BASE: Mobile base directional controls.
Move any slider to command that servo joint to rotate instantly on the physical BonicBot hardware.
Sequence Tab — Motion Sequence Authoring
Clicking Sequence in the robot sidebar opens the Sequence Motion Studio, where you record, edit, and save motion sequences (gestures, dances, greetings) for BonicBot.
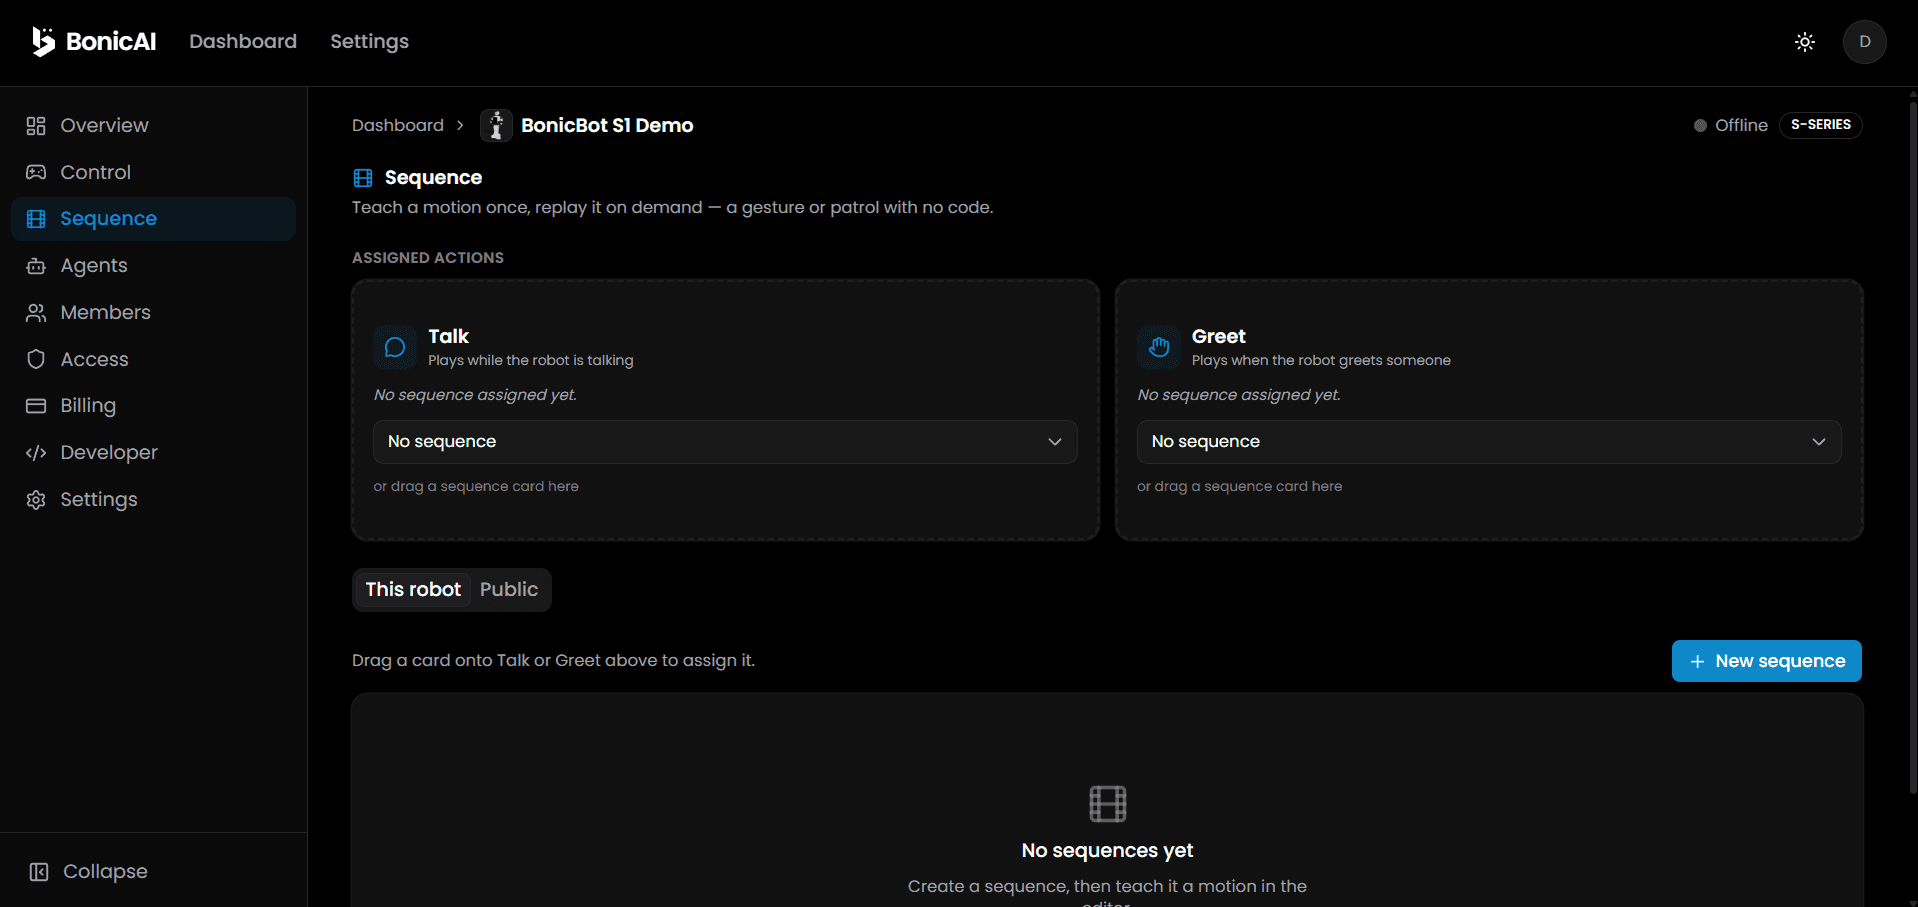
1. Sequence Library & Creating a New Sequence
-
Sequence Library Overview: Displays all saved keyframe motion sequences for this robot (e.g. handshake, wave, greet, bow). Each card displays sequence name, total duration (e.g.
5.0s), keyframe count (e.g.8 keyframes), and a ▶ Play button. -
Creating a New Motion Sequence:
- Click + New Sequence on the Sequence Tab.
- The New Sequence dialog appears (“Create a new keyframe sequence under this robot.”).
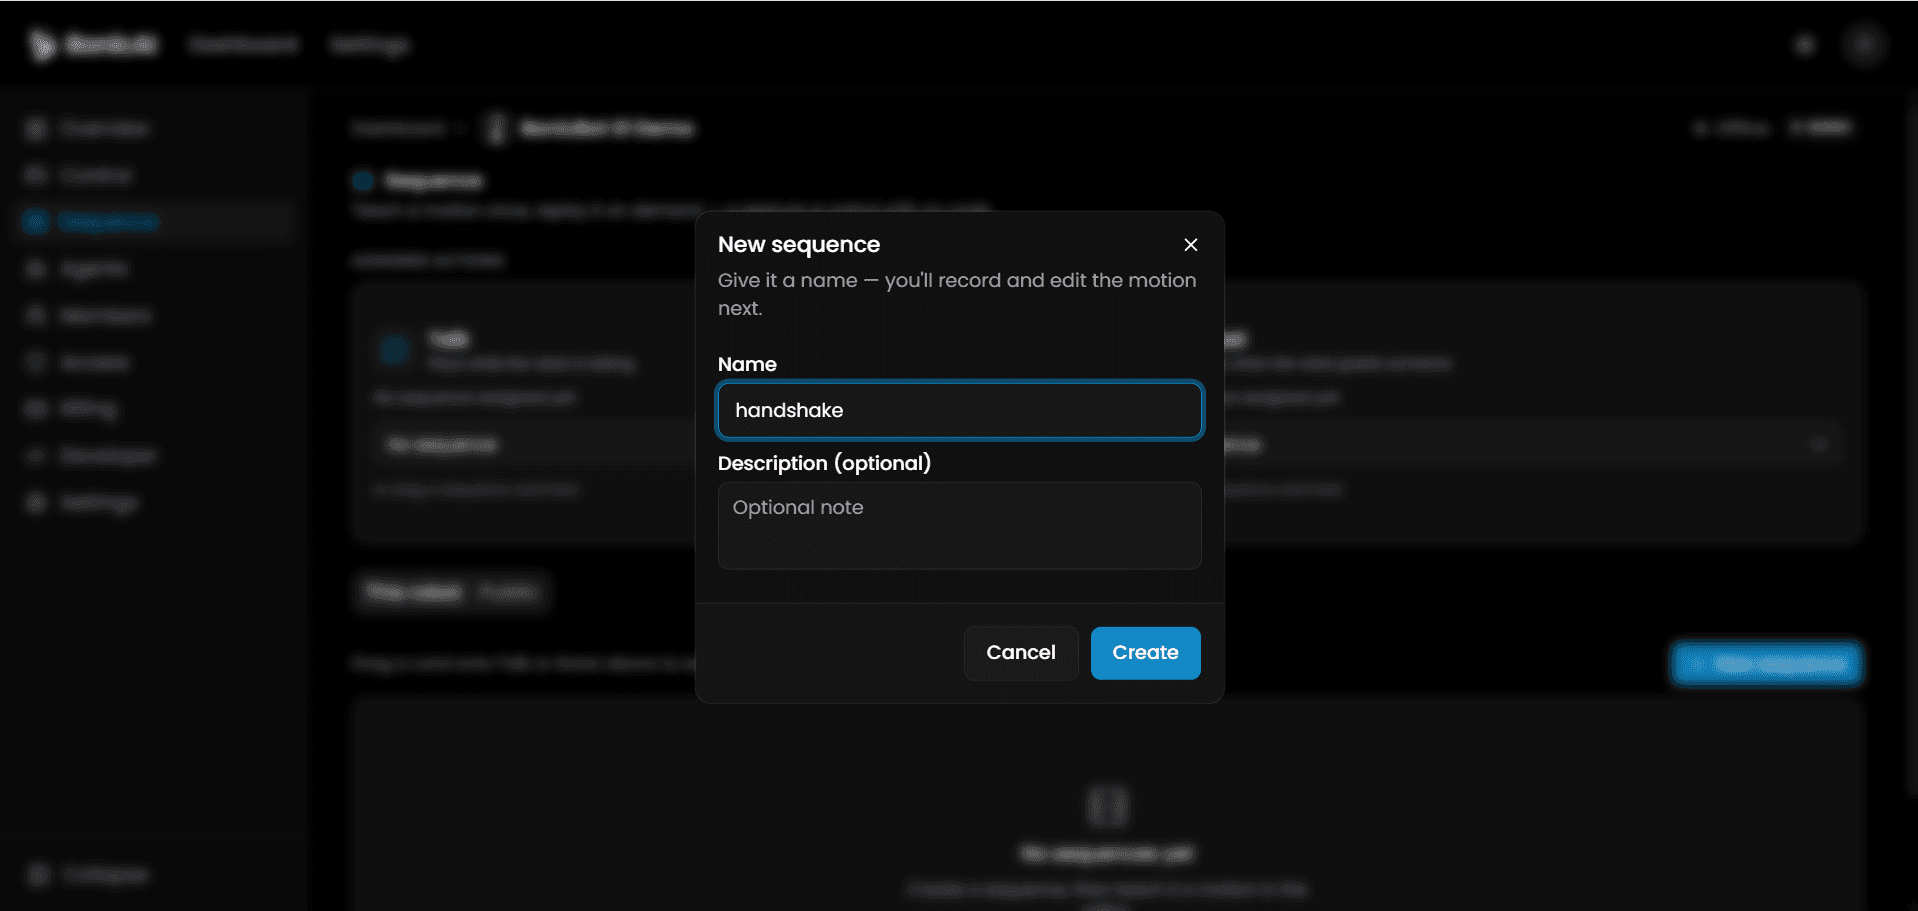
- Enter a Sequence Name (e.g. “Welcome Handshake”) and optional Description.
- Click Create Sequence to launch the Visual Timeline Motion Editor.
2. Top Control Bar Overview
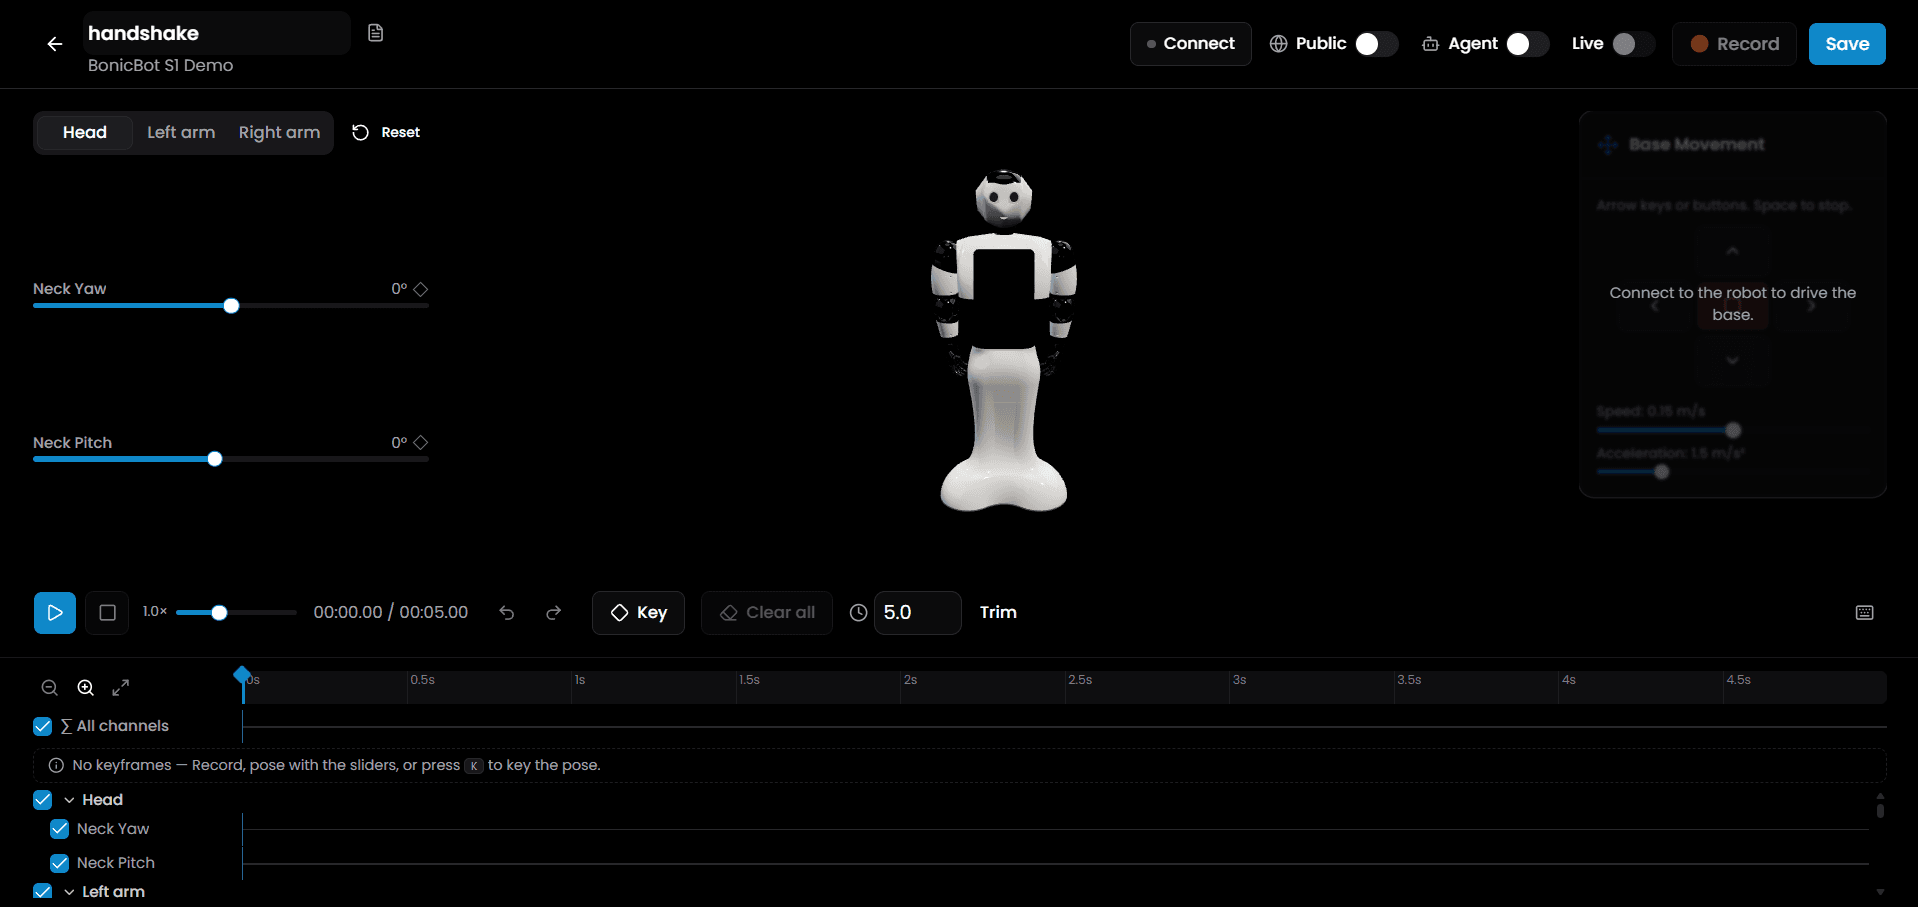
- Connect — connects to the physical robot via BLE for live recording.
- Public Toggle — make the sequence available across all robots in your organisation.
- Agent Toggle — allow AI agents to trigger this sequence during conversations.
- Live Toggle:
- Requires active BLE / Direct connection to the physical robot.
- When Live is enabled, users can manually pose and move the physical robot’s arms and joints by hand in real life (kinesthetic teaching).
- The robot’s live joint position sensors stream the exact physical poses back to the web studio in real time, automatically keyframing and recording the physical movement.
- 🔴 Record — start recording live manual poses or joint adjustments.
- Save — save the finished motion sequence to the cloud.
3. Interactive Posing Controls
- 3D Robot View (Center): Drag to inspect the pose from any angle.
- Joint Sliders (Left Panel): Select tabs (Head, Left arm, Right arm) to adjust individual joint axes:
- Head:
Neck Yaw(left/right rotation),Neck Pitch(up/down tilt). - Left / Right Arms: Shoulder, elbow, and wrist angles.
- Reset: Return joint group to zero pose.
- Head:
- Base Movement (Right Panel): Drive the robot’s mobile base using keyboard arrow keys or on-screen directional buttons. Adjust Speed (m/s) and Acceleration (m/s²).
4. How Keyframe Sequence Recording Works (Step-by-Step Guide)
A keyframe is a saved snapshot of all joint angles at a specific moment on the timeline. The software automatically calculates and creates smooth motion transitions between keyframes.
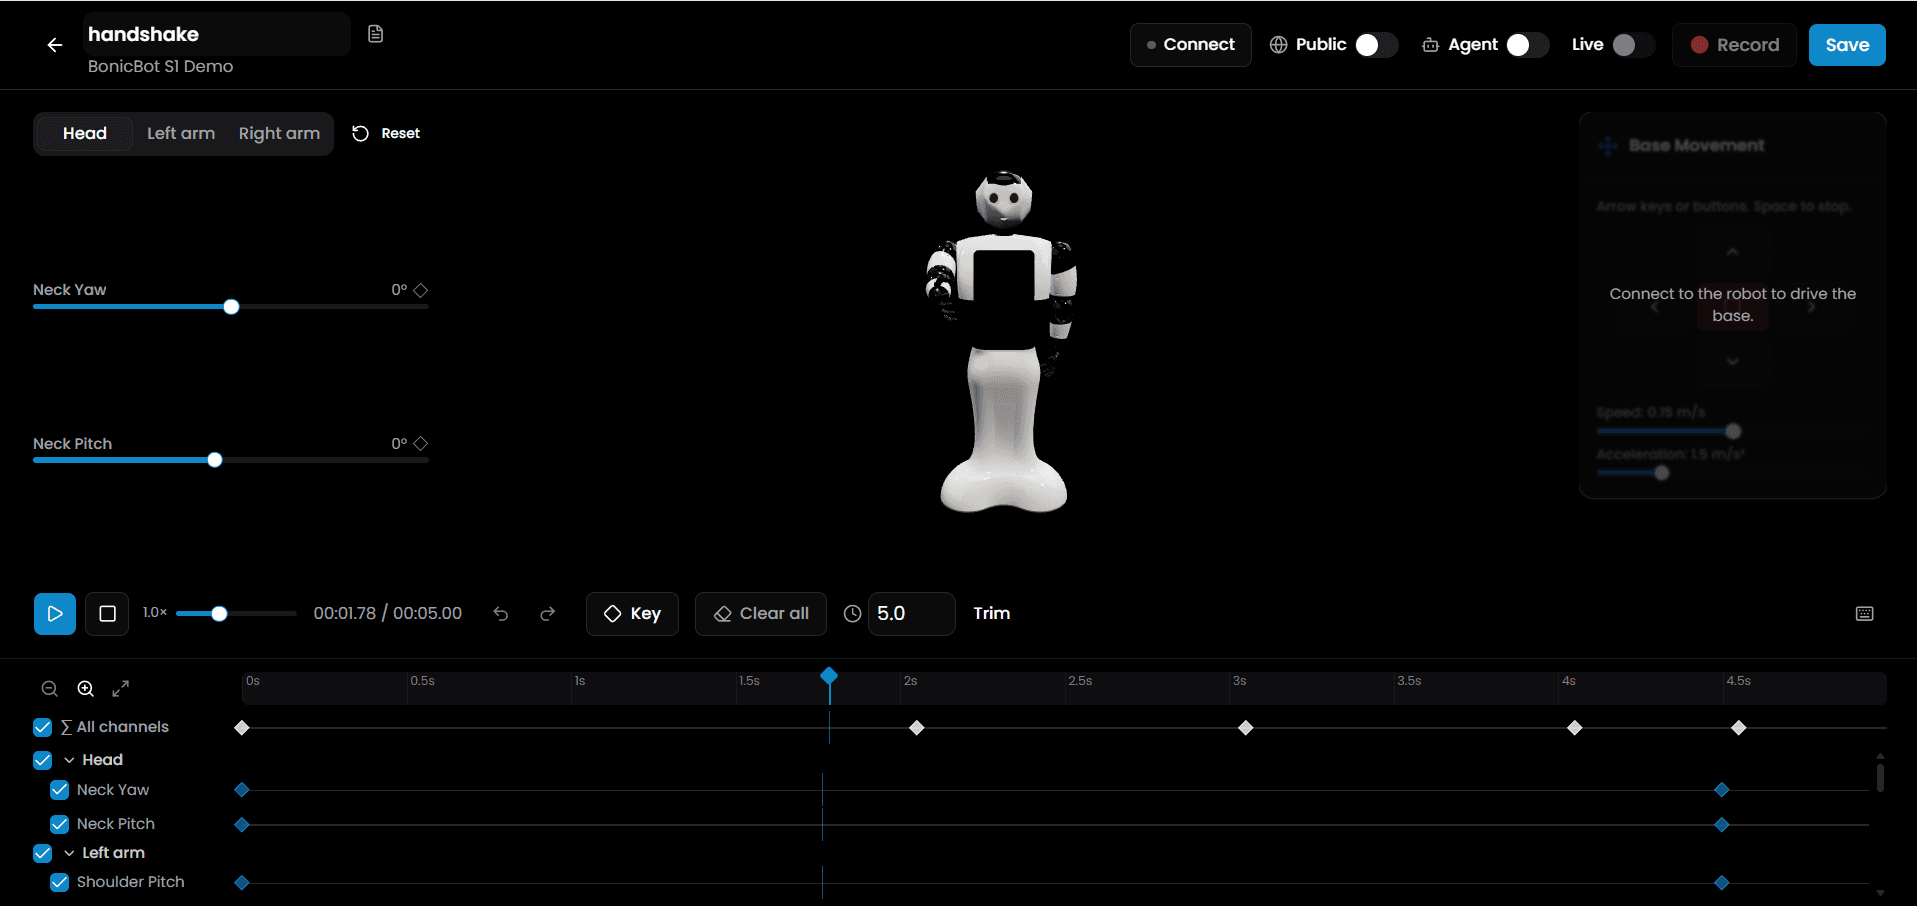
Here is the exact step-by-step workflow:
- Set the Playhead Timestamp:
- Drag the blue playhead line on the timeline to the desired time marker (e.g.
0.0sfor start pose,1.5sfor mid-pose,3.0sfor end pose).
- Drag the blue playhead line on the timeline to the desired time marker (e.g.
- Pose the Robot:
- Method A (Web Sliders / 3D Viewer): Select a joint tab (Head, Left arm, Right arm) and adjust the sliders to position the robot’s limbs.
- Method B (Physical Kinesthetic Posing): Connect via BLE, toggle Live ON, and physically move the BonicBot’s arms/head with your hands in real life.
- Capture / Drop the Keyframe:
- Click the ◇ Key button on the toolbar, or press the
Kkey on your keyboard. - Keyframe markers (
◇) will lock onto the timeline tracks (Head,Left arm,Right arm,Base).
- Click the ◇ Key button on the toolbar, or press the
- Advance the Timeline & Add Next Pose:
- Move the playhead forward (e.g. to
2.0s), pose the limbs for the next motion phase (e.g. arm raised for wave), and pressKagain.
- Move the playhead forward (e.g. to
- Preview & Adjust Playback:
- Click Play (▶) to preview the motion loop. Adjust playback speed (
1.0x), total duration (e.g.5.0s), or trim frames.
- Click Play (▶) to preview the motion loop. Adjust playback speed (
- Save Sequence:
- Click Save in the top right to store the sequence in the cloud.
5. Keyframe Timeline & Playback
- Timeline Controls: Play, Stop, playback speed multiplier (e.g.
1.0x), timecode counter (e.g.00:00.00 / 00:05.00), Undo, and Redo. - ◇ Key Button: Click ◇ Key (or press shortcut
Kon your keyboard) to capture the current joint pose into a timeline keyframe. - Clear All: Erase all keyframes on the timeline.
- Duration & Trim: Set total sequence length (e.g.
5.0s) and trim unwanted start/end frames. - Channel Tracks: Separate timeline tracks for
Head(Neck Yaw,Neck Pitch),Left arm,Right arm, andBaseallow precise multi-joint keyframing.
6. Assigning Sequences to Actions
Once saved, return to the main Sequences Tab to assign your sequence:
- Drag your sequence card onto Talk (plays while the robot is speaking) or Greet (plays when the robot greets a visitor).
Agents Tab — Robot AI Personalities
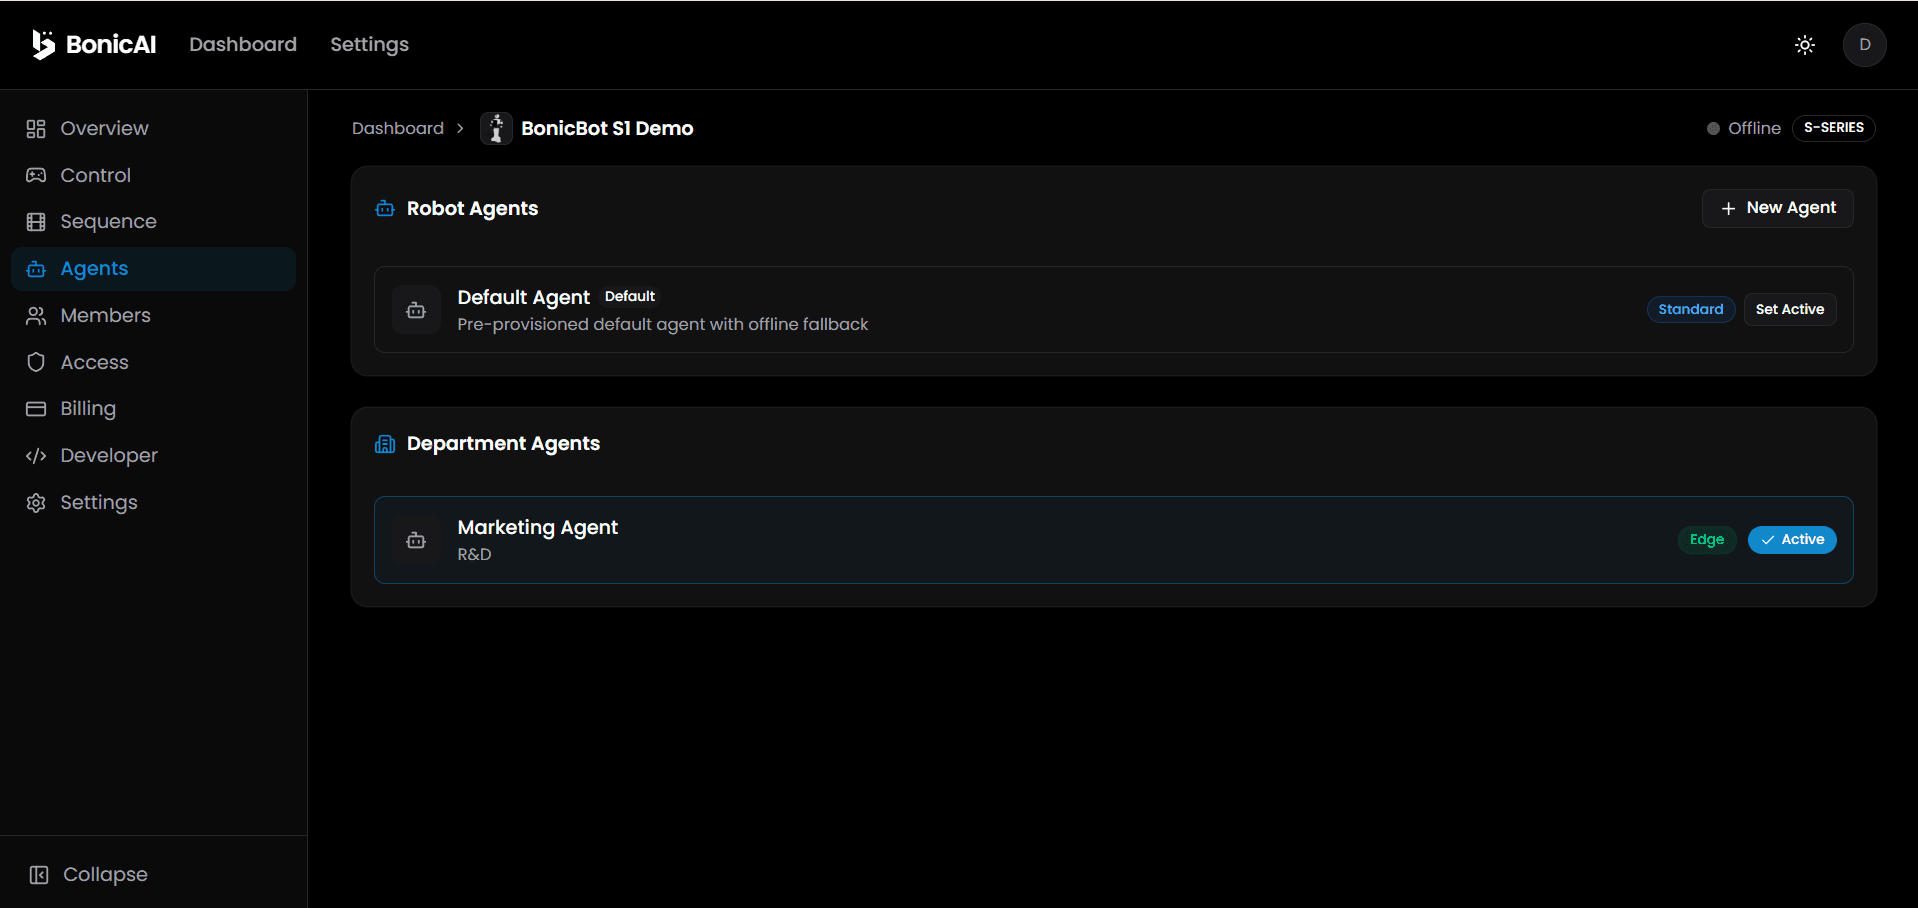
Clicking Agents in the robot sidebar displays the AI agents currently active or available for setup on this robot.
1. Active Agent Card
- Displays the AI agent currently running live on this robot (e.g. Marketing Agent).
- Displays status badge (Active), runtime tier (Premium / Standard / Edge), primary language, and attached knowledge groups.
2. Robot-Level Agents vs. Department Agents
- Robot Agents: Simple AI agent profiles created directly on this robot card. Quick to set up, but have no Knowledge Base access and no authentication security options.
- Department Agents: Full-featured agents configured at the department level with attached Knowledge Bases (RAG), custom system prompts, and security auth options (Face Recognition, RFID, Email/Password).
- Click Change Agent to select a different Department Agent or Robot Agent to run on this robot.
3. Creating a Quick Robot Agent
Click + Create Robot Agent to open the creation dialog:
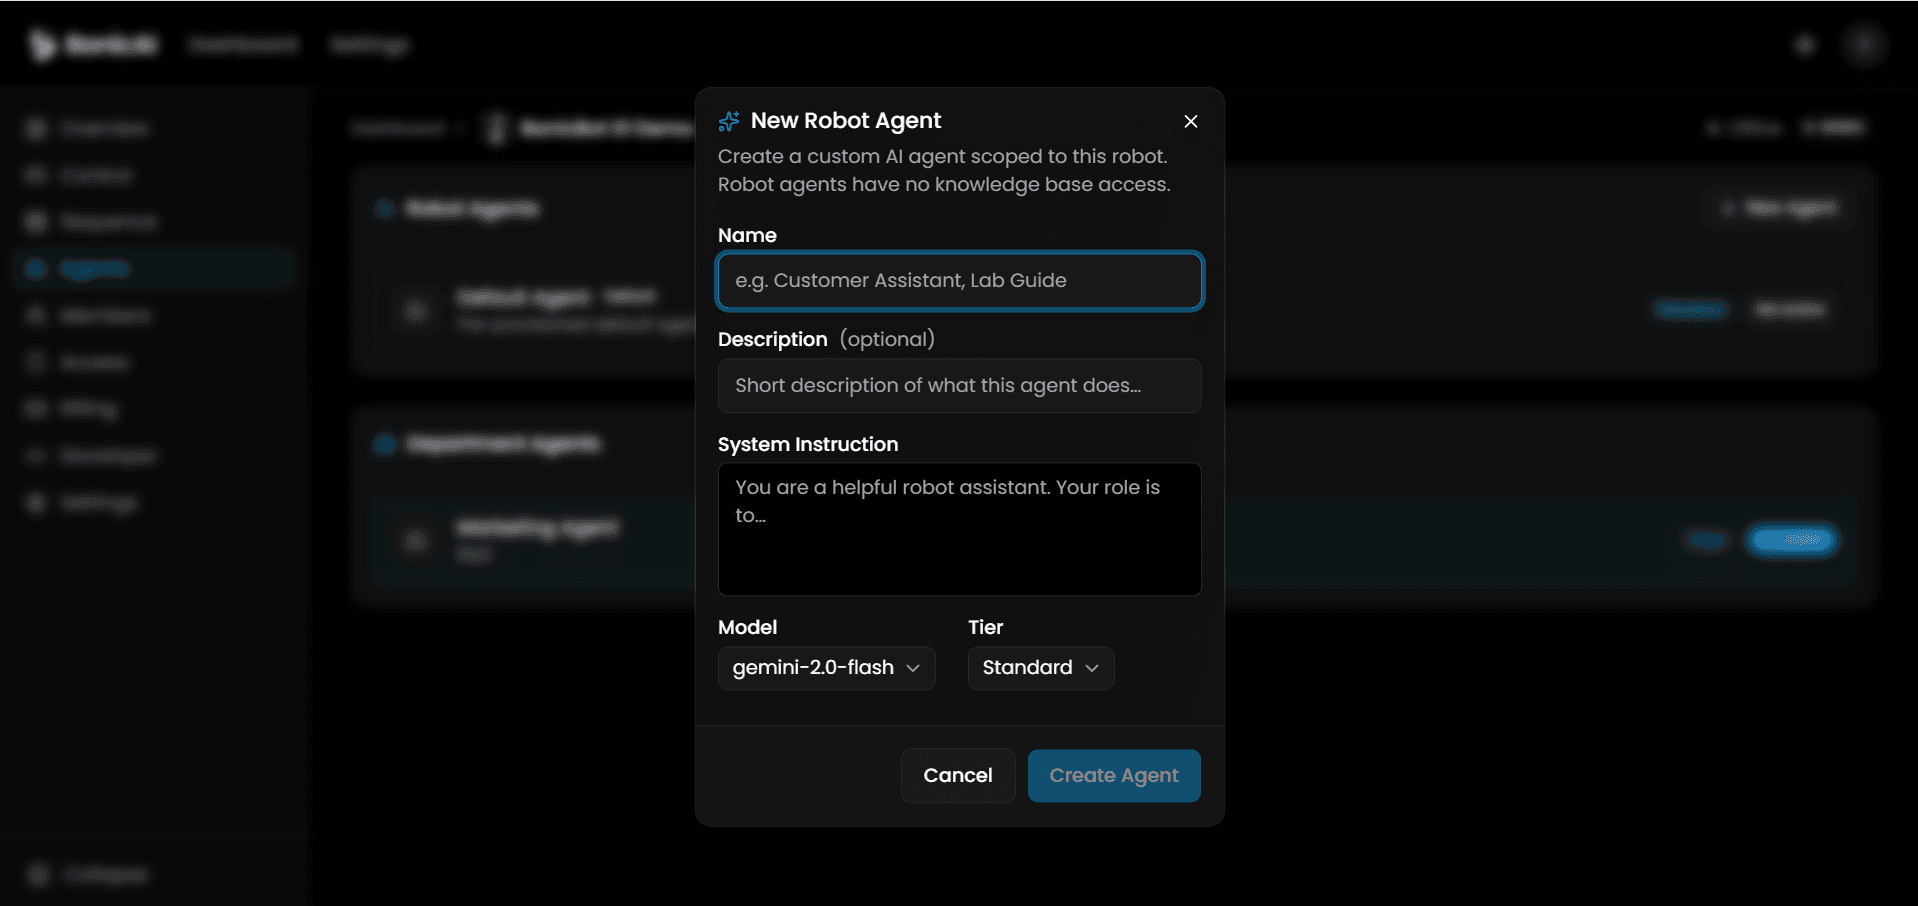
- Name (e.g. “Front Desk Receptionist”).
- System Instruction prompt.
- Tier selection (
Edge,Standard,Premium). - Click Create to save.
ℹ️ For full Knowledge Base (RAG) and Security controls, create a Department Agent instead (see Department Agent User Guide).
Members Tab — Direct User Access
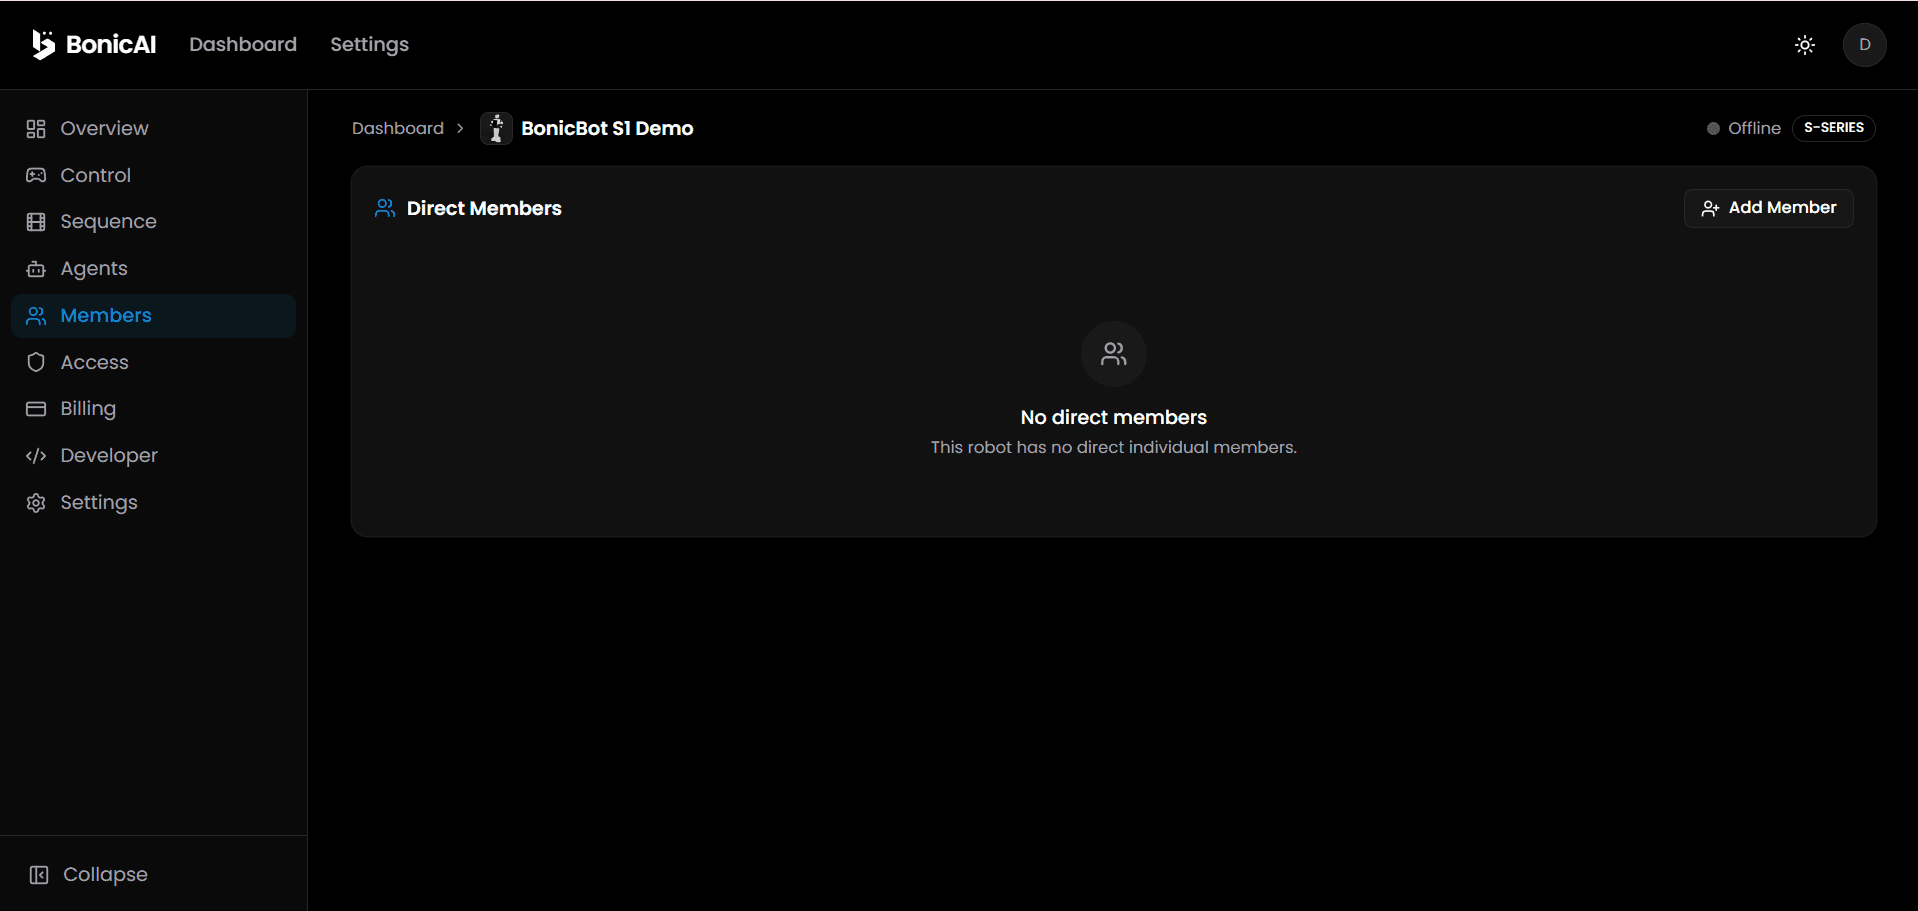
Clicking Members in the robot sidebar displays all individual users who hold direct access permissions for this robot.
1. Members List
- Shows member name, email address, role badge (e.g. Admin / Operator / Viewer), and access grant date.
- Click Remove next to a member to revoke their access.
2. Adding a Direct Member
- Click + Add Member in the top right.
- The Add Member to Robot dialog appears:
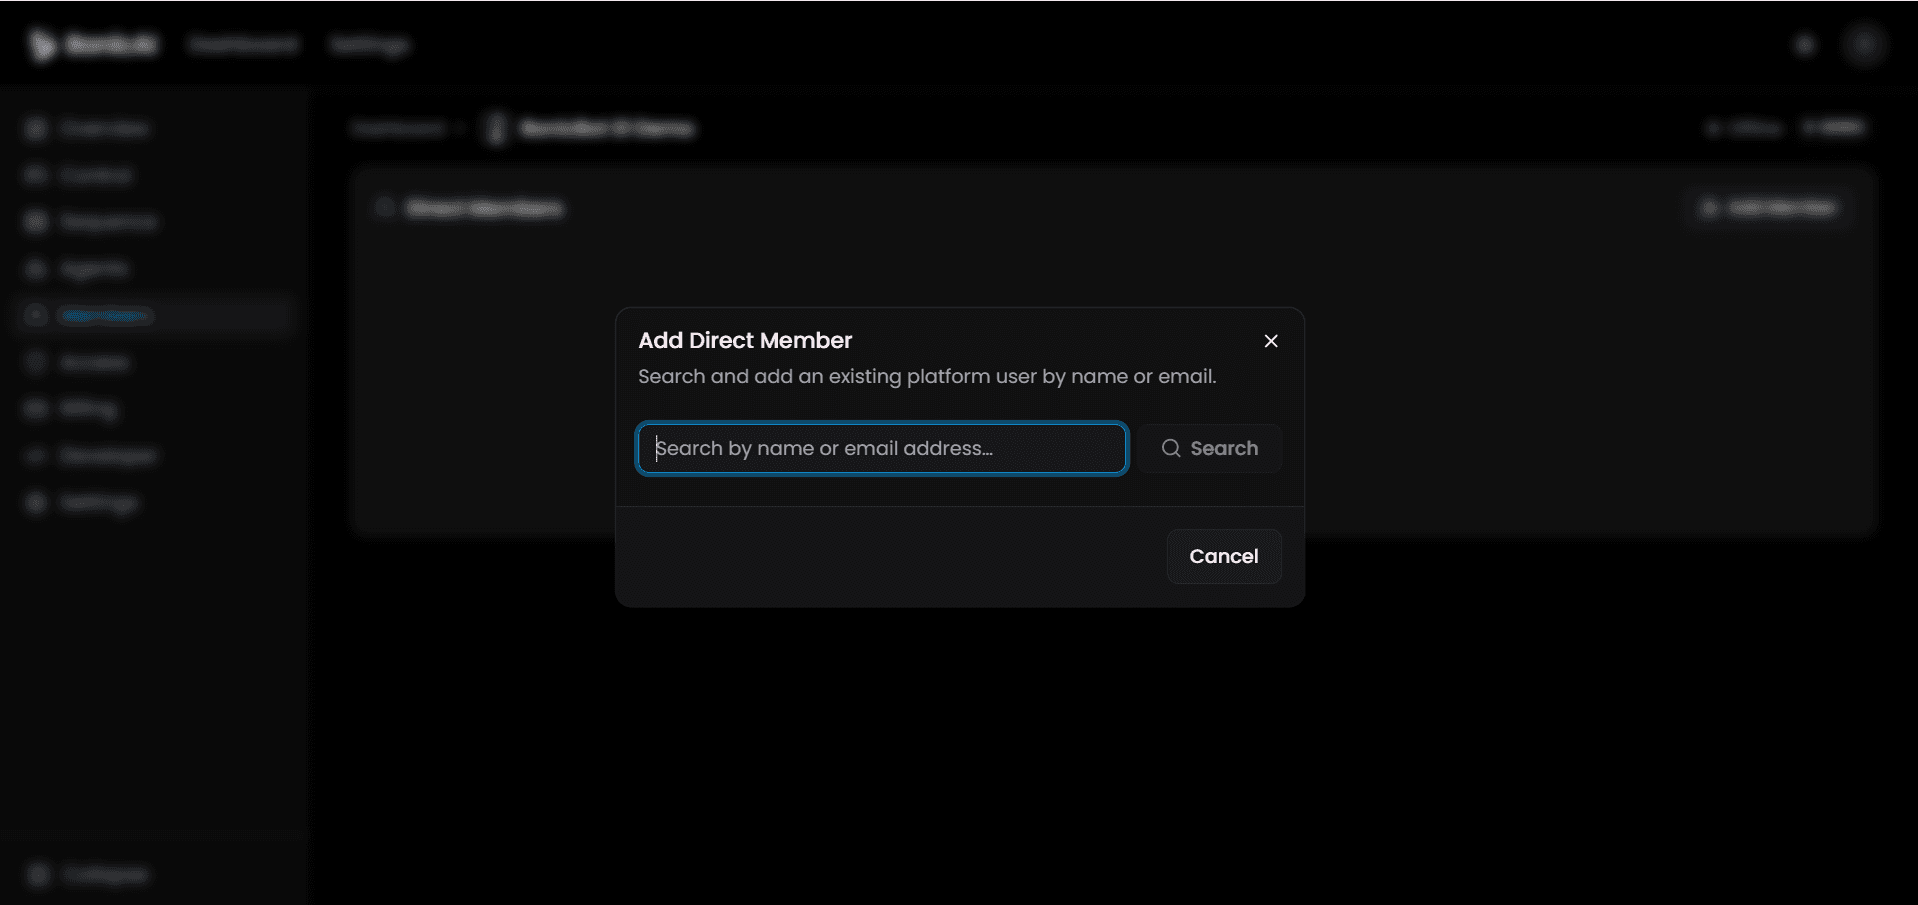
- Type a user’s name or email address into the search box.
- Click Search and select the user from the results to grant them direct access to this robot.
Access Tab
Clicking Access in the robot sidebar displays all organisations and department access groups that hold permissions for this robot.
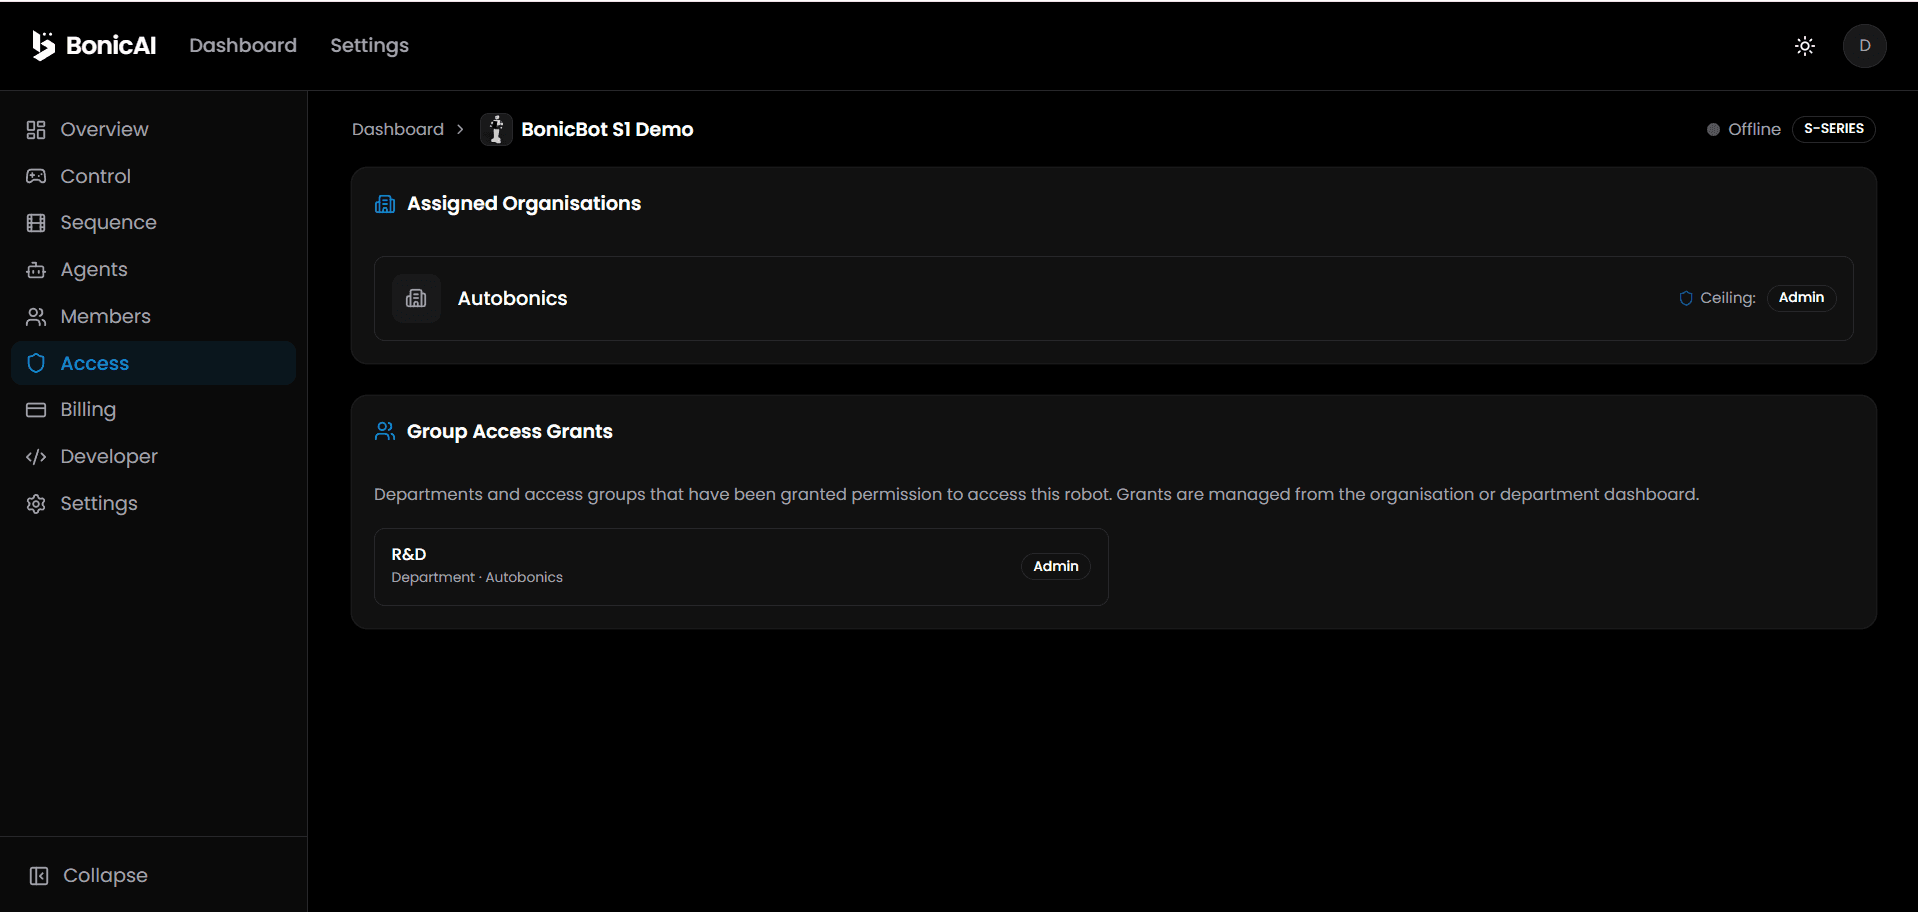
1. Assigned Organisations
- Displays which organisation owns or manages this robot (e.g. Autobonics).
- Shows the role ceiling granted at the organisation level (e.g. Ceiling: Admin).
2. Group Access Grants
- Displays all department groups that have been granted permission to access this robot (e.g. R&D department under Autobonics with Admin access).
- Note: Access grants themselves are managed from the main Organisation or Department Dashboard.
Billing Tab
Clicking Billing in the robot sidebar opens the credit balance and usage management page for this robot.
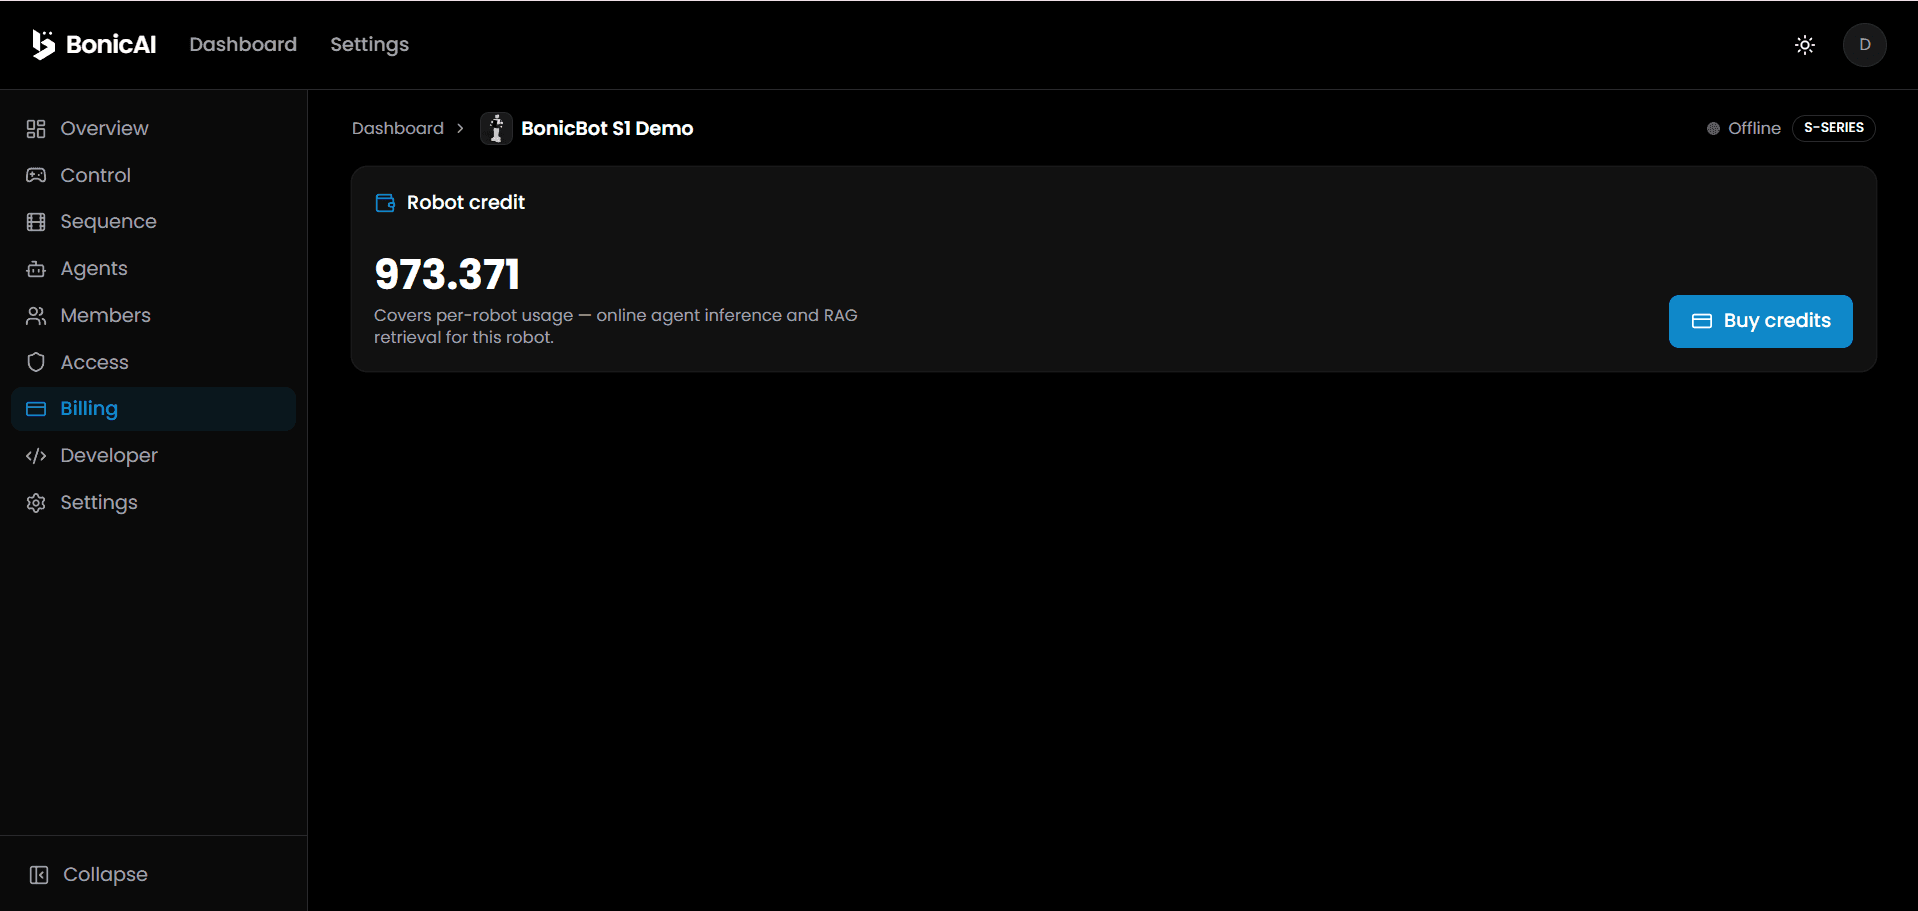
Robot Credit Balance
- Displays the current credit balance available for this specific robot (e.g.
973.371credits). - Usage: Robot credits cover per-robot online usage, including cloud AI agent inference turns and RAG document retrieval queries.
Buying Credits
- Click Buy credits on the billing page.
- The Add credit purchase dialog opens: “Buy credits at a fixed rate of ₹10 per credit plus processing fees.”
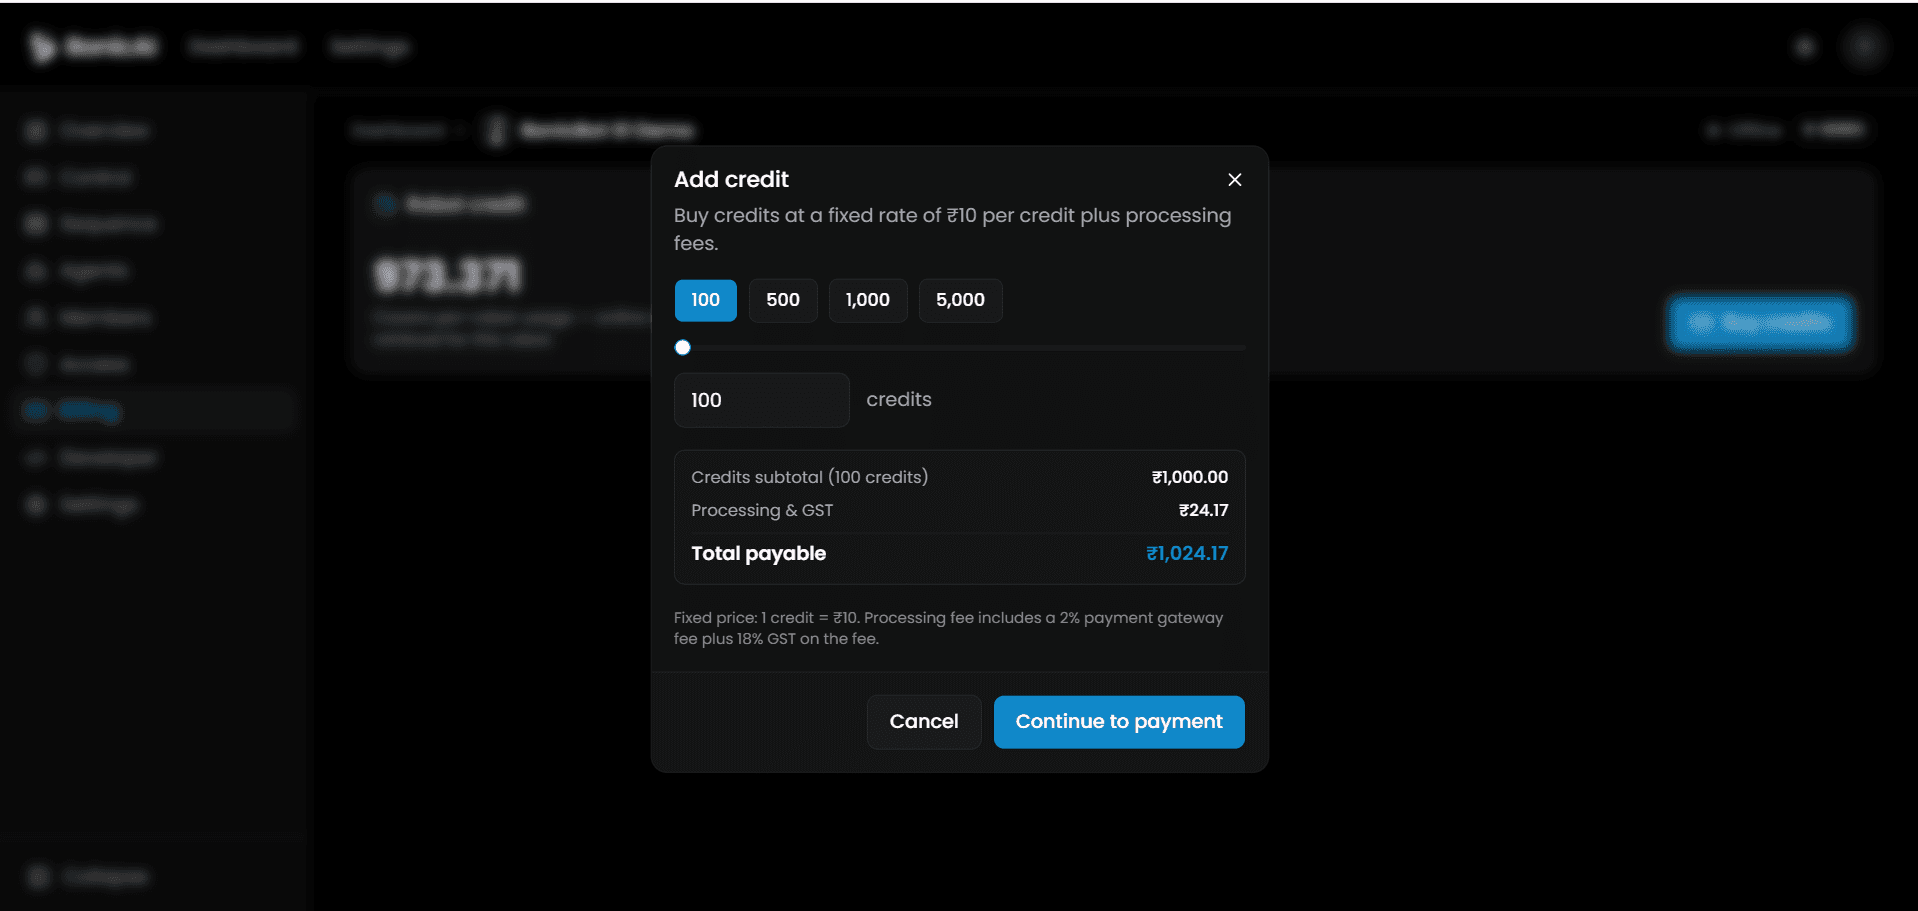
- Select a preset credit package (100, 500, 1,000, 5,000 credits) or use the slider/input box.
- Review the pricing breakdown:
- Credits Subtotal: Base rate (₹10 per credit).
- Processing & GST: Payment gateway fees (2%) + 18% GST on the fee.
- Total Payable: Final amount to pay.
- Click Continue to payment to complete the transaction via payment gateway.
Developer Tab (Coming Soon)
🚧 Feature Coming Soon
The Developer portal section is under active development and will be available in an upcoming BonicAI release.
When launched, the Developer Tab will provide:
- API Keys: Manage REST API authentication tokens for external integrations.
- WebSocket Telemetry Streams: Subscribe to real-time robot telemetry, battery, and joint status feeds.
- Custom Webhooks: Configure event listeners for robot status changes, completed marketing sessions, and lead captures.
- SDK Integration: Download developer SDKs to build custom applications for BonicOS.
Robot Settings Tab
Clicking Settings in the left sidebar under a selected robot opens the robot-specific hardware configuration and Bluetooth pairing settings.
💡 Note: To manage your personal user profile, face recognition, or account password, use the top-level Settings link in the main navigation bar (see Personal Account Settings).
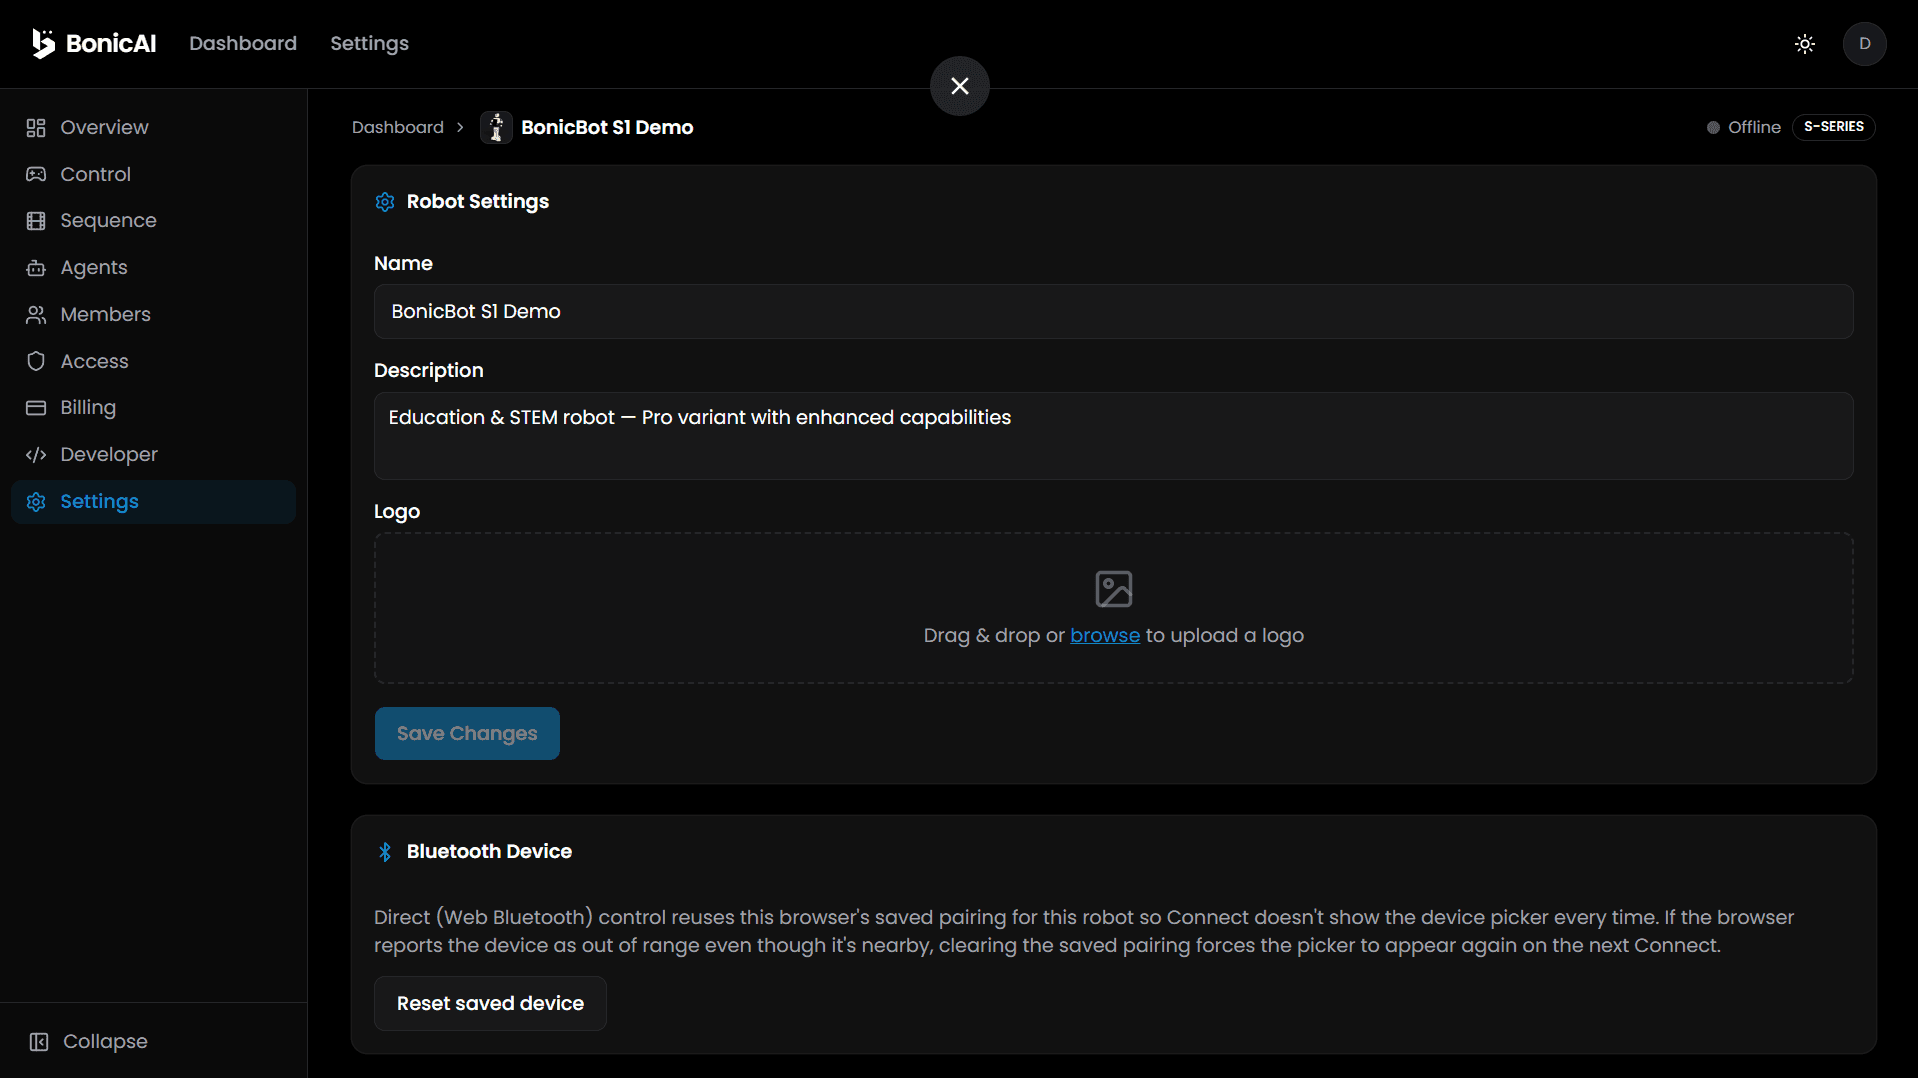
1. Robot Settings
- Name: Edit the display name of your robot (e.g. BonicBot S1 Demo).
- Description: Add or edit a description for the robot (e.g. “Education & STEM robot — Pro variant with enhanced capabilities”).
- Logo: Drag and drop an image file (or click browse) to upload a custom avatar logo for the robot.
- Click Save Changes to apply your updates.
2. Bluetooth Device Settings
- Web Bluetooth Pairing: Direct (Web Bluetooth) control reuses your browser’s saved pairing for this robot so that clicking Connect does not show the device picker dialog every single time.
- Reset Saved Device: If your browser reports the robot as out of range even though it is powered on and nearby, click Reset saved device. This clears the cached browser pairing and forces the Web Bluetooth device picker to pop up on your next connection attempt.
Tips for Users
- BLE Direct Mode: Always use the Direct connection button to connect your laptop/PC via Bluetooth (BLE) to the physical robot when performing live teleoperation or keyframe sequence recording.
- Kinesthetic Teaching (Live Posing by Hand): Enable the Live toggle with an active BLE connection to physically move the BonicBot’s arms and head with your hands. The Sequence Motion Studio senses your adjustments and records those physical movements into keyframes automatically.
- Keyboard Shortcut (
K): While posing in the Sequence Motion Studio, pressKon your keyboard to drop keyframes instantly onto the timeline at the playhead timestamp. - Reset Bluetooth Pairing: If Web Bluetooth fails to discover your nearby robot, open the Settings page and click Reset saved device to refresh browser Bluetooth pairing.
- Monitor Robot Credits: Check the Billing page regularly to ensure your robot has sufficient credits for cloud AI inference and RAG document queries.